Removing the background from images featuring intricate details like hair presents a persistent challenge for both amateur and seasoned Photoshop users. The delicate nature of fine strands and flyaway hairs makes precise selection a complex task, a long-standing problem in the realm of background removal. However, with the strategic application of Photoshop's powerful tools and refined techniques, it is entirely possible to effectively isolate a subject and render the background transparent, ensuring that even the most wispy hairs have no background behind them. This capability opens up a multitude of possibilities for various creative projects, from professional product photography to artistic composites.
This tutorial is designed to guide you through the process of removing hair backgrounds in Photoshop, employing a series of straightforward steps. We will explore Photoshop's most current methods, as of the latest updates, to achieve a transparent background around hair. Our approach will encompass both rapid, automated tools that leverage artificial intelligence and meticulous manual techniques for absolute precision.
The Challenge of Hair in Background Removal
Backgrounds can often be stubbornly hard and tricky to isolate subjects from. Hair strands, in particular, create intricate edges that standard selection tools frequently struggle to define accurately. Stray hairs and semi-transparent wisps demand careful refinement to avoid looking unnatural or being inadvertently removed. The ultimate goal is to either completely remove or effectively replace the background while meticulously preserving all the fine details of the hair. Fortunately, modern versions of Photoshop offer significantly improved AI-powered selections and specialized brushes specifically engineered to address these complex areas.
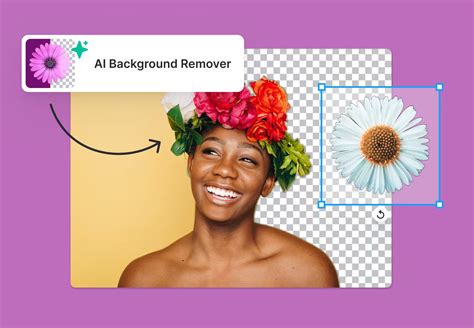
The latest Adobe Photoshop versions have introduced a "Remove Background" quick action, powered by artificial intelligence. This method is remarkably fast and often yields excellent results, particularly when the subject's hair exhibits a strong contrast with the background. We will begin by utilizing this one-click method and then proceed to refine the result to address any remaining imperfections, ensuring a polished final image.
Method 1: Leveraging AI with the "Remove Background" Quick Action
This method is ideal for achieving a quick and often surprisingly effective initial mask, especially when working with well-contrasted images.
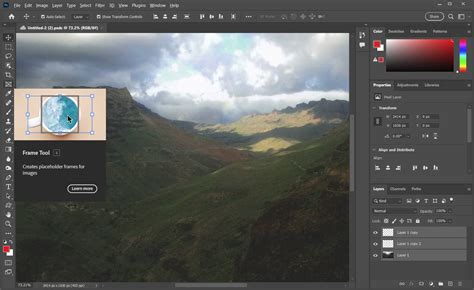
Step 1: Open the Image and Unlock the Layer
Begin by opening your chosen photograph in Photoshop. It's crucial to ensure that the layer containing your image is unlocked. By default, new images often open as a locked "Background" layer. You can easily unlock this by clicking the lock icon that appears next to the layer name in the Layers panel, or by converting it into a normal layer through other means.
Step 2: Utilize the "Remove Background" Quick Action
With your image layer selected in the Layers panel, navigate to the Properties panel. Within this panel, you will find a section labeled Quick Actions. Click on the Remove Background button. Photoshop's AI will then automatically detect the main subject of your image, which includes the person and their hair, and generate a layer mask that effectively hides the background pixels.
Step 3: Examine the Initial Result
After the quick action has been applied, it is imperative to zoom in closely and meticulously inspect the edges of the hair. You may notice areas where the background removal is not entirely perfect; perhaps tiny specks of background color remain trapped between hairs, or the edges appear slightly rough. Do not be discouraged; this is a common occurrence, especially when dealing with detailed hair.
Step 4: Refine the Hair Edges with "Select and Mask"
Now, we will focus on cleaning up the layer mask, with a particular emphasis on the hair details. Click directly on the layer mask thumbnail (the black and white icon representing the mask) of your image layer. Then, navigate to the menu bar and choose Select > Select and Mask. This action will open Photoshop's dedicated refinement workspace, designed for precise selections.
Within the Select and Mask workspace, choose a suitable View Mode from the options provided (for example, "On Black" or "On White"). This allows you to clearly see the hair edges against a contrasting background, making it easier to identify areas that need attention.
In the Properties panel of the Select and Mask workspace, you will find several sliders that can help smooth and feather the mask edge. Increasing the Smooth slider can help reduce jagged edges, while a small amount of Feather can soften the overall edge.
Next, select the Refine Edge Brush Tool (often represented by an icon resembling a brush with a dotted circle). Carefully brush over the edges of the hair where you observe any remaining background remnants. This specialized tool is designed to intelligently detect fine strands and fur-like details, significantly improving the mask in these challenging areas. It will seamlessly blend the subject’s hair with the new background or transparency. Take your time to meticulously paint over all the outer hair edges.

Step 5: Clean Up with the Brush Tool on the Mask (If Needed)
Following the use of the Refine Edge Brush, if you still notice a few small background bits that persist, you can manually edit the mask. Exit the Select and Mask workspace by clicking "OK". Back in the regular Photoshop view, select the mask thumbnail again. Use the standard Brush Tool with a soft edge. Set your foreground color to black and paint directly on the mask to conceal any unwanted specks of background. Conversely, if you accidentally remove a part of the hair that you wanted to keep, simply change the brush color to white and paint on the mask to reveal those areas again. Remember: painting with black hides pixels on the layer, and painting with white reveals pixels.
Step 6: (Optional) Insert a New Background
At this stage, you have successfully achieved a subject with hair and no background, meaning the layer with your subject is isolated on a transparent canvas. You can choose to leave it as is for a PNG export or for use in further compositing, or you can add a new background behind the subject.
To add a new background, simply drag and drop another image file into your Photoshop document, or create a new layer and fill it with a solid color or pattern. In the Layers panel, ensure this new background layer is placed below your subject layer. Resize or transform the new background as needed (using Edit > Free Transform) and press Enter to apply the changes. Your subject, with their meticulously refined hair, should now appear seamlessly integrated in front of the new backdrop.
Step 7: Save Your Work as PNG
For preserving the transparent background, the recommended file format is PNG. Navigate to File > Export > Export As… and select PNG from the format dropdown, or use File > Save As and choose PNG. Saving as a PNG will ensure that the transparency around the hair is maintained in the output file. JPEG format, on the other hand, cannot preserve transparency, so it should be avoided for this purpose. After saving, you will have successfully removed the background from your image, and the PNG file will be ready for use in any project.
Method 2: The Background Eraser Tool for Granular Control
For users who prefer a more hands-on approach, the Background Eraser Tool offers excellent control, allowing you to meticulously erase the background while carefully preserving the foreground, including fine hair details, by sampling colors. This method can be more time-consuming but is invaluable for achieving perfect results, especially in complex scenarios where automatic methods might struggle.
Step 1: Prepare Your Layers
Open your image in Photoshop. The first crucial step is to create a duplicate layer of your original image. You can do this quickly by pressing Ctrl+J (Windows) or Cmd+J (Mac). It is essential to work on this duplicated layer to protect your original image from any irreversible changes.
Step 2: Introduce a High-Contrast Reference Background
To make the selection process easier, especially for fine hair details, it's highly beneficial to place a solid color layer behind your subject that strongly contrasts with the hair color. For instance, if the hair is dark, a bright green or blue can be very effective. Create a new layer by clicking the "Create a new layer" icon at the bottom of the Layers panel. Use the Paint Bucket Tool to fill this new layer with your chosen high-contrast color. Then, drag this color layer in the Layers panel to be positioned below your duplicated photo layer. This temporary background will make it significantly easier to see the hair edges as you work, as the standard transparency checkerboard can sometimes be difficult to discern for very fine details.
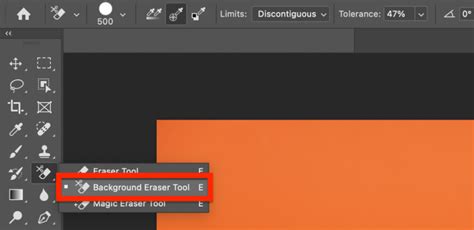
Step 3: Select the Background Eraser Tool
Locate the Eraser Tool in the Photoshop toolbar. Click and hold on the Eraser Tool icon to reveal a fly-out menu of related tools. Select the Background Eraser Tool. This tool operates by sampling a color you click on and then erasing pixels that match that sampled color.
In the Options bar at the top of the screen, adjust the Brush Size to a suitable starting point (you can always adjust this as you go). For the Sampling option, consider your background. If it's a solid, consistent color, using Background Swatch can be effective. In this case, you would first set your background color swatch in the toolbar to match the background color of your image (using the Eyedropper tool to pick it precisely). Then, selecting "Background Swatch" tells Photoshop to erase only pixels matching that specific color. Alternatively, Once sampling will erase based on the first color you click, and Continuous will keep erasing as you drag.
Step 4: Adjust Tolerance and Begin Erasing
The Tolerance setting in the Options bar is critical. It determines how similar a color needs to be to the sampled color to be erased. A lower tolerance (e.g., 20-30%) will restrict erasing to very similar colors, which is crucial for preserving delicate hair strands. A higher tolerance (e.g., 50% or more) will erase a broader range of colors. For fine hair edges, it's best to start with a relatively low tolerance to avoid accidentally removing semi-transparent hairs.
Begin working your way around the subject, focusing on the tricky hair areas first with a smaller brush size and lower tolerance. As you establish a clear outline around the entire hair and body of the subject, you can gradually increase the brush size to erase larger chunks of the remaining background outside this precise outline. Always exercise caution near the hair edges; it's far better to spend a bit more time preserving detail than to accidentally erase part of the hair itself.
Step 5: Hide the Reference Layer and Check Results
Once you have meticulously erased all of the background around the hair and subject, you should be left with just your subject against the transparent checkerboard pattern. Examine the fine hair detail to ensure it has been preserved. At this stage, you have effectively achieved a transparent background behind the hair. If some areas at the edges appear a bit harsh, or if a faint halo of the old background color remains, you can perform touch-ups. Use the regular Eraser tool in a very soft mode on those specific bits, or even a fine-tuned Brush Tool on the layer mask itself, to refine these areas.
Step 6: Save the Cut-Out as PNG
As with the first method, to preserve the transparent background, it is essential to save your work in PNG format. Go to File > Save As and choose PNG, or use the File > Export > Export As… option. Saving as PNG will ensure that the background remains transparent behind the hair. This file can now be placed on any new background you choose, used in e-commerce product photos with a plain backdrop, or overlaid onto graphic designs.
Advanced Refinements and Considerations
Removing Color Fringing
After cutting out hair from a background with a significantly different color, you might notice a slight outline of the old background color along some hair edges, often referred to as "color fringing" or "color spill." To fix this, Photoshop offers a couple of solutions.
Within the Select and Mask workspace, there is a checkbox option for Decontaminate Colors. This feature attempts to replace the background color spill with colors from the subject's hair.
Alternatively, you can manually address color fringing by creating a new layer directly above your subject layer. Clip this new layer to your subject (by holding Alt/Option and clicking between the two layers in the Layers panel). Then, using a soft Brush Tool, gently paint with a color sampled from the hair over the fringed areas. For more precise control, the Clone Stamp Tool can also be employed on this clipped layer.
When to Use Channels or the Pen Tool
In extremely challenging scenarios, such as images with a highly complex background visible through very fine hair, advanced users may opt for more intricate methods. The Channels method involves utilizing the image's individual color channels (Red, Green, Blue) to create a high-contrast mask. By isolating the channel that provides the best separation between the subject and the background, a precise mask can be generated.
The Pen Tool, on the other hand, can be used for meticulously outlining non-hair portions of the subject with vector paths, which can then be converted into selections and combined with masks. These methods are generally considered advanced and require a deeper understanding of Photoshop's capabilities, but they offer unparalleled precision for the most demanding tasks.
Insanely Difficult Selections MADE EASY with Alpha Channels in Photoshop
Practice on Different Images
The effectiveness of any given technique can vary significantly depending on the specific image. A photo with a simple, solid background might be processed in seconds using the AI "Remove Background" quick action. However, an image with a busy, complex background, or very fine, wispy hair against a similarly colored backdrop, might necessitate the more detailed approach of the Background Eraser Tool or even advanced channel masking. Consistent practice with a variety of images will quickly help you develop an intuition for which method is best suited for each unique situation.
By familiarizing yourself with these techniques and practicing them diligently, you will gain the confidence and skill to tackle even the most daunting hair background removal tasks in Photoshop, ensuring your subjects stand out crisply against any backdrop you desire. Remember to always save your final work in a format that preserves transparency, such as PNG, to maintain the integrity of your edits.
tags: #photoshop #remove #background #hair