The ability to transform a mundane sky into a dramatic focal point is a powerful technique in digital photography. Photoshop's Sky Replacement tool, an intelligent feature powered by Adobe Firefly generative AI, offers a streamlined and remarkably effective way to achieve this. This tutorial delves deep into the functionalities of this tool, providing a step-by-step approach for both beginners and advanced users to enhance their images with captivating skies.
Understanding the Core Functionality: AI-Powered Sky Transformation
At its heart, Photoshop's Sky Replacement tool is an AI-driven instrument designed to automatically detect and replace the sky in your photographs. The underlying technology, Adobe Firefly generative AI, intelligently analyzes the original sky in an image. It then seamlessly integrates a new sky from a curated gallery, ensuring that the lighting and shadows of the new sky are automatically adjusted to harmonize with the existing scene. This sophisticated automation significantly reduces the manual effort typically associated with sky manipulation, making it accessible to a wider range of users.
The AI-based nature of this feature allows for a high degree of customization. Users are not limited to the pre-selected skies; they can import their own sky images, offering unparalleled creative freedom. Furthermore, the tool provides adjustable settings that allow for fine-tuning the lighting and mood to perfectly match the overall aesthetic of the photograph.
Accessing and Navigating the Sky Replacement Gallery
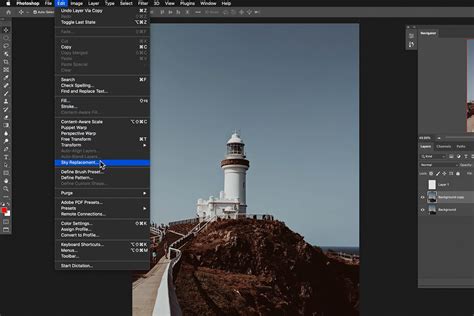
Getting started with Sky Replacement in Photoshop is straightforward. Begin by opening the image you wish to edit. The tool is readily accessible through the main menu: navigate to Edit > Sky Replacement. This action will unveil a gallery showcasing a diverse collection of sky options, thoughtfully organized into three distinct categories: "Blue Skies," "Spectacular," and "Sunset."
Within this gallery, you can preview various sky replacements by simply clicking on the sky thumbnails. This immediate visual feedback allows you to quickly assess how different skies might complement your chosen image. Once you've identified a sky that resonates with your vision, selecting it and clicking "OK" will apply it to your scene.
The effectiveness of the AI-powered Sky Replacement tool is generally optimized for photographs that feature a clearly defined horizon line and a distinct separation between the sky and the foreground. Images with such characteristics allow the AI to more accurately differentiate between the sky and other elements of the photograph, leading to more seamless and convincing results.
Step-by-Step: Replacing the Sky in Your Image
The process of replacing a sky in Photoshop can be broken down into a few key steps, designed to guide you from initial selection to final refinement:
- Pick Your Image: Select the photograph you want to enhance. This could be any image with a sky that you feel could benefit from a dramatic or atmospheric upgrade.
- View the Gallery: Access the Sky Replacement tool by going to Edit > Sky Replacement. Browse through the provided sky presets.
- Let Adobe Sensei Do the Work: Once you select a sky, the AI, powered by Adobe Sensei, will automatically detect the original sky and begin the replacement process.
- Pick Your Perfect Sky: Scroll through the available sky thumbnails and click on the one that best suits your image. Click "OK" to apply.
The tool automatically handles the initial blending and adjustments, providing a solid starting point for further refinement.
Importing Custom Skies: Unleashing Your Creative Potential
While Photoshop offers a robust library of skies, the ability to import your own images provides an almost limitless creative palette. To use a custom sky, navigate to the sky gallery as described above. Within the gallery, you will find a "+" button. Clicking this button will prompt you to locate and select an image from your computer. This allows you to utilize skies you've captured yourself or downloaded from other sources, ensuring a truly unique outcome. For instance, you might want to try our dramatic sunset sky in your image to evoke a specific mood.

Fine-Tuning and Manual Adjustments: Achieving Ultimate Control
The beauty of Photoshop's Sky Replacement tool lies not only in its automation but also in its comprehensive editing capabilities. After the initial AI-driven replacement, you have the power to fine-tune various aspects to achieve a perfect integration. This is where the manual aspect of the tutorial truly shines, offering ultimate control and accuracy.
When you apply a new sky, Photoshop creates a new layer group containing the sky and its associated masks. You can then manipulate these layers to refine the blend. For example, if the edges of the new sky are not perfectly aligned with the foreground, you can use the masking tools.
Adjusting Sky Properties: Within the Sky Replacement interface, you'll find several sliders that allow for significant adjustments:
- Sky Adjustments: These sliders typically control the Brightness and Scale of the replacement sky. You can drag the corner handle of the sky layer to resize and reposition it, ensuring it fits seamlessly into the composition.
- Color Adjustments: The Color Shift slider allows you to adjust the color temperature of the replacement sky to better match the lighting of your original scene. This is crucial for maintaining a natural look.
- Edge Lighting: This setting helps to create a more realistic transition by adding a subtle glow or darkening around the edges of the foreground elements to match the light source of the new sky.
- Foreground Adjustments: You can also adjust the Lighting Adjustment and Color Adjustment of the foreground to ensure it harmonizes with the new sky. This is particularly important if the new sky has a different color cast or intensity of light than the original.
Manual Masking for Precision: In some instances, the AI might not perfectly select the sky, leaving artifacts or misinterpretations. This is where manual masking becomes invaluable. If you notice areas where the house, for example, is being blended out or incorrectly masked, you can directly edit the layer mask. By selecting the brush tool and painting with black on the mask, you can "erase" the sky from areas where it shouldn't be, revealing the original foreground. Conversely, painting with white will bring back the sky. This granular control ensures that every element of your image is precisely as you intend it to be.
Sky Replacement with Photoshop
A Practical Example: Enhancing a Photograph from Austin, Texas
To illustrate the power of these tools, consider a practical scenario. Imagine a photograph captured just outside Austin, Texas, featuring a building with a unique architectural design (which, as a fun fact, was featured on the TV show The Leftovers). The original photograph, while interesting, suffers from a plain blue sky. While a polarizing filter was used to deepen the blue, the photographer, residing in California, couldn't revisit the location for a more atmospheric shot.
This is a prime candidate for Sky Replacement. The photographer can leverage their personal collection of cloud and sky photographs, meticulously curated in Lightroom over time. Whenever an interesting sky is encountered, it is captured with the best available camera. This personal library becomes a powerful resource for creating custom sky replacements.
By importing one of these custom cloud photographs into the Sky Replacement tool, the photographer can imbue the image with the desired mood and dynamism. The manual adjustments then come into play, ensuring that the clouds are scaled and positioned correctly, and that the lighting and color balance between the new sky and the building are seamless. The process of painting on the house where it was blending out, using the masking tool, ensures that all of the house is showing again, fully integrated with the new sky. This meticulous approach transforms a good photograph into a truly compelling one.
Saving and Exporting Your Enhanced Image
Once you are satisfied with your sky replacement and all adjustments have been made, it's time to save your masterpiece. To share your image, navigate to File > Export > Export As. This will open a dialog box where you can specify the desired format (e.g., JPEG, PNG), size, and scale, tailoring the output for your specific digital or print project. This ensures that your enhanced image is ready for its intended use, whether it's for online portfolios, social media, or professional printing.
Beyond Sky Replacement: A Glimpse into Photoshop's Creative Potential
While Sky Replacement is a powerful standalone feature, it's important to remember that Photoshop offers a vast array of tools for image manipulation. For instance, this tutorial on Sky Replacement can be complemented by learning other popular effects, such as the particle dispersion effect, which can further enhance the artistic qualities of your images. The continuous evolution of Photoshop, with features like Adobe Firefly generative AI, underscores its position as an industry-leading platform for creative professionals and enthusiasts alike.
The journey of mastering Photoshop's Sky Replacement tool is an ongoing one, filled with opportunities for creative exploration. By understanding the interplay between AI automation and manual control, users can unlock new levels of artistic expression, transforming ordinary photographs into extraordinary visual narratives. This tutorial has aimed to provide a comprehensive understanding, encouraging you to experiment and discover the endless sky options available within Photoshop.
tags: #photoshop #sky #replacement #tool