Photoshop's Brush Tool is a powerful and versatile instrument, offering a gateway to creating intricate digital art, from bold illustrations to realistic body modifications. This tutorial delves into the world of Photoshop tattoo brushes, guiding you through the process of transforming digital designs into convincing body art, whether for personal projects, photo manipulation, or even creating your own unique tattoo flash. We'll explore how to leverage custom brushes, layer styles, and various blending techniques to achieve authentic-looking results.
The Foundation: Sketching and Outlining
The journey of creating a digital tattoo often begins with a simple sketch. Following along with a Photoshop video tutorial, you can start with a loose, initial sketch of your chosen subject, such as a snake or a bird. Once the basic form is established, the next crucial step involves accurately outlining your illustration. Photoshop offers helpful brush settings that can be adjusted to achieve clean, precise lines, mimicking the careful strokes of a tattoo artist.
For instance, when working with the Brush Tool, reducing the "Spacing" to 1% and enabling the "Smoothing" option can make a significant difference in achieving neat, flowing lines, especially when drawing with a mouse. The Brush Tool functions by applying color using strokes, much like a traditional drawing tool. It works by adding a shaped mark on a layer, and continuous pressure creates a stroke until the mouse button or pen is released.
Brush Tool Essentials: Tip Shape, Blending, Opacity, and Flow
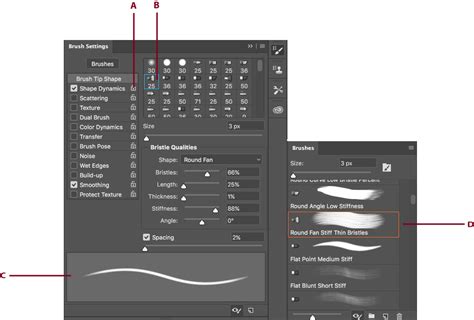
The fundamental options for the Brush Tool are its "Brush Tip Shape," "Blending Mode," "Opacity," and "Flow." The "Brush Tip Shape" settings allow you to modify how colors are applied. Within the "Brush Preset Picker," you'll find several built-in presets. The "Size" of the brush tip can be increased or decreased using the "[" and "]" keys, while "Hardness" controls the strength of the brush tip's border. The color applied is determined by the "Foreground Color."
Beyond the basic presets, you can manage brush lists by loading, saving, replacing, or appending brush collections. Each stroke made with the Brush Tool can have a "Blending Mode" applied, similar to those used for layers. These modes, such as "Darken," "Multiply," "Overlay," "Lighten," "Color Dodge," and "Linear Dodge," are incredibly useful for adding color or light effects.
The "Flow" setting controls the speed at which paint is laid down. Each pass of the brush over the same spot will build up more paint, allowing for subtle gradations and layered effects. This is particularly useful when simulating traditional airbrushing, where a longer press results in a larger mark.
Bringing Illustrations to Life with Color and Shading
The artwork truly comes to life when color is introduced. Each hue can be applied to a separate layer, providing maximum flexibility for editing. The "Magic Wand" tool, with the "Sample All Layers" option checked, can be used to select areas for color filling. By holding the "Shift" key, you can select multiple areas requiring the same color.
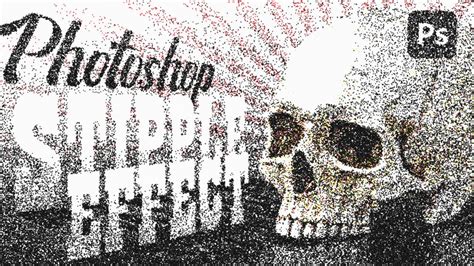
Shading is where an illustration begins to take on depth and dimension. A common technique used in tattoos and body art is "stipple shading," which involves applying a concentration of small dots. This can be achieved using custom brushes designed for this purpose. When applied at a low "Flow" setting (e.g., 10%), these brushes create realistic shading effects that mimic the look of ink absorbed into the skin. By building up the effect gradually, you can create beautiful gradients from light to dark. If you accidentally go outside the lines, a layer mask can be used to refine and fix the shading.
Advanced Shading Techniques: Dissolve Mode and Layer Masks
To achieve a softer, more integrated shading effect, the "Dissolve" blending mode can be employed. By adding a new layer above the colored layer, filling it with black, and then clipping it to the layer below (using the "Alt" key), you can apply shading. A layer mask on this shading layer allows you to paint with black to erase the shading or white to restore it, precisely controlling where the shading appears. The "Dissolve" mode will gradually fade out the grain of the shading due to the softness of the brush, creating a natural transition.
Achieving Realistic Tattoo Effects on Skin
Transforming a flat illustration into a convincing tattoo on a subject's body part requires careful attention to detail and the use of specific Photoshop tools and techniques.
Seamless Integration: Masks, Liquify, and Smudge Tools
Once your tattoo illustration is ready, it can be placed onto a subject's image. To make it appear as if it's truly on the skin, a "vector mask" or "layer mask" is essential. This allows you to softly erase areas that might be overflowing or don't quite fit the body's contours. The "Erase Tool" can also be used for this purpose, quickly removing excess parts of the illustration that extend beyond the clothing fabric or body.
Crucially, the tattoo needs to follow the natural contours of the skin. Tools like the "Smudge Tool" and the "Liquify Tool" are invaluable here. They allow you to gently push and pull the design, making it wrap around curves and bends in the skin, thus enhancing the illusion of realism. The "Smudge Tool," in particular, can create an effect that looks like ink has been absorbed into the skin around the lines.
Adding Dimension: Layer Styles and Blur
To give the tattoo a sense of depth and make it feel less like a flat sticker, "Layer Styles" can be applied. A "Bevel & Emboss" style can add subtle dimension. When setting this up, it's important to match the light direction with the lighting in the scene to ensure the shadows and highlights appear natural. Adjusting "Depth," "Size," and "Soften" values, and setting "Highlight Mode" and "Shadow Mode" to "Soft Light," can greatly enhance the 3D effect.
A little blur can also go a long way in making the tattoo look and feel like it was made with ink. Duplicating the tattoo layer and applying a "Gaussian Blur" (e.g., 3.9) can simulate the effect of ink being absorbed by the surrounding skin. To further refine this, a black layer mask can be added to the blurred layer. By painting with white on this mask in areas where black lines converge, you can simulate the concentration of ink that would occur in those areas in a real tattoo.
Simulating Skin Texture
The final step in making a tattoo look truly embedded in the skin is to add subtle skin texture to the tattoo itself. This can be achieved by sampling a color from the subject's skin near the tattoo. Then, using a very small brush with a low flow, lightly paint over areas of the tattoo. This will add small specks of skin color, creating the illusion that the tattoo is integrated with the skin's surface.
Add Amazing Tattoos Under 3 Minutes with Photoshop!
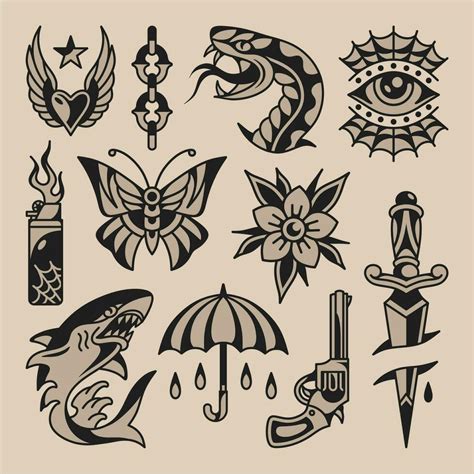
The "Old School" Tattoo Flash Aesthetic
The "Old School" tattoo style, also known as traditional or American traditional, is a highly recognizable and popular aesthetic. Characterized by thick black outlines, bold, limited color palettes, and iconic imagery such as roses, anchors, pin-up girls, and nautical themes, this style has its roots in sailor tattooing. Creating digital art inspired by this aesthetic in Photoshop offers the advantage of using layers, allowing for easy editing and revisions, unlike the permanent nature of real ink.
Crafting Traditional Designs in Photoshop
To produce a digital illustration inspired by old-school tattoos, begin by opening Adobe Photoshop and creating a new document. A canvas size of around 2000x2000 pixels is often suitable. When drawing lines, the "Brush Settings" should be adjusted for spacing and smoothing.
Traditional tattoo designs often feature symbolic elements. For instance, hearts and roses accompanied by banners containing names are iconic sailor tattoo motifs. Creating these elements on separate layers allows for individual manipulation. Smooth, slow strokes are key to drawing shapes like banners. Simplified leaf shapes can be added on their own layers, and layer masks can be used to erase any overlaps, ensuring clean integration of elements.
For text within banners, using a specific font as a template can guide the hand-drawn lettering. Applying color involves assigning each hue to a separate layer. The "Magic Wand" tool with "Sample All Layers" enabled is useful for selecting areas for color fills.
Adding Grainy Shading and Vintage Texture
Shading in the old-school style often has a distinctive grainy texture. This can be achieved by adding a new layer above the color layer, filling it with black, and then clipping it to the layer below. Setting this shading layer to the "Dissolve" blending mode with reduced opacity, and then using a layer mask to paint with black or white, allows for precise control over where the shading is applied. The "Dissolve" mode helps to fade out the grain softly.
Once the design is fully colored and shaded, adding an old paper texture to the background can give the final piece the appearance of vintage tattoo flash. This final touch helps to complete the bold design, complete with thick black outlines, vibrant colors, and strong grainy shading, all constructed with the flexibility of Photoshop layers.
Exploring the Breadth of Photoshop Brushes
The power of Photoshop's Brush Tool extends far beyond replicating traditional tattoo styles. The platform offers a vast array of resources, including custom brushes designed for numerous artistic purposes. From tribal, Celtic, and dragon-themed brushes to those depicting skulls, flowers, hearts, and henna patterns, there's a brush to suit almost any aesthetic.
Creating and Utilizing Custom Brushes
Photoshop's ability to create custom brushes from scratch is a fundamental feature. This process can involve using any image as a source for a brush tip. By masking or erasing parts of an image, you can define the shape of your brush. Once created, these custom brushes appear in the Brush Settings Panel and the Brush Preset Picker.
The "Brush Settings Panel" (accessible via Window > Brushes) is where you can fine-tune brush behaviors. Options like "Shape Dynamics" control the randomness of size, angle, and roundness. "Scattering" determines the number and placement of brush marks in a stroke. "Color Dynamics" allows you to control how the color of paint changes across a stroke, with options for Hue, Saturation, and Brightness jitter.
Textured brushes utilize patterns to create strokes that appear to be painted on a textured surface. The "Texture Each Tip" checkbox applies a new instance of the texture with each painted mark, while "Build Up" simulates airbrushing. "Protect Texture" ensures that the same pattern and scale are applied to all brush presets with texture.
Brush Resources and Applications
Beyond creating your own, a wealth of pre-made Photoshop brushes are available from various marketplaces. These can include shader brushes for grungy effects, realistic paint brushes, spray-paint splatters for posters and collages, abstract brushes for adding movement, smoke brushes for dramatic effects, halftone gradient brushes for comic book styles, and sleek, futuristic network turbulence brushes.
These brushes can be used for a wide range of applications, from photo manipulation and creating digital illustrations to designing posters, invitations, social media graphics, and more. The ability to apply artwork as a "Smart Object" in Photoshop also allows for non-destructive transformations and easy application of effects.
Conclusion: Unleashing Your Digital Tattoo Artistry
Photoshop's comprehensive toolset, particularly its Brush Tool and extensive brush customization options, empowers artists to create incredibly realistic and stylized tattoo effects. Whether you're aiming for the authentic feel of old-school flash art or a modern, integrated tattoo on a photograph, the techniques discussedâfrom initial sketching and precise outlining to advanced shading, realistic skin integration, and the use of diverse brush presetsâprovide a solid foundation. By mastering these Photoshop tattoo brush techniques, you can bring your creative visions to life and explore the vast possibilities of digital body art.