Photoshop's interface, with its vast array of tools and panels, can initially appear daunting to newcomers. However, understanding the purpose and placement of its core components transforms this complexity into a powerful and intuitive creative environment. By knowing where to direct your attention, the entire workflow becomes significantly more manageable, allowing for focused and efficient image manipulation and design.
The Canvas: Your Creative Playground
The absolute heart of the Photoshop experience is the canvas. This is the central area where all your creative endeavors take place - where you draw, paint, design, and manipulate your images. Think of the canvas as the windshield of a car; it's the primary viewport through which you see the most crucial element: your project. It is here, on the canvas, that the visual magic unfolds, and it's where you should ideally direct approximately 90% of your focus.
The Toolbar: Your Arsenal of Tools
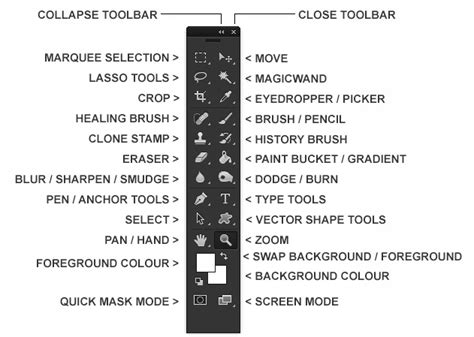
Positioned by default on the left side of your workspace is the Toolbar. This is where you'll find all the essential tools Photoshop offers, from brushes and selection tools to type and shape creators. To maximize efficiency, it's highly recommended to interact with the Toolbar primarily through hotkeys. For instance, pressing 'B' instantly activates the Brush tool, a far quicker method than manually navigating your mouse cursor to the Toolbar's icon. Accessing tools via keyboard shortcuts drastically speeds up your workflow, allowing you to concentrate on the creative process rather than tool selection. The Toolbar can be customized; by clicking and dragging its top edge, you can detach it and let it float freely, or dock it to another side of your workspace, such as the right.
The Options Bar: Contextual Controls
Directly beneath the main menu, the Options Bar plays a crucial role by dynamically adapting its content based on the currently selected tool from the Toolbar. As you switch between different tools, the Options Bar updates to display the specific settings and parameters relevant to that active tool. This contextual nature makes it an indispensable area for fine-tuning your actions. For example, when the Brush tool is selected, the Options Bar will present choices for brush size, hardness, opacity, and blending mode. When the Type tool is active, it will offer font selection, size, and color options.
The Menu Bar: The Command Center
At the very top of the Adobe Photoshop application resides the Menu Bar. This system houses a comprehensive collection of options and features, organized into logical categories such as File, Edit, Image, Layer, Type, Select, Filter, 3D, View, Window, and Help. While many of the most frequent and important actions have dedicated hotkeys for faster access, the Menu Bar remains essential for less common commands, accessing specific functionalities, and exploring the full breadth of Photoshop's capabilities. It's the overarching command center from which you can initiate almost any operation within the software.
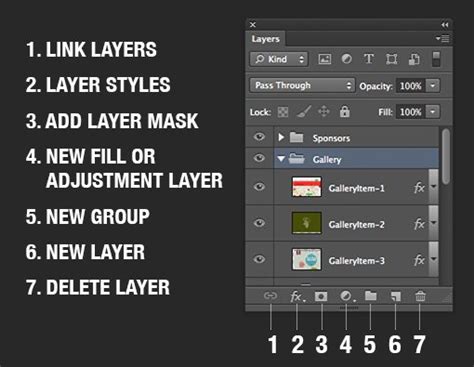
The Layers Panel: Building Your Project Stack
Directly related to the canvas is the indispensable Layers panel. Typically found on the right side of your screen, its presence is vital for managing the different elements of your project. If you don't see it, you can easily bring it back by navigating to Window > Layers in the main menu. Everything you add to the canvas - an image, a shape, text, or a painted stroke - will be represented as a distinct layer in this panel. Currently, when you open a new project, you'll likely see a single layer named "Background."
The analogy of driving is helpful here: the canvas is your windshield, offering a view of the road (your image). The Layers panel, in turn, is akin to your car's dashboard, providing critical information and controls like speed, fuel level, and indicators - in Photoshop's case, this translates to layer visibility, opacity, blending modes, and the order of your elements.
Workspaces: Tailoring Your Environment
Photoshop comes equipped with several pre-built workspaces, designed to optimize the interface for specific tasks. These can be accessed by clicking the Workspace icon, usually located in the top-right corner of the application window. Options typically include "Essentials" (a general-purpose layout), "3D," "Graphic and Web," "Photography," and more. For beginners, starting with the "Essentials" workspace is highly recommended. If your Photoshop layout appears different from a tutorial or example, you can often reset the current workspace to its default configuration by selecting Window > Workspace > Reset [Workspace Name].
Customizing your workspace is a key aspect of efficient Photoshop usage. Panels, much like the Toolbar, can be detached, moved, resized, and docked to various locations. For example, the Libraries panel, if present, can be moved or closed entirely to reclaim valuable screen real estate for the canvas. You can also enable and disable panels as needed through the Window menu.

Managing Panel Clutter: Maximizing Canvas Space
A fundamental principle in mastering Photoshop's interface is understanding that space is precious. As you open more panels, the available area for your canvas inevitably shrinks. Removing unnecessary panels is a crucial skill. For instance, panels like "Color" and "Swatches" might be rarely used by some users and can be closed by clicking the "Close Tab Group" option from the tiny icon in the top-right of the panel area. By decluttering your interface, you ensure that your canvas remains as large and unobstructed as possible, which is essential for a positive creative experience.
Customizing the Application's Appearance
Photoshop offers options to change the overall color theme of the application. You can access these preferences by pressing Ctrl+K (Windows) or Cmd+K (Mac) to open the Preferences dialog box. Navigate to the "Interface" section, where you'll find four different color schemes to choose from. Selecting any of these will immediately alter the look of the interface, allowing you to personalize your working environment.
Navigating and Viewing Your Document
Beyond the main interface elements, Photoshop provides tools specifically for navigating and viewing your image.
The Zoom Tool and Fit Screen
When working with an image, the Zoom Tool, typically found near the bottom of the Toolbar (represented by a magnifying glass icon), allows you to magnify or reduce your view. A useful setting in the Options Bar for the Zoom Tool is "Scrubby Zoom." When unchecked, it provides more predictable zooming behavior. The "Fit Screen" option in the Options Bar is invaluable for quickly viewing your entire image at once, adjusting the zoom level so the whole document fits within the window. The current zoom level is always displayed in the document's tab and often in the bottom-left corner of the Document window.
The Navigator Panel
Another powerful tool for navigation is the Navigator panel (accessible via Window > Navigator). This panel displays a thumbnail of your image with a red bounding box indicating the currently visible area at your current zoom level. You can reposition this red box to pan around your image, or use the sliders below the thumbnail to adjust the zoom level.
Understanding Common Tools and Their Functions
While a comprehensive list of every tool is beyond the scope of this overview, understanding the purpose of some frequently used tools is essential:
- Move Tool: (Shortcut: V) This is your primary tool for repositioning selected elements, layers, or selections on the canvas.
- Marquee Tools: (Rectangular and Elliptical) These tools allow you to create geometric selections. Holding the Shift key while dragging with the Rectangular Marquee tool will constrain the selection to a perfect square.
- Lasso Tools: These tools provide freehand selection capabilities.
- Magic Wand Tool: This tool selects pixels based on color and tonal similarity.
- Crop Tool: Similar to the Rectangular Marquee tool, this allows you to define an area to keep, discarding everything outside of it. Pressing Enter/Return finalizes the crop.
- Spot Healing Brush Tool: A very useful tool for removing blemishes or unwanted elements. It works by sampling surrounding pixels to seamlessly blend corrections.
- Brush Tool: (Shortcut: B) The foundational painting tool in Photoshop, offering a wide range of brush tips, sizes, and opacities.
- Eraser Tool: This tool removes pixels from a layer, making them transparent.
- Gradient Tool: Used to create smooth transitions between colors.
- Blur Tool: As the name suggests, this tool is used to soften or blur areas of an image.
- Sharpen Tool: The opposite of the Blur tool, it enhances edges and details.
- Dodge Tool and Burn Tool: These tools are used to lighten (Dodge) or darken (Burn) specific areas of an image, mimicking darkroom techniques.
- Type Tool: (Shortcut: T) Essential for adding text to your designs. It offers numerous options for font, size, color, and alignment.
- Pen Tool: A powerful tool for creating precise paths and selections, which can then be used for masks, shapes, or further manipulation.
- Shape Tools: Allows you to draw vector shapes like rectangles, ellipses, and polygons, which are placed on Shape Layers.
- Hand Tool: (Shortcut: H) Used for panning around your image when zoomed in. Holding the Alt key while using the Zoom Tool allows you to zoom out. Holding Shift with the Zoom Tool zooms all open windows simultaneously.
- Color Boxes: The foreground and background color swatches are critical for many tools. Clicking on them opens the Color Picker, and the Eyedropper tool allows you to sample colors directly from your image.
Keyboard Shortcuts and Learning Through Practice
The importance of keyboard shortcuts cannot be overstated. They are the key to unlocking a significantly faster and more fluid workflow. Familiarizing yourself with common shortcuts, like Command-Z (Undo), will dramatically improve your efficiency.
Ultimately, the best way to learn Photoshop is through consistent practice. Don't be afraid to experiment with different tools and settings. Mistakes are an inevitable part of the learning process, and each one offers an opportunity to understand the software better.
Adobe Photoshop Keyboard Shortcuts (Diagram)
Photoshop on the Web: Accessibility and Core Features
Photoshop on the web provides a streamlined, accessible version of the powerful desktop application, allowing users to edit images directly in their browser. Its interface is designed for intuitive use, featuring common editing tools and generative AI capabilities. The homescreen allows quick access to recent work. Key elements include:
- Main Menu: Access to core functionalities.
- Filename: Displays the name of the current document.
- Version History: Allows tracking and reverting to previous saves.
- Saved Status: Indicates whether the document is saved.
- Zoom Level: Shows the current magnification.
- Open in Desktop App: Option to transition to the desktop version.
- Download: Save the image to your device.
- Share: Collaborate with others by inviting them to edit or view.
- Adjust: Offers preset adjustments and masks for Brightness/contrast, Hue/saturation, Exposure, Vibrance, Color balance, Black & white, and Gaussian blur.
- Shapes: Tools for creating basic vector shapes.
- Layers Panel: Manages image layers.
- Layer Properties Panel: Adjusts the characteristics of selected layers.
The web interface is dynamic, offering curated options based on your current actions, guiding you through the editing process.
The Power of Workspaces and Customization
Workspaces are preset arrangements of Photoshop's interface elements, designed to suit different workflows. The "Essentials" workspace is a good starting point, but specialized workspaces like "Graphic and Web" or "Photography" can significantly enhance productivity for specific tasks. Saving your custom workspace is highly recommended, especially if others use your computer or if you frequently switch between diverse projects. This ensures that you can quickly restore your preferred layout without manually rearranging panels each time. For those specializing in areas like web design, app design, or graphic design, prioritizing panels such as Properties, Layers, and Character becomes essential. Experimentation is key to discovering the panel combinations that best suit your individual creative process.
The interface, while extensive, is built upon a logical framework. By understanding the roles of the Document window, Toolbar, Options Bar, Menu Bar, and the various Panels, you can effectively navigate Photoshop and harness its immense creative potential. The new Search feature in recent versions further streamlines the process of finding tools and commands, making the vast capabilities of Photoshop more accessible than ever before.