In the realm of digital art and photography, Adobe Photoshop stands as an indispensable tool, empowering creators to transform ordinary images into extraordinary visual narratives. Beyond basic corrections and touch-ups, Photoshop offers a vast playground for imaginative exploration, enabling the infusion of atmosphere, mystery, and unique artistic styles into your work. Photography itself is not merely about what can be captured by a camera; it extends into the post-processing stage, where Photoshop allows for the addition of diverse effects and the redirection of your creative output. This guide delves into a plethora of innovative Photoshop editing ideas, catering to both novice enthusiasts and seasoned professionals, designed to elevate your imagery and unlock new dimensions of artistic expression.
Crafting Atmosphere and Mystery with Digital Elements
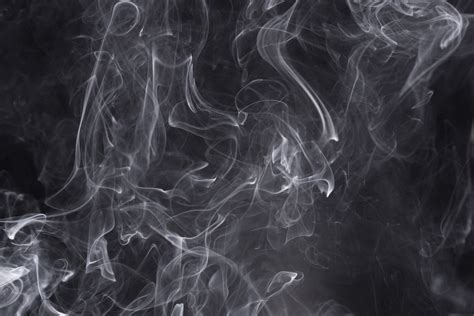
One of the most effective ways to imbue your images with a sense of atmosphere and mystery is through the strategic use of digital elements. Smoke effects, for instance, can dramatically alter the mood of a photograph. The easiest method to achieve this in Photoshop involves utilizing specialized brushes and filters. Begin by creating a new, empty layer specifically for your smoke effect. Select the Brush Tool from the toolbox and choose a smoke brush. Apply this brush onto a black background, allowing the strokes to form the basis of your smoke. Once you are satisfied with the brushwork, you can further enhance the smoke by applying various filters. Crucially, adjust the opacity of the smoke layers and experiment with different blending modes. This allows for a seamless integration of the smoke into your existing image, creating a believable and evocative atmosphere.
Another powerful technique for adding atmosphere is the application of lens flare effects. These can infuse your images with a sense of dreaminess, drama, or an ethereal quality. To implement this, create a new layer and navigate to Edit > Fill. Subsequently, access the Lens Flare filter, which can be found under the Filter menu. By adjusting the flare's characteristics, you can simulate various lighting conditions and add a captivating glaze to your photographs. This is particularly effective for enhancing landscapes or portraits, giving them a more artistic and evocative feel.
Introducing Dynamic Effects and Transformations
Photoshop offers a remarkable array of effects that can fundamentally transform the appearance and narrative of your photographs. The glitch effect, for example, introduces digital distortions and visual "errors" that can lend a contemporary, edgy aesthetic to your work. While multiple methods exist for creating a glitch effect, one of the most accessible is by employing Photoshop's halftone filter. This filter can break down an image into dots, mimicking the appearance of old printing techniques, which can be further manipulated to create a digital distortion.
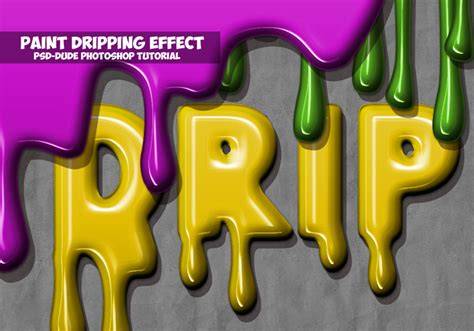
For those seeking a more painterly aesthetic, the paint splash or drip effect can be highly impactful. This effect makes your photos appear as if they have been drenched or splashed with vibrant paint. The process typically involves opening your desired image and duplicating it into a new layer. Then, highlight the subject and convert it to a Smart Object (Layer > Smart Objects > Convert to Smart Object). This conversion allows for non-destructive editing. You can then customize your brush settings to fit your artistic vision and use tools like the Forward Warp Tool to create the characteristic dripping effect.
To convey a specific narrative or introduce an element of fantasy, consider transforming your subject's scale. Imagine your subject shrunk to the size of an insect and placed within a macro scene, or conversely, enlarged to monumental proportions. This concept, often explored by artists like YouTuber Rafy A., allows for surreal and thought-provoking compositions.
The Ink Smudge Effect offers a vintage-like aesthetic, adding a touch of retro charm to your images. This involves adjusting your brush settings to achieve the desired smudge effect. Blurring the edges and utilizing the Transform tool (Ctrl/Cmd+T) to rotate, warp, and resize the smudges are key steps. This is a relatively simple project, making it accessible even for beginners.
For a dramatic and visually striking effect, the particle dispersion, famously seen in the "Thanos snap" scene from Marvel's Avengers, can be recreated in Photoshop. On the subject layer, use the Forward Warp tool to distort the areas you wish to disperse. Subsequently, apply the Dispersion Filter to the subject layer. This filter breaks down the subject into particles, creating a sense of disintegration.
Adding dynamic elements like flames or clouds can also significantly enhance an image. To create a flame effect, select the Brush tool and choose a red or orange color. With your frame layer selected, navigate to Filter > Render > Flame. The Flame dialog box allows you to adjust the flame's characteristics. Use the Transform tool to scale and position the flame as needed, and consider adding a subtle glow or reflection on nearby surfaces with a soft brush beneath the flame. Similarly, the simplest way to add clouds is by using a preset cloud brush, which can be found in Photoshop's brush library or downloaded from various online resources.
Creative Techniques for Enhanced Imagery
Beyond specific effects, Photoshop provides a range of techniques to elevate your photography. Black-and-white conversion, for instance, forces a focus on textures, patterns, and tonal variations, moving away from the reliance on color. These monochrome images can possess a timeless and impactful quality.
1-Minute Photoshop - Create Dramatic Black & White
Double exposure is another powerful experimental technique, originally a feature of film photography where a single frame was exposed twice. In Photoshop, this can be achieved digitally by merging two images. You can place one image on top of another as a new layer and then use blending modes and layer masks to create a seamless and artistic combination. This technique offers immense creative control, allowing for the creation of dreamlike and surreal compositions.
A double-light effect can lend a professional polish to your images without requiring extensive studio setups. By strategically adding two distinct light sources within Photoshop, you can create contrasting moods or balance warmth and coolness. This involves manipulating lighting effects to achieve a desired aesthetic.
Cinemagraphs, which feature a single subtly moving element within a still photograph, add a magical and captivating quality to your work. These are not to be confused with GIFs, as the majority of the image remains static. Creating a cinemagraph typically involves using a short video clip as a source.
Exploring Advanced and Experimental Ideas
For those looking to push the boundaries of visual storytelling, several advanced techniques offer unique possibilities. 3D photography, while cyclical in popularity, allows you to transform digital photos into retro 3D images, often requiring special glasses for viewing.
Transforming digital photos into watercolor paintings is another artistic endeavor achievable with Photoshop. This manipulation technique utilizes specialized watercolor brushes to create a digital painting effect. While it can be challenging, the results can be stunning, mimicking the look and feel of traditional watercolor art.
The posterize option can transform a photograph into a cartoon-like creation, simplifying colors and tones to achieve a graphic aesthetic. Similarly, Liquify filters allow you to morph images like wet clay, creating trippy and abstract effects. Colorize filters offer the ability to alter the hue of a picture, opening up possibilities for surreal color palettes.
Compositing is a fundamental and versatile creative manipulation technique where multiple images are combined to form a single, cohesive composition. This can range from seamlessly blending two photos to creating elaborate digital collages with various elements like text, illustrations, and abstract shapes. The key lies in skillful use of layers, blending modes, and layer masks.

The Droste effect, characterized by a picture within a picture, creates a surreal and dream-like recursion. This typically involves an image containing a frame or border, within which the image itself is repeated, often infinitely. Achieving this effect requires careful attention to perspective and framing.
Multiplicity is another technique that adds surrealism and humor by featuring multiple versions of the same subject within a single frame. This is often achieved by taking several photos of a subject from different positions and then carefully combining them using layer masks in Photoshop.
The infrared effect can completely alter the mood and perception of a set of photos. While simple to implement, it can have a significant impact, introducing unique color shifts and ethereal qualities. This effect offers considerable flexibility, allowing for subtle or dramatic changes.
The bokeh effect, characterized by a blurred background with sharp focus on the subject, can be achieved both in-camera and through post-processing in Photoshop. This technique draws attention to the subject by isolating it from its surroundings with a soft, out-of-focus backdrop.
Practical Tools and Shortcuts for Efficient Editing
Beyond the creative ideas, mastering Photoshop also involves understanding its practical tools and shortcuts to streamline the workflow. The "Select Subject" tool, for instance, is a time-saving feature that attempts to automatically select the main subject in an image, providing a quick starting point for more complex selections.

Lightroom's "Best Photos" feature, which utilizes AI to analyze and select the best images from a set, can also be a valuable tool for photographers before even opening Photoshop.
Keyboard shortcuts are essential for efficient editing. For example, pressing the square bracket keys [ and ] while using any brush-based tool resizes the brush tip, while holding Shift with these keys changes the brush hardness. Duplicating layers or selections is as simple as pressing Cmd/Ctrl+J. A merged copy of all visible layers can be created with Cmd/Ctrl+Shift+Alt+E. The number keys 0-9 can be used to quickly set brush opacity or layer opacity, with two keys pressed in succession setting a specific value (e.g., 56 for 56%). Cmd/Ctrl+F opens the Photoshop finder for quick access to any tool or command, and D resets foreground/background colors to black and white, while X flips them. Filling a layer with foreground or background color can be done with Alt+Backspace or Cmd/Ctrl+Backspace, respectively. Zooming is efficiently handled by holding Cmd/Ctrl+Space and dragging.
Holding Alt while dragging any layer, selection, text, shape, or layer style creates a quick copy. Alt-clicking a layer mask thumbnail toggles a black-and-white mask view, while Shift-clicking disables or enables a mask. Alt-clicking the eye icon on a layer hides all other layers, and Cmd/Ctrl-clicking a layer or mask loads its shape as a selection. Using Alt with the layer mask thumbnail creates a black mask that hides everything. Adding Shift to a tool shortcut cycles through related tools, and holding Alt with the Dodge and Burn tools temporarily switches between them. In split toning, holding Alt while dragging Hue or Balance sliders temporarily views Saturation at 100%.
Mastering Blending Modes and Layer Techniques
Blending modes are a cornerstone of advanced Photoshop editing, allowing for sophisticated integration of layers. To hand-color monochrome photos, create a new layer, set it to "Color" blending mode, and paint with your desired colors. For a simple double exposure, drag one image onto another and set the blending mode to "Screen." To add stars to a night sky, copy a sky layer, set its blending mode to "Lighten," and adjust with Levels if needed.
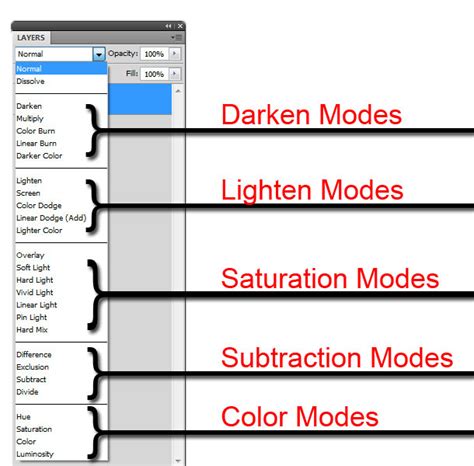
To control color brightness, use a Black & White adjustment layer set to "Luminosity" and adjust the B&W sliders. Textures can be blended using "Overlay" or "Soft Light" modes, with "Multiply" or "Screen" as alternatives, and layer opacity adjusted for strength. Creating a neutral layer set to "Overlay" and filling it with 50% gray allows for dodging and burning on all underlying layers. A sharpening effect can be achieved by duplicating a layer, setting it to "Overlay," and applying a High Pass filter. Understanding that blending modes often have opposite counterparts (e.g., Lighten/Darken, Screen/Multiply) can aid in experimentation. Layer Fill and Layer Opacity can produce different results with certain blending modes, with Fill often yielding better outcomes.
Leveraging Camera Raw and Advanced Adjustments
Camera Raw offers powerful tools for image adjustment before entering Photoshopâs main interface. The Detail panel's sharpening settings depend on image resolution and content; generally, detailed images benefit from a high Amount and low Radius, while less detailed images might need a higher Radius and lower Amount. When using local adjustments like the Graduated Filter, starting with the plus/minus icon next to a slider loads a starting point and resets others. The Targeted Adjustment Tool allows precise control over Hue, Saturation, or Luminance by right-clicking and dragging over the image.
"Enhance Details" from the Filmstrip dropdown menu can correct artifacts and color discrepancies. Opening an image in Camera Raw as a Smart Object by holding Shift and clicking "Open Object" allows for non-destructive edits that can be revisited later. Tonal sliders can be pushed beyond their limits by using a Graduated Filter that covers the entire frame. Settings made in Camera Raw can be copied to other images via Bridge. Holding Alt with tonal sliders in the Basic panel reveals clipping in a grayscale view.
Embracing the Art of Photo Manipulation
Photo manipulation is an art form as old as photography itself, involving the combination, alteration, and creation of new works from existing assets. Whether for surrealistic photomontages or the creation of fantastical worlds, it requires an understanding of fundamental photographic principles like perspective, lighting, and color. While Photoshop enables incredible artistic freedom, it's crucial to maintain the integrity of photographic images, especially in photojournalism. For artistic expression, clarity of vision is paramount. Having a clear idea of the desired outcome before starting will prevent distractions and ensure a focused workflow.
When combining images, ensuring realistic perspective, lighting, and shadows is key. Matching the darkest color of a subject to the darkest color of the background is a crucial step in lighting consistency. Adjusting hue and saturation settings helps shadows blend seamlessly into the background. While stock images can be useful, taking your own photographs offers greater control over matching lighting and perspective. Non-destructive editing is vital, allowing for changes and restarts throughout the workflow. Practice and experimentation are the most effective ways to develop an eye for realism, perspective, lighting, and color.
By exploring these diverse Photoshop editing ideas, from subtle atmospheric enhancements to radical transformations, creators can unlock new levels of artistic expression and bring their unique visions to life. The journey of mastering Photoshop is one of continuous learning, experimentation, and creative exploration.