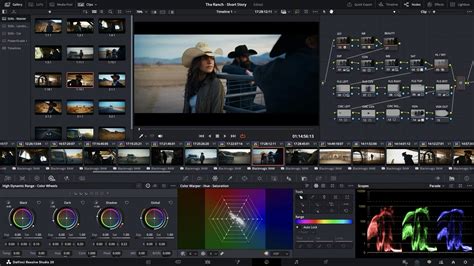
Ever needed to adjust just one specific part of your shot in DaVinci Resolve? Maybe make the sky more dramatic without affecting the landscape, or perhaps apply that classic blurred face effect for privacy? That’s exactly where Power Windows shine. They are an incredibly useful feature that allows for precise control over image adjustments, essential for targeted color grading and effects.
What Exactly Are DaVinci Resolve Power Windows?
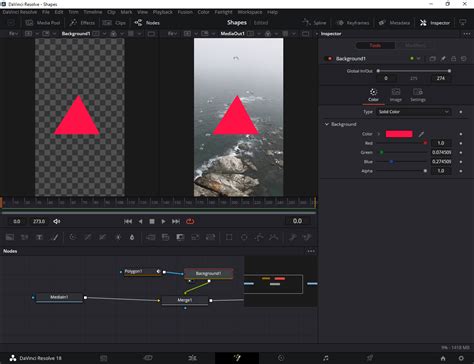
Think of Power Windows as sophisticated masks within DaVinci Resolve. They empower you to isolate specific areas of your image. Consequently, any color correction, grading, or effect you subsequently apply will only impact that precisely selected region. This capability grants you pinpoint control over your image adjustments, allowing for nuanced and professional-looking results.
As demonstrated in visual guides, common and highly effective uses for Power Windows include:
- Enhancing Specific Elements: This is a primary application. You can selectively boost the saturation or contrast of a vibrant sky, make a logo pop on screen, or bring out the details of a particular product in a commercial. The ability to isolate these elements means you can dramatically alter their appearance without disturbing the rest of the scene.
- Selectively Blurring or Obscuring Parts of the Frame: This is crucial for privacy and compliance. For instance, you might need to blur out faces of individuals who haven't given consent for their image to be used, or obscure license plates on vehicles to protect anonymity. Power Windows make this a straightforward process.
- Creating Vignettes or Targeted Lighting Effects: A vignette, which darkens the edges of a frame while keeping the center brighter, can draw the viewer's eye to the subject. Power Windows allow you to create these effects with much greater control and subtlety than a global adjustment. Similarly, you can simulate localized light sources or add subtle glows to specific areas.
The core principle is that Power Windows act as a stencil, defining where your edits will be applied. This granular control is what separates amateur edits from professional-grade color grading.
Power Windows in Davinci Resolve Free | Tutorial
Getting Started: The Window Types and Controls
DaVinci Resolve provides a versatile toolkit of Power Window shapes to get you started, all conveniently located within the ‘Window’ panel on the Color Page. These shapes offer a foundation for creating your masks, and they can often be combined or refined for more complex selections.
The five primary Power Window shapes available are:
- Linear: This is the most basic shape, offering a simple square or rectangle. It's perfect for masking out horizontal or vertical areas, or for creating clean, defined edges.
- Circle: As the name suggests, this shape allows you to create an ellipse or a perfect circle. It's ideal for isolating round objects or creating radial vignettes.
- Polygon: This tool is exceptionally useful for creating custom shapes with straight edges. You can click to define vertices, allowing you to precisely outline irregular objects or areas within your frame.
- Curve: For more organic and complex shapes, the Curve tool is indispensable. It lets you create custom shapes using smooth Bezier curves, enabling you to meticulously trace intricate outlines or create soft, feathered masks.
- Gradient: This shape generates a linear gradient mask. It's incredibly effective for simulating the effect of physical graduated filters, such as darkening the top of the frame to balance a bright sky with a darker foreground.
You have the flexibility to use these shapes individually for simple tasks, or you can combine multiple windows on a single node. This combination allows for the creation of highly complex and specific selections, enabling sophisticated masking workflows.
Once a Power Window is active, most common adjustments like its position, rotation, size, aspect ratio, and importantly, its softness (feathering), can be manipulated directly in the viewer window. These on-screen controls provide an intuitive way to shape and position your mask. If, for any reason, these on-screen controls disappear from view, you can easily re-enable them by clicking the dropdown menu located in the bottom-left corner of the viewer window.
Beyond the on-screen manipulation, the Window panel itself offers crucial options for refining your masks:
- Labeling: This is a highly recommended practice, especially when using multiple windows. Giving your windows descriptive names (e.g., "Sky," "Face 1," "Product Logo") makes it significantly easier to manage and identify them later, particularly in complex projects.
- Invert: This powerful option flips the selection. Instead of affecting the area inside the window shape, it affects everything outside it. This is incredibly useful for applying effects to the background while leaving a subject untouched, or vice versa.
- Subtract: This mode is particularly useful when you are combining multiple windows. It allows you to use one window to "cut out" a portion of another window's mask, creating more intricate and precise masking scenarios.
Making Power Windows Move: Tracking!
Since video is inherently a moving medium, your carefully crafted Power Windows often need to follow elements within the shot as they move. Fortunately, DaVinci Resolve’s built-in tracker is an exceptionally powerful and indispensable tool for this purpose. It automates the process of keeping your masks locked onto their intended subjects, saving you a tremendous amount of manual work.
To utilize the tracker:
- Navigate to the ‘Tracker’ panel: This panel is typically located near the Power Window controls on the Color Page.
- Ensure you’re in ‘Window’ mode: This mode specifically links the tracker to the active Power Window you’ve created.
- Select the Power Window you wish to track: Make sure the correct window is highlighted and active.
- Use the track forward/backward buttons: DaVinci Resolve offers intuitive buttons to initiate tracking forward through the clip or backward from the current frame.
However, tracking is not always perfect, and you may encounter issues. If you find your window is not sticking to the subject, several strategies can help:
- Adjust Parameters: The tracker has several parameters that can be adjusted. For simpler movements, you might find success by disabling tracking for certain axes like Pan, Tilt, Zoom, or Rotate. If your subject is moving in a very predictable way, disabling unnecessary tracking options can improve accuracy. You can also experiment with disabling the Perspective 3D tracking if it’s not needed.
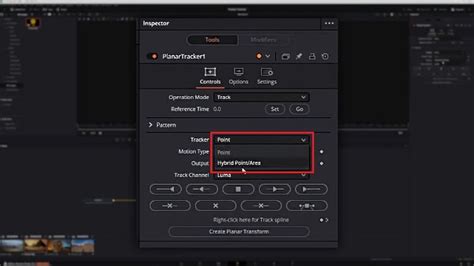
- Try Different Trackers: DaVinci Resolve offers more than one type of tracker. Experiment with the different options available:
- Point Tracker: This tracker analyzes the movement of a specific point within your selection.
- Window Tracker: This is the default and often the most effective for general object tracking.
- IntelliTracker: This is the most advanced tracker, using AI to analyze motion and identify trackable features. Experiment to see which tracker works best for your specific footage and the nature of the movement.
- Manual Keyframing: For particularly challenging sections of footage, where automatic tracking fails or becomes jittery, manual keyframing is your fallback. You can switch the tracker panel to ‘Frame’ mode. This mode allows you to manually adjust the window’s position, size, or shape frame-by-frame precisely where needed. By setting keyframes for these adjustments, you can ensure your mask stays perfectly locked onto the subject even through complex or erratic motion. This is more time-consuming but offers ultimate control.
Working with the Opposite: Outside Nodes
A common scenario in color grading involves wanting to apply an adjustment to everything except a specific area you've masked. For example, you might want to desaturate the background of a shot while keeping your subject in full color. While you could achieve this by selecting your subject with a Power Window and then clicking the ‘Invert’ button within the window settings, DaVinci Resolve offers a more elegant and often cleaner solution: the Outside Node.
An Outside Node is a special type of node that inherits the alpha (or mask) channel from the preceding node but automatically inverts it. This means that any grading or correction applied to the Outside Node will affect everything outside the mask defined by the previous node. This is incredibly useful for creating a wide range of effects without needing to invert your masks manually, which can sometimes lead to edge issues or confusion when managing multiple inverted masks.
There are two primary ways to create an Outside Node:
- Using a Shortcut: This is the fastest method. First, select the node that contains your Power Window. Then, press
Alt + Oon Windows orOption + Oon a Mac. This will instantly create a new node after the selected one and automatically set it up as an Outside Node. - Using the Menu: Alternatively, you can use the node menu. Right-click on the node that currently has your Power Window applied. From the context menu that appears, navigate to ‘Add Node’ and then select ‘Add Outside Node.’
Using Outside Nodes can streamline your workflow, particularly when dealing with complex grading tasks that require adjustments to both foreground and background elements independently. It keeps your node tree cleaner and your intentions clearer.
Bonus Tips for Custom Shapes: Polygon to Bezier
Sometimes, you might start by drawing a mask using the Polygon tool because it's quick and easy for creating straight edges. However, as you refine your grade or effect, you might realize that you need smoother, curved edges to better match the subject. DaVinci Resolve makes this transition seamless.
If you've begun with a Polygon shape and later decide you need curves, you don't have to start over. You can convert your existing polygon points into Bezier curves. Simply select the Polygon window, and you'll notice that the handles for the points can be manipulated to create smooth curves, much like the Curve tool itself. This allows for a flexible workflow where you can begin with a simpler shape and then iteratively refine it into a more complex and organic mask as your needs dictate. This feature significantly enhances the efficiency of creating custom masks, preventing the need to redraw complex shapes from scratch.