The world of professional printing often involves intricate processes and specific requirements to achieve a polished final product. One such crucial element, frequently misunderstood but vital for a flawless finish, is the concept of "print bleed." This article aims to demystify print bleed, explain its purpose, and guide you through its implementation in your design workflow, particularly within Adobe Photoshop, while also touching upon other relevant software and considerations.
What is Print Bleed?
In essence, a print bleed is the area outside a document that's trimmed after printing. It's an extension of your design - be it an image, background color, or graphic element - that goes beyond the intended final dimensions of your printed piece. This "extra" area is then cut away by professional printing equipment.
The primary reason for implementing a bleed is to account for the inherent tolerances within the printing and cutting process. Printers operate at high speeds, and even the most sophisticated machinery can experience slight misalignments. Without a bleed, these minor shifts could result in a thin, unsightly white border appearing on the edges of your finished product, detracting from its professional appearance. By extending your design into the bleed area, you ensure that even if the cut is not perfectly precise, the color or image will extend to the very edge of the trimmed document.
The necessity of bleed arises because no printer can print precisely to the edge of the substrate (the actual paper, vinyl, or other material being printed). Therefore, to achieve a seamless, edge-to-edge design, the artwork must extend beyond the final trim line.
Why is Print Bleed So Important?
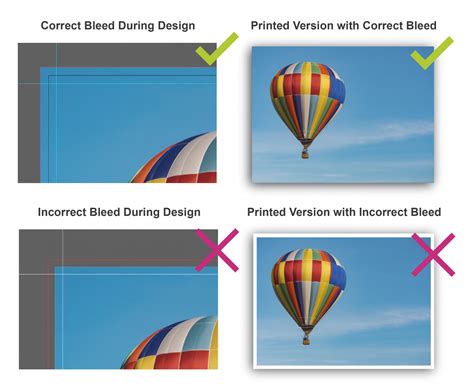
The importance of print bleed cannot be overstated, especially when aiming for professional-looking printed materials. If the printing bleed is done improperly, or not at all, your project can come out looking unprofessional, with parts of your design potentially chopped off in the wrong places.
Consider a business card design where a crucial element, like a logo or a distinct color, is intended to run to the edge. If a bleed isn't incorporated, and the cutting machine shifts even slightly, a sliver of white paper might appear where the design should be. This can make the entire card appear unfinished and carelessly produced. Conversely, with a properly set up bleed, that same slight shift in the cutting process would simply trim away a portion of the extended design, leaving the intended artwork intact and the card looking immaculate.
Bleeds in printing are essential because of the edges of your artwork and the paper matter. When you send in a design, you want to keep this in mind. Because things are printed and cut. The bleed area helps to give an accurate appearance to the finished piece. Bleed is when the color or image is taken outside the trim line. This means that when a stack of print is cut on the guillotine, it avoids having a thin white line visible as there can be slight movement within production. It is really important to take anything that is beyond the trim area to the full bleed dimensions.
Understanding Key Print Areas: Bleed, Trim, and Safe Zone
To effectively implement print bleeds, it's crucial to understand the different zones within a print-ready document:
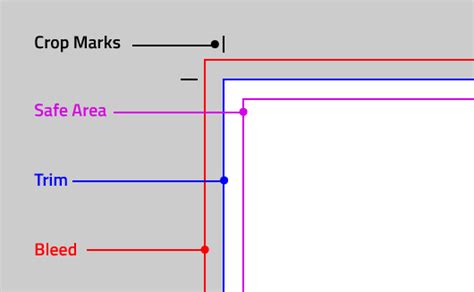
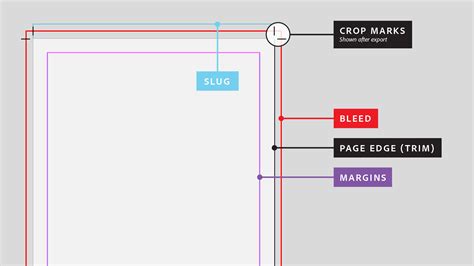
- Bleed Line/Trim Line: This is the intended final size of your document after it has been printed and trimmed. In many design programs, this is referred to as the "document size."
- Bleed Area: This is the extra area that extends beyond the trim line. It's where your design elements should extend to ensure they reach the edge of the final product after trimming.
- Safe Zone (or Margin): This is an area within the trim line where all critical design elements, such as text, logos, and important graphics, should be placed. Keeping these elements within the safe zone ensures they are not accidentally cut off during the trimming process. A common recommendation for a safe zone is a minimum of 5mm margin around the edges for best results. For business cards, a 5mm safe zone is often sufficient, while for larger formats up to A2, a margin of 10-15mm is advisable.
Standard Bleed Dimensions and Calculations
The specific bleed requirements can vary depending on the printer and the type of print job. However, a common standard for most print projects is a bleed of 3mm on each edge. In imperial measurements, this is often equivalent to ⅛ inch (0.125 inches).
When preparing your document, you need to increase the overall dimensions to include this bleed area. For example, if you are designing an 85mm x 55mm business card, you would add 3mm to each edge, resulting in a document size of 91mm x 61mm for printing.
Here's a chart illustrating common print sizes and their dimensions with a 3mm bleed:
| Document Type | Size in mm (WxH) | Size with 3mm Bleed (WxH) |
|---|---|---|
| A0 | 841 x 1189 | 847 x 1195 |
| A1 | 594 x 841 | 600 x 847 |
| A2 | 420 x 594 | 426 x 600 |
| A3 | 297 x 420 | 303 x 426 |
| A4 | 210 x 297 | 216 x 303 |
| A5 | 148 x 210 | 154 x 216 |
| A6 | 105 x 148 | 111 x 154 |
| A7 | 74 x 105 | 80 x 111 |
| Business Card | 85 x 55 | 91 x 61 |
| Pull Up Banner | 800 x 2000 | 806 x 2006 |
Important Note: Always check with your specific printer for their exact bleed requirements, as these can sometimes differ. Larger documents or specific finishing processes might necessitate a larger bleed area. For instance, wallpaper, wall vinyl, and wrap-around mounted prints might require a bleed of 20mm on all edges.
Implementing Bleed in Photoshop
While Adobe Photoshop is a powerful image editing tool, it's not always the most intuitive for setting up print documents with bleeds and crop marks compared to layout-focused software like InDesign or Illustrator. However, it is certainly possible with careful planning.
The core principle when working in Photoshop is to increase your document's dimensions to accommodate the bleed before you start designing.
Here’s a step-by-step approach:
- Determine Final Document Size and Bleed: Decide on the final trim size of your document and the required bleed (e.g., 3mm or 0.125 inches per edge).
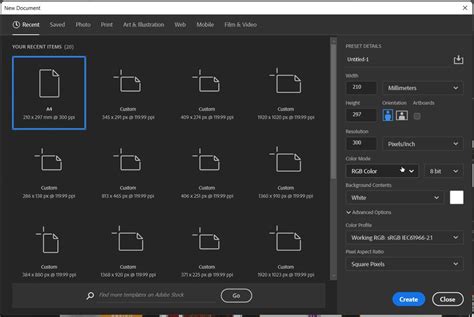
- Create a New Document with Bleed: When creating a new document in Photoshop (File > New), you need to add the bleed amount to both the width and height of your intended final size. For example, if your final business card size is 85mm x 55mm and you need a 3mm bleed on each side, your Photoshop document should be set to 91mm (85 + 3 + 3) x 61mm (55 + 3 + 3). Ensure your resolution is set to 300 dpi for printing.
- Add Guides for Trim and Safe Zones: Once your document is created, it's highly recommended to set up guides to visualize the trim line and the safe zone.
- For the Trim Line: Click on the top ruler and drag down a guide to represent the top edge of your final document. Do the same for the left ruler, dragging a guide to the left edge. These guides should align with the actual dimensions of your design, excluding the bleed. If your document canvas includes the bleed, you'll need to offset your guides inwards by the bleed amount. For instance, if your canvas is 91mm wide and your trim is 85mm, your left and right guides should be placed at 3mm and 88mm (91 - 3) respectively.
- For the Safe Zone: To create a safe zone, you'll need to add further guides inside the trim line. Using the example of a 5mm safe zone, drag guides inwards from the trim line by 5mm on all four sides.
- You can also use the "View > New Guide Layout" option to create columns and rows, which can be helpful for setting up consistent margins and guides.
How to Add Bleed in Photoshop
Adding Crop Marks in Photoshop (and Alternatives)
Adding crop marks directly within Photoshop for print can be a bit more cumbersome than in dedicated layout applications. While it's possible to manually create them or use specific actions, it's often more efficient to generate them during the export process or use alternative software.
Using the Print Dialog (for PDF Output):
One method to incorporate crop marks and bleed information when exporting from Photoshop is through the "Print" dialog, even if you're ultimately aiming for a PDF.
- Go to File > Print.
- In the Printer drop-down menu, select "Microsoft Print to PDF" (or a similar PDF printer).
- Navigate to the "Printing Marks and Bleeds" section.
- Check the "Corner Crop Marks" box.
- Some print presets or options might allow you to specify a bleed width here. Look for a "Bleed" button or setting and set the Width to your required amount (e.g., 3 millimeters).
- Click "Print". This will generate a PDF file with your design, including the crop marks and bleed.
Important Consideration: While this method can generate crop marks, it's generally recommended to use Adobe InDesign or Adobe Illustrator for professional print documents that require precise bleed and crop mark settings. These programs are designed for page layout and offer more robust control over these elements.
Using Other Design Software for Print
Adobe InDesign: InDesign is the industry standard for page layout and is ideally suited for print projects. When creating a new document (File > New > Document), you can directly input bleed and margin values in the "Document Setup" dialog box. You can set bleeds for the top, bottom, inside, and outside edges (usually 3mm or 0.125 inches). These settings are maintained throughout the document, and crop marks can be easily added when exporting to PDF (File > Export, choose Adobe PDF, and select "Marks and Bleeds" from the export options).
Adobe Illustrator: Similar to InDesign, Illustrator allows you to set bleed and margins during the initial document setup (File > New). You can specify bleed values for all sides. When saving as a PDF (File > Save As, select Adobe PDF), you can include crop marks and specify bleed settings under the "Marks and Bleeds" tab.
Microsoft Word: Word is generally not recommended for professional printing that requires precise bleed and crop marks. It offers limited control over output files, and achieving consistent bleed or adding crop marks is difficult or impossible. You may also encounter issues with image resolution.
Beyond the Basics: Considerations for Specific Products
While a standard 3mm or 0.125-inch bleed is common, some print products have unique requirements:
- Booklets and Folded Items: For projects that will be bound or folded, it's crucial to implement bleeds on the interior borders as well. This prevents an unfinished look where the fold occurs. Binding processes can cause printed sections to "creep," meaning they shift slightly, so adequate bleed is essential.
- Large Format Prints: As mentioned, larger documents like posters, banners, wallpaper, or wall vinyl often require a more substantial bleed area, sometimes up to 20mm or more, to accommodate the printing and finishing processes.
- Printer Spreads: In certain scenarios, like with magazines, a "printer spread" might be used. In such cases, you might only need to set up bleeds for the outside edges, though it's still good practice to consider them for inside edges. Magazine printers typically use templates that define precise bleed areas.
Final Thoughts on Bleed
Understanding and correctly implementing print bleeds is a fundamental skill for anyone involved in graphic design for print. It's a proactive measure that safeguards your designs against minor inaccuracies in the printing and cutting process, ensuring that your final product looks as professional and polished as you envisioned. While Photoshop can be used, leveraging the capabilities of InDesign or Illustrator for print-focused projects will generally lead to a smoother workflow and more reliable results. Always communicate with your printer to confirm their specific requirements, and remember that a well-executed bleed is an investment in the quality of your printed materials.
If you're looking for ready-made, print-ready resources, platforms like Envato offer a vast selection of templates for flyers, brochures, posters, and cards, many of which are pre-set with bleeds, saving you the hassle.