Creating a professional-looking booklet from within Adobe InDesign can seem like a complex endeavor, especially for those new to the process. However, with a clear understanding of the necessary steps and a bit of practice, it can become a seamless and rewarding experience. This in-depth guide will equip you with the knowledge and confidence to print booklets from InDesign, transforming your digital designs into tangible, high-quality publications. We will navigate the intricacies of setting up your InDesign document for booklet printing, meticulously adjusting text frames and images, understanding the crucial 'Print Booklet' feature, and ultimately, successfully printing your booklet. Furthermore, we will address common hurdles that may arise, such as paper jams or color inconsistencies, ensuring a smooth production process from start to finish. Whether you are a complete novice or a seasoned professional, this tutorial aims to provide the essential skills for a flawless booklet printing operation.
Phase 01: Setting Up Your InDesign Document for Booklet Printing
The foundational step in printing any booklet from InDesign lies in the proper imposition and setup of your document. This initial phase involves several key components: creating a new document, defining the page size, establishing margins, and incorporating bleeds. Additionally, the strategic application of master pages and styles is crucial for maintaining uniformity and efficiency throughout your booklet.
Creating a New Document
To embark on the journey of creating your booklet, begin by opening Adobe InDesign and navigating to File > New > Document. This action will present you with a dialog box where you can specify the fundamental parameters of your project. For booklet creation, it is imperative to ensure you have an even number of pages. This is because the printing process, particularly for saddle-stitched booklets, requires pages to be arranged in multiples of four. Select 'Facing Pages' to enable the side-by-side view of left and right-hand pages, which closely mimics the final printed spread and aids in layout design.
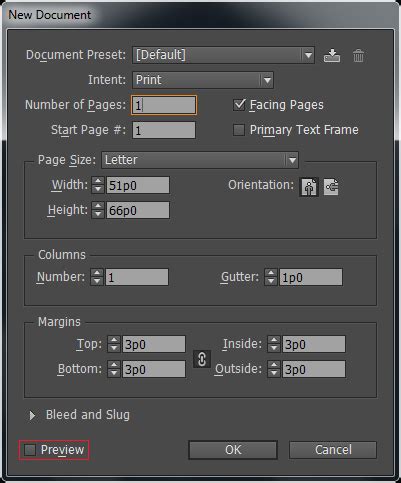
Next, you will need to choose your page size. For this project, we are focusing on creating a booklet where each page occupies half of a standard letter-sized paper. Therefore, select 'Letter - Half' for your 'Page Size', resulting in dimensions of 5.5 x 8.5 inches. To ensure correct orientation for your design, set the 'Orientation' to 'Portrait'. Under 'Number of Columns', select '1'. Once these initial settings are configured, click 'Create' to finalize the InDesign booklet setup and commence designing your document.
Setting Up Page Size, Margins, and Bleed
After the document is created, the subsequent critical step involves meticulously setting up your page size, margins, and bleeds. The page size should directly correspond to the final dimensions of your intended booklet. You can adjust this by going to File > Document Setup. Margins are essential for providing adequate breathing room around your content, preventing crucial elements from being too close to the edge and ensuring a clean, professional appearance.
Bleed is an indispensable element for professional printing. You should always supply artwork with at least 3mm (or 1/8 inch) of bleed on each edge. Bleed refers to the extra area extending beyond your document's trim line. While this area is ultimately trimmed off, it is vital for accommodating minor variations in the trimming process and guarantees that your images or background colors extend seamlessly to the very edge of your printed page, thus avoiding any unsightly white borders. For a visual understanding of why bleed is necessary and how to implement it, a dedicated video guide is highly recommended.
What are Slugs and Bleeds in Adobe Indesign
Applying Master Pages and Styles
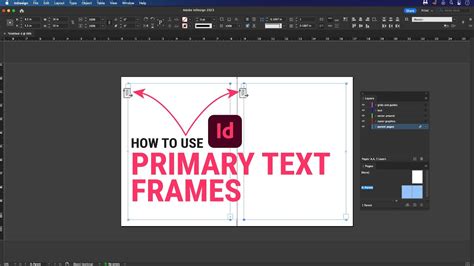
Master Pages in InDesign function as templates, ensuring consistency across all the pages of your booklet. They are non-printing pages that allow you to place elements like page numbers, headers, and footers, which will then automatically appear on all your document pages. To apply a master page, navigate to Window > Pages and then drag the desired master page onto your document pages.
Styles, on the other hand, are crucial for maintaining uniformity in text formatting. InDesign offers both Paragraph and Character styles, which can be accessed via Window > Styles. Applying these styles ensures that your typography remains consistent throughout the booklet, contributing significantly to its professional aesthetic. While master pages are a powerful tool, it's acknowledged that they can take some time to become fully accustomed to, as their intuitiveness can sometimes be a learning curve.
Phase 02: Prepare Your Content for Print
With your InDesign document meticulously set up, the next phase focuses on preparing your content for the printing process. This involves fine-tuning the placement and sizing of text frames and images, as well as utilizing InDesign's Preflight tool to identify and rectify any potential print errors. These steps are paramount to ensuring that your final printed booklet is polished and free from formatting issues.
Adjusting Text Frames and Images
Properly aligning text frames and images is fundamental to achieving a professional-looking booklet. To adjust text frames, select the 'Text Tool' from the toolbox, click on the text box, and then drag its corners to resize. For images, use the 'Selection Tool' to select the image and then drag its corners while holding down the 'Shift' key to maintain its original proportions. Ensure there is sufficient spacing between your text and images to create a clean and visually appealing layout.
Checking for Print Errors with the Preflight Tool
Before proceeding to the printing stage, it is highly advisable to run your document through InDesign's Preflight tool. This invaluable feature scans for potential issues that could compromise your final print, such as missing fonts, overset text (text that doesn't fit within its frame), or low-resolution images. You can typically find the Preflight indicator at the bottom of your screen; a green dot signifies no errors, while a red dot indicates that issues have been detected. Clicking on this dot will generate a detailed error report, allowing you to address any problems before creating your print-ready files.
Phase 03: Configure Print Settings
Once your content is prepared and ready, it's time to configure the print settings within Adobe InDesign. This crucial step ensures that your document is translated into a printable format that meets your specific requirements. The process involves selecting the 'Print Booklet' feature, customizing various print settings according to your printer's capabilities, and meticulously adjusting the print preview for the desired layout. These actions are vital to prevent any printing mishaps.
Selecting 'Print Booklet' from the File Menu
To initiate the booklet printing process, navigate to File > Print Booklet. This action will open the 'Print Booklet' dialog box, presenting you with options to select the type of booklet you are creating. For a standard booklet, the '2-up Saddle Stitch' option is generally most suitable. If you are designing a fold-out brochure or a pamphlet that requires a different binding method, 'Consecutive' types might be more appropriate. Carefully choose the option that best aligns with your design and intended output.
Configuring Print Settings and Choosing Your Printer
Within the 'Print Booklet' dialog box, click on 'Print Settings'. This will lead you to the standard InDesign print window. Here, under the 'Printer' dropdown menu, select the printer you intend to use. Next, define the 'Setup' for your document, specifying the orientation and paper size to match your design and the capabilities of your printer. It is essential that these settings accurately reflect your printer's physical specifications.
You may also need to select print marks, such as crop marks, under the 'Marks and Bleed' menu, if required for trimming. However, for a straightforward booklet where trimming is not a primary concern, it is often recommended to uncheck these marks to avoid unnecessary complexity.
Adjusting the Print Preview for Desired Layout
While still within the 'Print Booklet' dialog box, take advantage of the 'Preview' option, located in the left-hand column. This feature provides a visual representation of how your pages will be arranged and appear when printed and assembled. Scroll through the previewed spreads to meticulously check if the layout is as intended. This step is invaluable for spotting any layout mismatches or errors before committing to the printing process, thereby saving you time and resources. Pay close attention to the first and last spreads, ensuring they correctly represent your front and back covers.
Phase 04: Printing the Booklet
With your print settings finalized and the preview meticulously reviewed, it's time to execute the final stage: printing your booklet. This involves a final confirmation of all settings and initiating the printing process, which will bring your InDesign document to life in a physical format, representing the culmination of your design efforts.
Reviewing and Confirming Printing Settings
Before you hit the 'Print' button, a thorough review and confirmation of all your print settings is paramount. Navigate back to the 'Preview' tab on the left side of the 'Print Booklet' window. This will display a layout preview of your pages. The initial sheet should accurately depict your inside front cover and inside back cover. Double-check critical elements such as paper size, orientation, printer selection, and any other configurations you have made. If specific paper qualities or color accuracy are crucial for your project, pay extra attention to these settings.
Clicking 'Print' to Start the Process
Once you are completely satisfied with all the settings and the preview accurately reflects your desired outcome, it's time to click the 'Print' button. This action will send your prepared document to the printer, and the printing process will commence. The duration of the printing will naturally vary depending on the total number of pages in your booklet and the processing speed of your printer. Patience is key during this stage; await the emergence of your newly printed booklet.
Phase 05: Troubleshooting Common Printing Issues
Despite meticulous planning and careful execution, encountering printing issues is not uncommon. These can range from frustrating paper jams and misalignment to color discrepancies or font inconsistencies. Instead of succumbing to panic, it's essential to approach these problems systematically and with a clear mind. Here, we will address two of the most frequent printing-related challenges and offer potential solutions.
Addressing Paper Jams or Misalignment
Paper jams or misalignment can abruptly halt your printing process. If a jam occurs, carefully and gently remove the jammed papers without causing any damage to your printer's internal mechanisms. For issues related to misalignment, ensure that the paper is correctly loaded into the paper tray and that the printer settings precisely match the actual paper size being used. Consulting your printer's user manual can often provide specific troubleshooting steps tailored to your particular printer model.
Fixing Colour and Font Issues
Color discrepancies can arise from a mismatch between your screen's display and the printer's output. To mitigate this, always ensure you are working in the appropriate color mode for printing, which is typically CMYK, and that your printer's color settings are correctly configured. For font-related problems, verify that all fonts used within your InDesign document are installed on your system and are properly embedded within your file. If you encounter persistent font issues or color inaccuracies, exporting your InDesign document as a high-resolution PDF and printing from Adobe Acrobat can often resolve these problems.
Alternative PDF Export Method for Printing
While the 'Print Booklet' feature is robust, there's an alternative method that some find more straightforward, particularly when dealing with specific printer requirements or when aiming for maximum control. This involves exporting your InDesign document as a PostScript (.ps) file and then using Adobe Acrobat Distiller to convert it into a high-quality PDF.
To do this, go to File > Export in InDesign and select 'PostScript File' from the 'Format' menu. Once the .ps file is generated, you can directly drag and drop it into Adobe Acrobat Distiller. This allows for greater control over the PDF's quality by enabling you to select a specific PDF profile or even build your own. It's important to note that the default "standard" setting in Distiller might not always produce the highest resolution, and dragging a .ps file directly into Adobe Reader or Acrobat Pro might utilize this less optimal setting.
This direct PostScript to PDF workflow can be particularly beneficial for achieving perfect margins and avoiding the time-consuming task of trying to figure out how to print your booklets flawlessly. Moreover, if you make a mistake during manual duplexing (double-sided printing), this method makes it easier to re-print specific pages.
Leveraging Templates and Book Files
For those new to creating books in InDesign, utilizing pre-designed templates can be an immense advantage. Templates often come with pre-configured settings for page numbers, sections, and master pages, significantly reducing the initial setup time and complexity. Book cover templates are also excellent resources for designers looking to hone their cover design skills.
When working with longer book projects, InDesign's 'Book Files' feature can streamline your workflow. A Book File allows you to manage multiple InDesign documents (typically chapter files) as a single unit. This makes it easier to make global changes, such as updating page numbering or styles, across your entire book. To create a Book File, go to File > New > Book in InDesign. Once the Book File is created, you can add your individual InDesign chapter files to it from the 'Book' panel's main menu by choosing 'Add Document'.
Setting Up Page Numbering
Correctly setting up page numbering is crucial for any book. Within your Book File or a single InDesign document, you can define how your page numbering will function. For instance, you might want page 1 to begin at the start of your first chapter. This can be achieved in the 'New Section' window by checking 'Start Page Numbering at' and setting the desired number. You can also implement different numbering styles, such as using Roman numerals for introductory sections. To do this, again in the 'New Section' window, check 'Start Page Numbering at' and set the starting number.
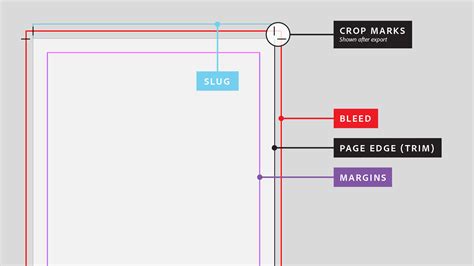
Understanding Print-Specific Elements: Bleeds, Margins, and Trim
When preparing your InDesign document for professional printing, it's vital to understand the roles of bleeds, margins, and the trim line.
Bleed: Represented by the red line in your InDesign document, the bleed area extends beyond the trim line. Any background art or elements that you want to extend to the very edge of the finished page must reach this red line. This ensures that when the page is trimmed, there will be no unprinted white edges.
Margins: Indicated by the purple line, margins define the safe area within which your critical text and artwork should be placed. Artwork placed outside this margin is at risk of being trimmed. Some printers may add extra space in the spine area to ensure critical art remains easily readable, especially in perfect-bound books.
Trim: This is the white area of your document, representing the final size of your page after it has been cut. The trim line indicates where the edge of the paper will be cut.
Print Books: Enduring Appeal and Formats
Despite the rise of eBooks, print books continue to hold significant appeal within the publishing market. For traditionalists and enthusiasts alike, the tactile experience of a print book remains a powerful draw. The most common and cost-effective print format is the paperback (or softcover), offering excellent value for self-publishers. Hardcover books, while more expensive to produce, can command a higher retail price. Standard print sizes are often dictated by genre and are designed to fit comfortably on bookstore shelves, also serving as an implicit indicator of the book's content to the reader. The choice of paper stock significantly impacts the book's weight and the thickness of its spine. Heavier paper stock results in a weightier book and a wider spine.
Typesetting and Cover Design
Typesetting is the art and science of arranging text on the inside pages of a book. While it can be a specialized skill, learning the basics of typesetting is achievable. Developing a keen eye for selecting appropriate fonts is crucial. Many typesetters favor classic serif typefaces for their readability and traditional appeal.
The cover of a book is its visual introduction, and the creativity and diversity in book cover designs are truly inspiring. Resources like Pinterest and the Book Cover Archive offer a wealth of inspiration for book cover design.
Final Export for Professional Printing
When your InDesign document is finalized and you are ready to send it for professional printing, the final step is to export it as a high-quality PDF. Navigate to File > Export in InDesign and select 'Adobe PDF (Print)' from the 'Format' menu. It is often recommended to export your cover and inside pages as separate PDF files. When exporting, pay close attention to compression settings. To avoid unnecessary quality loss, turn off all compression settings unless your images possess exceptionally high resolution. For print, an ideal resolution is 300 pixels per inch (ppi), though up to 400 ppi/dpi is generally acceptable. In the 'Output' tab, if your images are in CMYK color mode, choose 'No Color Conversion.' If they are in RGB, select 'Convert to Destination (Preserve Numbers)' and then choose an appropriate output profile, such as 'Japan Color 2001 Coated' for coated paper or 'Japan Color 2001 Uncoated' for uncoated paper.
Frequently Asked Questions
Can I print double-sided booklets in InDesign?
Yes, Adobe InDesign fully supports double-sided, or duplex, printing. During the print settings configuration, under the 'Printer' options, select 'Two-Sided' and then choose 'Short-Edge binding' for a standard booklet. This ensures your booklet is printed on both sides of the paper.
How do I make an A4 booklet in InDesign?
Creating an A4 booklet follows the same general procedure as any other booklet. The primary difference lies in setting the page size. When creating your document or going to File > Document Setup, select 'A4' from the available page size options. The subsequent steps for layout, printing, and configuration remain consistent with the guide provided.
What do I do if my printer isn't supported in InDesign?
If your printer is not directly supported or recognized by InDesign, a reliable workaround is to export your InDesign document as a PDF file. You can then print this PDF using your printer's dedicated software. Utilizing a PDF also provides a portable and universally compatible version of your booklet, which can be easily shared or printed at any time and from any compatible device.