The journey of a digital photographer often involves a deep dive into the realm of post-processing, transforming raw captures into compelling visual narratives. For many, the initial encounter with sophisticated editing software like Adobe Photoshop can seem daunting. However, with a structured approach and an understanding of the fundamental tools, even the most complex workflows become manageable. This tutorial aims to demystify the process of working with camera raw files in Photoshop, guiding you from the initial capture to the final polished image.
The Power of Raw: Understanding the Digital Negative
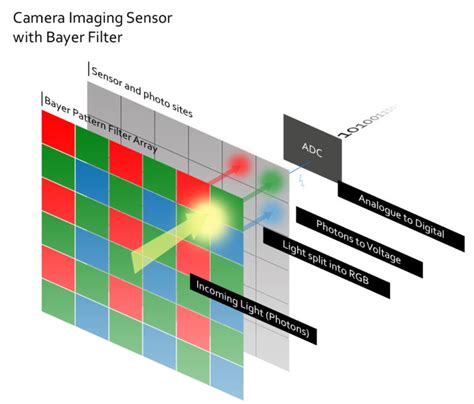
At the heart of high-quality digital photography lies the raw file. Unlike JPEGs, which are processed and compressed by your camera's internal software, raw files are essentially unprocessed data directly from the camera's image sensor. Think of a camera raw file as your photo negative; it contains all the captured information, offering immense flexibility for post-processing. This preservation of camera raw data is crucial for achieving the best possible image quality.
Digital cameras capture and store camera raw data with a linear tone response curve (gamma 1.0). This is distinct from how both film and the human eye perceive light, which have a nonlinear, logarithmic response (gamma greater than 2). By working with raw files, you retain the full dynamic range and color information captured by your sensor, allowing for more extensive adjustments to exposure, white balance, and color without introducing artifacts or losing detail.
Different camera models save camera raw images in many different formats, and the data must be interpreted differently for these formats. Common proprietary raw file extensions include NEF (Nikon), CR2 (Canon), ARW (Sony), and others. However, the advent of the Digital Negative (DNG) format has provided a standardized solution. The DNG format is a non-proprietary, publicly documented, and widely supported format for storing raw camera data. Hardware and software developers use DNG because it results in a flexible workflow for processing and archiving camera raw data. Because DNG metadata is publicly documented, software readers such as Camera Raw do not need camera-specific knowledge to decode and process files created by a camera that supports DNG. If support for a proprietary format is discontinued, users may not be able to access images stored in that format, and the images may be lost forever. You can convert camera raw files to the DNG format by using the Adobe DNG Converter or the Camera Raw dialog box.
Introducing Adobe Camera Raw: Your Gateway to Raw Processing
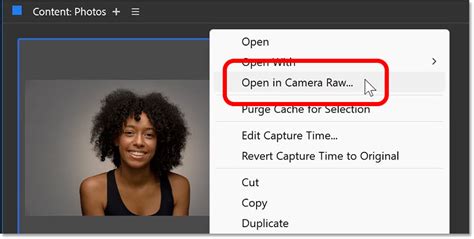
Adobe Camera Raw (ACR) is a powerful plug-in that serves as the primary interface for processing raw files within Photoshop, After Effects, and Adobe Bridge. When you open a raw file directly in Photoshop, it automatically launches the Camera Raw dialog box. This application allows you to make critical adjustments before the image is even fully loaded into Photoshop, ensuring that you are working with the best possible starting point.
You can open camera raw files in Camera Raw from Adobe Bridge, After Effects, or Photoshop. Using Adobe Bridge, you can apply, copy, and clear image settings, and you can see previews and metadata for camera raw files without opening them in the Camera Raw dialog box. This capability is invaluable for quickly culling and organizing your raw files. You can modify the default settings that Camera Raw uses for a particular model of camera. For each camera model, you can also modify the defaults for a particular ISO setting or a particular camera (by serial number).
When you use Camera Raw to make adjustments (including straightening and cropping) to a camera raw image, the image’s original camera raw data is preserved. The adjustments are stored in either the Camera Raw database, as metadata embedded in the image file, or in a sidecar XMP file (a metadata file that accompanies a camera raw file). This non-destructive workflow is a cornerstone of modern digital editing, allowing you to revisit and alter your edits at any time without degrading the original image data.
Camera Raw supports images up to 65,000 pixels long or wide and up to 512 megapixels, catering to the needs of even the most demanding professional workflows.
Navigating the Camera Raw Interface: Essential Tools and Panels
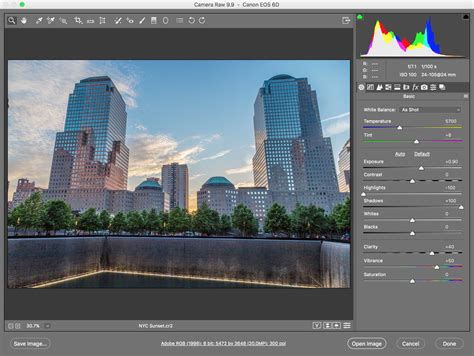
The Camera Raw dialog box presents a comprehensive set of tools and panels designed for precise image control. The interface is broadly divided into several key areas: the image preview, the toolbar, and the adjustment panels.
The Basic Panel: Foundation of Your Edits
The 'Basic' panel is where you'll make most of your fundamental adjustments. This panel provides sliders for:
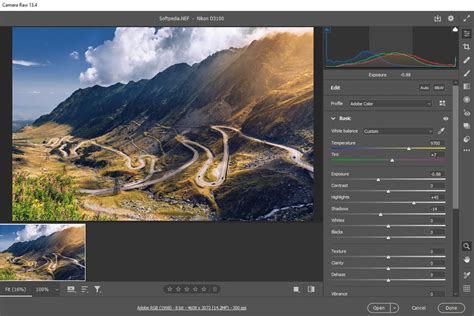
- White Balance: Correcting the color cast of your image to ensure whites appear truly white and colors are rendered accurately. You can select a preset, use the eyedropper tool to click on a neutral area in the image, or manually adjust temperature and tint.
- Tone Adjustments:
- Exposure: Controls the overall brightness of the image.
- Contrast: Adjusts the difference between the darkest and brightest areas.
- Highlights: Recovers detail in overexposed bright areas, such as the sky.
- Shadows: Reveals detail in underexposed dark areas.
- Whites: Sets the white point of the image.
- Blacks: Sets the black point of the image.
- Presence Adjustments:
- Texture: Enhances or softens details in the mid-tone range.
- Clarity: Adds localized contrast, making details "pop." This is distinct from global contrast and can be used to add punch to textures or subjects.
- Dehaze: Removes atmospheric haze or fog, or conversely, can be used to add a moody atmospheric effect.
- Vibrance: Intelligently boosts the saturation of less-saturated colors, protecting skin tones and preventing over-saturation.
- Saturation: Increases the intensity of all colors equally.
When you use Camera Raw to make adjustments, the image’s original camera raw data is preserved. The adjustments are stored separately. You can modify the default settings that Camera Raw uses for a particular model of camera. For each camera model, you can also modify the defaults for a particular ISO setting or a particular camera (by serial number).
Beyond the Basics: Fine-Tuning with Specialized Panels
Once your basic adjustments are in place, you can delve into more specialized panels for refined control:
- Detail Panel: This panel houses controls for Sharpening and Noise Reduction. The Sharpness slider adjusts the image sharpness to provide the edge definition you want. The Sharpness adjustment is a variation of the Adobe Photoshop Unsharp Mask filter. This adjustment locates pixels that differ from surrounding pixels based on the threshold you specify, and increases the pixels’ contrast by the amount you specify. When opening a camera raw file, the Camera Raw plug‑in calculates the threshold to use based on the camera model, ISO, and exposure compensation. The Detail tab contains controls for reducing image noise-the extraneous visible artifacts that degrade image quality. Image noise includes luminance (grayscale) noise, which makes an image look grainy, and chroma (color) noise, which is visible as colored artifacts in the image.
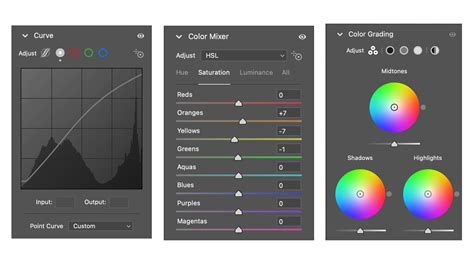
- Color Grading Panel: This panel allows for precise color adjustments using color wheels for Shadows, Midtones, and Highlights, enabling sophisticated color toning.
- Optics Panel: Here, you can remove chromatic aberration or correct for lens distortion and vignetting. Checking "Enable Profile Corrections" will automatically apply corrections based on your camera and lens profile, often removing unwanted distortions and vignetting.
- Geometry Panel: This panel is dedicated to perspective and level corrections, allowing you to straighten tilted horizons or correct converging vertical lines. You can also adjust the aspect ratio and angle here.
- Effects Panel: Offers creative effects like grain and vignette.
- Calibration Panel: This panel allows you to adjust how the camera's raw data is interpreted, often used for advanced color work. A Process Version is a method of deciphering the raw file format. The default version used is Process Version 2012. This method of deciphering the raw file format provides you with ways to work with the most recent and improved features in the raw file format. Photoshop Elements contains three Process Versions (one current, and two legacy versions). When you open a raw file that has not been opened in an earlier edition of Photoshop Elements, the default Process Version 2012 is used. To check the Process Version applied to your raw image, in the Camera Raw dialog box, click the Camera Calibration tab. Yes. Process Version 2012 enables you to work with the latest enhancements in the raw format. However, if you have many raw images that were opened with previous editions of Photoshop Elements (and hence using older Process Versions), you may choose to apply an older Process Version to your newer raw images. In Process Version 2012, the Color Detail slider has been introduced. In Process Version 2012, Luminance Detail and Luminance Contrast have been added.
Presets and Profiles: Streamlining Your Workflow
Camera Raw offers a vast library of presets and profiles that can be applied to your images to achieve specific looks quickly. You can also save your own custom settings as presets for future use. To apply the same adjustments to other images later, save the settings as a preset. To save the adjustments as the defaults to be applied to all images from a specific camera model, a specific camera, or a specific ISO setting, save the image settings as the new Camera Raw defaults. Access and browse through Premium presets for Portraits for different skin tones, Cinematic, Travel, Vintage, and more. You can also find your User Presets here.
Step-by-Step Processing Workflow Example
Let's walk through a typical raw processing workflow using the provided information, focusing on transforming an underexposed image with dull colors.
1. Initial Assessment and Basic Adjustments
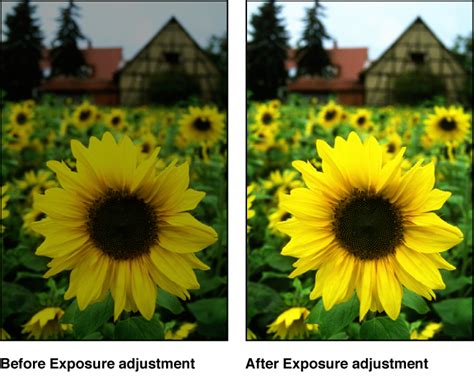
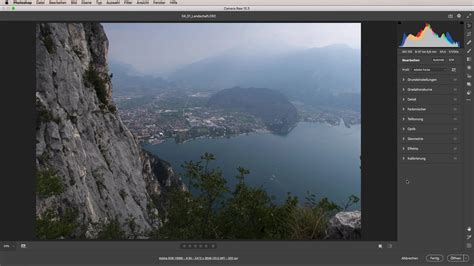
When you open a camera raw file, Photoshop automatically opens the Adobe Camera Raw dialog. At first glance, you may think this image can’t be saved because it’s too dark. But digital cameras retain more information in shadows than in highlights. It’s best to expose for the highlights and let shadows be dark. In the settings on the right, start by dragging the Shadows slider to the right. Notice the dark areas get brighter. The image could still be brighter, so let’s adjust the Exposure (which is an overall brightness). That’s better, but the highlights in the sky could stand to be a bit darker. The colors are a bit dull.
2. Enhancing Tone and Color
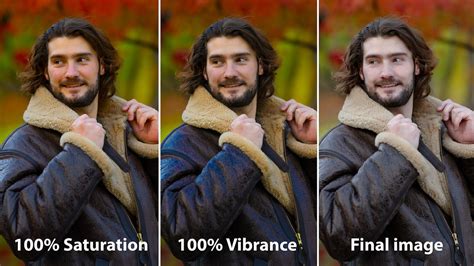
Now, let's address the dull colors. What’s the difference between Vibrance and Saturation? They both adjust color saturation, but in slightly different ways. Vibrance is a bit more subtle and can be more natural. Sometimes Saturation can oversaturate colors in an unrealistic way. But feel free to compare them and see which one you like better. In the Basic panel, dial in about +50 units of Saturation to give this image a little bit of life. You can also enhance the lower saturated colors by adjusting the Vibrance slider (+25 units). If the color relationships in your image don’t quite look right, you can refine them by going to the “HSL or Hue, Saturation and Luminance” panel. For instance, reduce the orange and yellow hue sliders to about -25 to produce a richer sunrise without affecting the cooler hues.
3. Adding Localized Contrast and Detail
Camera Raw has a great adjustment called Clarity. It adds contrast, but localized around specific details. It can really add punch to an image when used properly (don’t overdo it). As you watch the image, drag the Clarity slider to the right. This can really bring out details in textures like stones or foliage.
4. Lens Corrections and Chromatic Aberration Removal
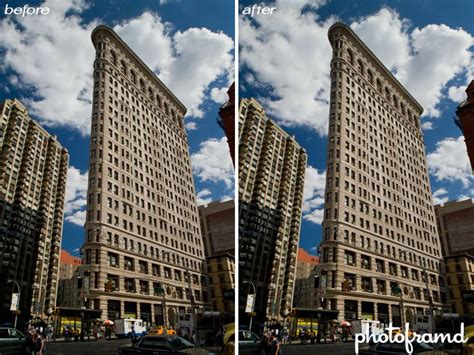
This image was shot at 24mm. Lens distortion is common at this focal length, but Camera Raw can compensate for that! Above all the settings on the right is a row of tabs. Check on Enable Profile Corrections. Notice the distortion is removed. How did Camera Raw know how to do that? Notice under Lens Profile it lists the specific camera and lens used for this photo. Camera Raw contains a large database of popular cameras and lenses so it knows how to counteract the right amount of lens distortion for each. The camera wrote this information into the RAW file. Adobe Camera Raw reads that info and refers to its database so it knows what to do.
On the far right side of the photo, there’s part of a building that’s mostly cut off. Click on that building a few times to zoom in. The edges of the buildings have pronounced green and magenta coloring. These are called chromatic aberrations. Depending on the camera and lens combination, these aberrations may be extreme, or so subtle you may not even notice them. Check on Remove Chromatic Aberration, and notice the green and magenta are mostly gone from the edges.
5. Cropping and Straightening
Use the Crop Overlay tool to straighten horizons or recompose your image. You can also use the Straighten tool to realign an image vertically or horizontally by clicking and dragging along a line that should be vertical or horizontal. Adjust the Aspect Ratio and Angle as needed.
6. Saving Your Adjustments and Opening in Photoshop
Once you are satisfied with your adjustments in Camera Raw, you have several options:
- Open Image or OK: Opens copies of the camera raw image files (with the Camera Raw settings applied) in Photoshop or After Effects. The original camera raw image file remains unaltered. Press Shift while clicking Open Image to open the raw file in Photoshop as a Smart Object.
- Save Image: Applies the Camera Raw settings to the images and saves copies of them in JPEG, PSD, TIFF, or DNG format. Press Alt (Windows) or Option (Mac OS) to suppress the Camera Raw Save Options dialog box and save the files using the last set of save options.
Regardless of which you choose, your Camera Raw edits are saved into a metadata file (called yourfilename.xmp) alongside the original RAW file (yourfilename.cr2). If you open the RAW file later, your changes will still be there. If at any point you don’t like the changes you have made in Camera Raw, you can revert an image back to the default settings. In the Camera Raw dialog, on the right side of the tabbed settings area, go to the panel menu and choose Reset Camera Raw Defaults.
Advanced Techniques and Workflow Integration
Camera Raw Power, Now as Layers! (Photoshop Update)
The true power of raw processing lies in its integration with other editing tools and advanced techniques. While Camera Raw handles the foundational adjustments, Photoshop itself offers a vast array of tools for further refinement.
Leveraging Nik Collection for Selective Edits
Many photographers integrate specialized plugin suites like the Nik Collection into their workflow for more targeted adjustments. For instance, Viveza within Nik Collection allows for selective light and color adjustments using control points. You can add control points to specific areas, such as shadows on stones, to increase structure and reveal details, or add contrast to make them pop. Similarly, Color Efex Pro offers a wide range of filters for global or local color effects, contrast enhancements, and tonal adjustments. Presharpener can be used for selective sharpening, and Dfine for targeted noise reduction.
The Role of Adobe Bridge and DNG Converter
Adobe Bridge plays a crucial role in managing raw files. It allows you to preview images, view metadata, and even apply and synchronize settings across multiple raw files without opening them in Camera Raw. This is particularly useful for batch processing. As mentioned earlier, the Adobe DNG Converter is essential for converting proprietary raw files to the DNG format, ensuring broader compatibility and long-term archival integrity.
Understanding Process Versions
Photoshop Elements contains different Process Versions (e.g., Process Version 2012) which are methods of deciphering the raw file format. The default version, Process Version 2012, enables you to work with the latest enhancements. However, if you have older raw images processed with earlier versions, you might choose to apply an older Process Version for consistency.
Final Touches and Output
After initial processing in Camera Raw and further refinement in Photoshop or with plugins, you'll often save your work as a TIFF file for maximum quality. You can then open this TIFF file back in Lightroom or Photoshop for final touches, such as applying a signature or making minor white balance adjustments. Finally, you'll save the image in your desired output format, such as JPEG, for web sharing or printing. Remember that whatever software you use for post-processing, nothing can fix a badly composed image. Hence, post-processing is a means to extract the most out of your image but that starts with the image itself. Hence, spend more time honing your photography skills, to begin with, and in parallel take baby steps towards learning post-processing.
By understanding and utilizing the tools within Adobe Camera Raw, you unlock the full potential of your digital camera, transforming raw data into stunning photographic art.
tags: #processing #raw #files #in #photoshop