Procreate, a powerful digital art application, offers a wealth of features designed to empower artists of all levels. Among these essential tools is the ability to control layer opacity, a fundamental technique for achieving depth, subtle effects, and sophisticated compositions. Whether you're a seasoned digital painter or just beginning your Procreate journey, understanding how to manipulate layer opacity is a crucial skill. This guide will delve into the various methods for adjusting layer opacity in Procreate, ensuring you can effectively integrate this technique into your creative workflow.

The Significance of Layer Opacity in Digital Art
Opacity, in the context of digital art, refers to the degree to which a layer is transparent or opaque. A layer with 100% opacity is fully solid, while a layer with 0% opacity is completely invisible. By adjusting the opacity between these extremes, artists can achieve a multitude of effects. Lowering opacity can soften the intensity of colors, create subtle overlays, or allow underlying layers to show through, adding depth and dimension. Conversely, increasing opacity makes a layer more prominent and solid.
For designers, crafters, and creatives, knowing how to change opacity in Procreate is one of the most useful tools. It allows for the creation of unique designs, the conversion of hand-drawn images into digital works for online profiles, and the seamless integration of various artistic elements. For instance, when digitizing drawings, an artist might import a photo of a sketch, create a new layer over it, and begin digitally sketching their artwork. In this process, the ability to lower the opacity of the photo layer whenever needed is invaluable for refining linework and detail.
Method One: Utilizing the Layers Panel Opacity Slider
Procreate provides a direct and intuitive way to adjust layer opacity through its dedicated Layers Panel. This method is straightforward and accessible, making it an excellent starting point for new users.
To begin, open your Procreate canvas, which may contain your existing artwork, photo, drawing, or imported file. The first step is to access the Layers Panel. This is typically done by tapping on the Layers icon, which is usually located in the upper right corner of the screen. It's often depicted as a stack of squares and is the second icon from the right.
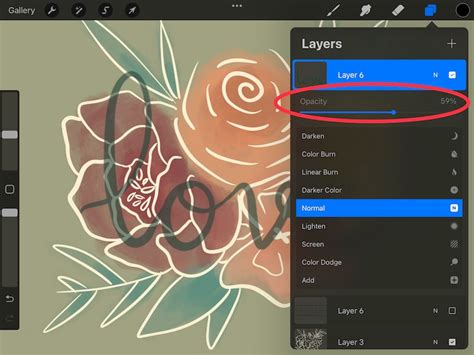
Once the Layers Panel is open, you will see a list of all the layers that constitute your canvas. At the top of this panel, you will notice a Procreate Layer Opacity Slider, which is initially set to 100%. This slider is your primary tool for controlling the transparency of the currently selected layer.
To decrease the opacity of a layer, simply tap and drag this slider to the left. As you drag, you will observe the selected layer becoming progressively more transparent. Conversely, dragging the slider to the right will increase the opacity, making the layer more solid. You can change the layer opacity in Procreate according to your needs, allowing for precise adjustments to achieve your desired visual outcome. After making your adjustments, you can close the blending modes by tapping on the "N" again. Each layer in Procreate has these options available, and you can revisit and edit them at any time.
This method is particularly useful when working with imported designs. Each imported design, if you wish to change its opacity independently, needs to be placed on its own layer. This ensures that you can isolate and adjust the transparency of individual elements without affecting others.
Method Two: The Tap and Slide Gesture
Procreate is renowned for its gesture-based controls, and adjusting layer opacity is no exception. The "Tap and Slide" method offers an alternative, often quicker, way to manipulate layer transparency, leveraging Procreate's intuitive gestures.
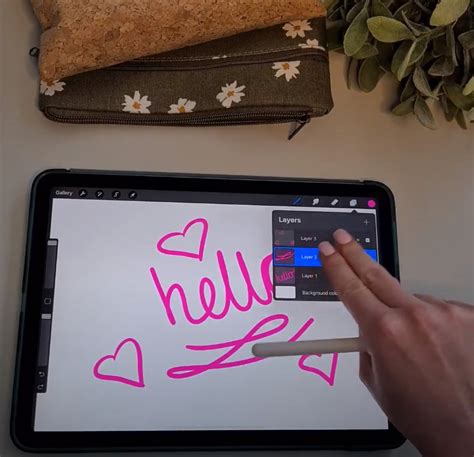
To employ this method, navigate back to the Layers Panel. Instead of tapping the "N" icon, you will perform a two-finger tap directly on the layer you wish to modify. Upon executing this gesture, your screen will dynamically change, displaying the opacity strength prominently at the top.
With the opacity control now visible, you can use your finger or Apple Pencil to tap and slide. Sliding to the left will decrease the layer's opacity, making it more transparent. Sliding to the right will increase the opacity, rendering the layer more opaque. This gesture-based approach allows for fluid and rapid adjustments, enabling you to freely adjust the opacity as needed.
This method is an excellent example of working smarter within Procreate. For those who prefer a more tactile and gesture-driven experience, the Tap and Slide method can be an easier and more efficient option for changing layer opacity. A comprehensive visual and in-depth guide on how to use gestures in Procreate can further enhance your understanding and mastery of these powerful controls.
Adjusting the Opacity of Multiple Layers: Grouping and Flattening
Often, an artist may need to adjust the opacity of several layers simultaneously to achieve a cohesive effect. Procreate offers a solution for this by allowing you to group and then flatten multiple layers. It's important to note that flattening is a destructive process, meaning it cannot be undone once performed. Therefore, it's advisable to ensure you are satisfied with your layers before proceeding with flattening.
To group multiple layers, begin by tapping on the first layer you want to include in the group. This will select it. Then, for each subsequent layer you wish to add, slide your finger or pencil from left to right across the layer. This action will highlight the layer in blue, indicating it has been selected. Continue this process for all the layers you intend to group.
Once all desired layers are selected, tap the "Group" option, which is typically found at the top right of the Layers Panel. This action will bundle the selected layers into a single, organized group, which can then be managed as one unit.
After grouping, if you need to adjust the opacity of all elements within that group as a single entity, you will need to flatten the group. To do this, tap twice on the newly created grouped layer. This action will open a small contextual menu. Within this menu, select the "Flatten" option. The grouped layer will now be consolidated into one single layer. You can then adjust the opacity of this flattened layer, and the change will affect all the elements that were originally part of the group.
This technique is particularly useful when you have multiple elements that need to function as a unified visual component, such as parts of a background or intricate design elements that you want to fade or blend together.
HOW TO USE LAYERS IN PROCREATE FOR BEGINNERS: Procreate Tutorial for Artists✨
Advanced Opacity Control: Selection and Cut & Paste
For more granular control over which parts of a layer have their opacity adjusted, Procreate offers a method involving selections. This advanced technique allows you to isolate specific areas of your artwork and then manipulate their transparency independently.
First, locate the "S" or Selection icon in the upper left corner of the Procreate menu. Tapping this icon activates the selection tools. Based on the nature of your artwork, drawing, photo, or file, you can choose from various selection shapes. Common options include rectangular, oval, freehand, or automatic selections. For instance, if your artwork has a distinct rectangular shape, choosing the rectangular selection tool would be appropriate.
After making your selection, you can perform actions such as cutting, copying, or duplicating the selected area. A particularly useful function for opacity control is the "Cut & Paste" option. When you swipe down with three fingers on the canvas, a Copy & Paste menu appears, offering actions like Cut, Copy, Copy all, Duplicate all, and Cut & Paste. Selecting "Cut & Paste" will create a new layer containing only your selected area.
Once this selected area is on its own new layer, you can then adjust its opacity using the methods described previously. By clicking on the "N" to open the blending modes for this new layer, you'll find the opacity slider. Sliding this slider to the left will reduce the opacity of your selection, and sliding to the right will increase it. This allows you to precisely control the transparency of specific parts of your artwork, creating sophisticated layering and blending effects.
This method provides a powerful workaround for situations where you might want to adjust the opacity of only a portion of a layer, offering a level of control that goes beyond simply adjusting the entire layer's transparency.
Integrating Opacity Control into Your Workflow
Understanding and implementing layer opacity adjustments in Procreate can significantly enhance your artistic output. It's a versatile tool that can be applied in numerous creative contexts.
For those working with digital brushes and textures, adjusting the opacity of a brush layer can create softer, more nuanced strokes. When applying textures or patterns, lowering their opacity allows them to blend more subtly with the underlying artwork, adding depth without overwhelming the composition.
In the realm of photo manipulation or composite imagery, opacity is paramount. Artists can layer multiple images, adjusting the opacity of each to create seamless and believable scenes. This is essential for techniques like digital collage or creating atmospheric effects.
Furthermore, the ability to adjust opacity is invaluable when working with color palettes. By layering semi-transparent color washes, artists can develop complex color harmonies and achieve subtle tonal shifts. This can be particularly useful when trying to achieve specific lighting conditions or moods within an artwork.
For digital illustrators and concept artists, opacity control is a staple. It aids in refining linework, developing shading, and building up forms gradually. The process of sketching, then inking, and finally coloring often involves multiple layers, each benefiting from precise opacity adjustments.
Final Thoughts on Opacity Mastery
Mastering layer opacity in Procreate is a straightforward process that can be quickly and easily integrated into your creative toolkit. By familiarizing yourself with the Layers Panel Opacity Slider and the Tap and Slide gesture, you gain immediate control over transparency. For more complex scenarios, the ability to group and flatten layers, or to use selections for targeted opacity adjustments, opens up a world of advanced possibilities.
Whether you are digitizing traditional sketches, creating intricate digital paintings, or designing graphics for various platforms, the judicious use of layer opacity will undoubtedly elevate the quality and sophistication of your work. It's a fundamental yet powerful technique that empowers you to express your creativity with greater nuance and control, leading to more compelling and visually rich artistic outcomes.
If you found this tutorial on how to change the opacity of a layer in Procreate useful, feel free to explore other tutorials on Procreate that can further expand your digital art skills. Knowing how to change opacity is just one of the many ways Procreate allows you to refine your creative vision.