Perspective grids are a powerful tool for digital artists, allowing them to create realistic depth and dimension in their artwork. Procreate, a leading drawing application for iPad, offers a robust Perspective Guide feature that empowers artists of all levels to easily implement these principles. This tutorial will delve into the intricacies of Procreate's Perspective Guides, from initial setup to advanced application, ensuring you can confidently create compelling and believable scenes.
Understanding the Fundamentals of Perspective
Before diving into Procreate's tools, it's essential to grasp the basic concepts of linear perspective. Perspective is the technique used to depict three-dimensional objects on a two-dimensional surface, creating an illusion of depth and distance. Objects appear to diminish in size as they recede from the viewer. This effect can be achieved through one-point, two-point, or three-point perspective.
One-Point Perspective
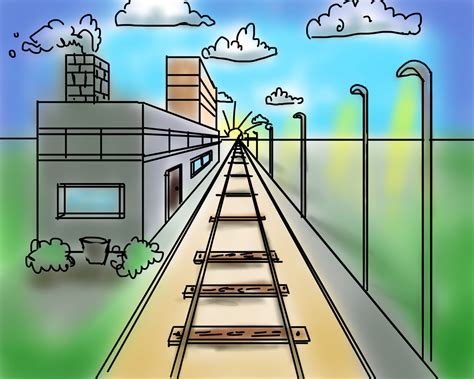
One-point perspective, also known as parallel perspective, is the simplest form. In this type of perspective, all surfaces in the image that face the viewer appear in their true shape, without any distortion. Only the surfaces that travel towards or away from the viewer distort. These lines all converge towards a single vanishing point, typically located on a horizon line. This is ideal for depicting scenes viewed head-on, such as a road stretching into the distance or the interior of a room viewed from a corner.
Two-Point Perspective
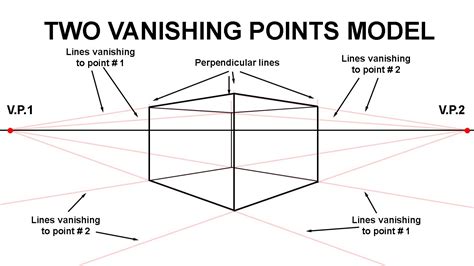
Two-point perspective, or angular perspective, offers a more realistic representation of how we often view objects. In this system, only vertical lines remain parallel. All horizontal lines converge towards either of two vanishing points, both situated on a horizon line. This is commonly used when an object is viewed at an angle, allowing for the depiction of two sides of the object simultaneously. It provides a greater sense of depth and complexity than one-point perspective.
Three-Point Perspective
The most complex, yet often the most realistic, form of perspective is three-point perspective. In this method, all lines recede towards one of three vanishing points. This effectively mimics how we perceive the real world, where objects recede away from us on every axis, creating a sense of looking up at or down upon a scene. This is particularly useful for dramatic compositions, such as extreme high or low-angle shots of cityscapes or towering structures.

Activating and Customizing Procreate's Perspective Guides
Procreate's Drawing Guides feature, introduced and expanded over several versions, makes implementing these perspective principles incredibly accessible.
Enabling Drawing Guides
To begin using perspective tools, you first need to enable Drawing Guides for your artwork. Navigate to your Actions menu by tapping the wrench icon. Within the Canvas tab, you will find the option to toggle "Drawing Guide" on. If this is your first time using a Drawing Guide on a particular canvas, you'll need to enable it and then tap "Edit Drawing Guide" to access its settings.
Selecting the Perspective Mode
Once Drawing Guides are enabled, you can choose your desired guide mode. Procreate offers several options, including 2D Grid, Isometric, Perspective, and Symmetry. For perspective work, select the "Perspective" mode. Default guidelines will then appear on your canvas, ready for customization.
Setting Vanishing Points
When in Perspective mode, the core of the tool is the ability to set vanishing points. Tap anywhere on the screen to create your first vanishing point. You can create up to three vanishing points, allowing you to switch seamlessly between one-point, two-point, and three-point perspective by simply tapping on the canvas. You can also drag these vanishing points on or off the canvas. Off-canvas points can often lead to more natural-looking results, especially in two-point and three-point perspectives.
Adjusting Grid Appearance
Procreate provides extensive options to customize the appearance of your perspective guidelines to suit your workflow and visibility needs. You can adjust the thickness and opacity of the lines using dedicated sliders on the bottom toolbar. The hue of the guidelines can also be changed via a slider on the top toolbar. This ensures the grid is easy to see without obscuring your artwork.
Manipulating Guidelines
The position of your guidelines can be fine-tuned using the blue node, allowing you to precisely control the placement of vanishing points and horizon lines. Rotation of the grid or specific vanishing point axes can be achieved using the green node. These controls offer a high degree of flexibility in setting up your perspective environment.
Leveraging Drawing Assist for Precision
A key feature that works in conjunction with Perspective Guides is Drawing Assist.
Activating Drawing Assist
Each guide mode, including Perspective, has an "Assisted Drawing" toggle located on the lower toolbar. When this setting is turned on for a specific layer, any strokes you make on that layer will be forced to snap to the perspective lines of the active guide. You will see an "Assisted" tag next to the layer name in your Layers menu, confirming its activation.
Benefits of Drawing Assist
Drawing Assist significantly simplifies the process of creating accurate perspective. It ensures that lines you draw automatically align with your chosen vanishing points, eliminating the guesswork and the need for constant manual correction. This allows artists to focus on their creative vision rather than the technicalities of perspective, making it easier to sketch, refine, and ink objects with correct angles and proportions.
Customizing Drawing Assist
For even greater control over how Drawing Assist functions, you can explore the Gesture Controls within your Actions > Prefs menu. This allows you to tailor the snapping behavior to your specific preferences.
How to Draw in Perspective using Procreate Drawing Guides
Practical Application: Sketching and Inking with Perspective Guides
With your Perspective Guide and Drawing Assist set up, you're ready to start creating. The process often begins with blocking out basic shapes and then adding details.
Blocking Out the Main Forms
When starting a new piece, especially if you're new to perspective, it's advisable to begin with simple, box-like shapes. Objects like suitcases, books, cameras, or even simple planters are excellent starting points. For instance, when drawing a suitcase in two-point perspective, you would first sketch the front vertical edge. Then, using the guide lines that recede towards the left and right vanishing points, you would define the overall width. A "measuring bar" can be used to establish the thickness of the form, which then controls all other thicknesses.
Placing Details Accurately
Once the main form is established, you can begin adding details such as handles, straps, or latches. Remember that vertical elements should generally remain straight up and down (holding one finger on the screen while drawing can help achieve a perfect vertical). Any elements that sit on a face of the object should follow that face's vanishing direction. For a handle, for example, angle the top and bottom edges to match the nearest guide lines.
Finding the True Center
To ensure elements like handles or badges are perfectly centered, Procreate's perspective tools can assist. Draw light lines from corner to corner across the face of the object to find its center. From this center point, draw a line that recedes towards the correct vanishing point. The intersection of these lines will indicate the true center for placement, preventing elements from appearing "off" or unbalanced.
Inking with Character
After sketching your forms and details, you'll typically move to inking. Lower the opacity of your sketch layer and create a new layer above it for your linework. Using a rough or slightly "wonky" brush can add character and a handmade feel to your artwork, especially for objects with a vintage aesthetic. Small, intentional imperfections can be more appealing than overly perfect, sterile lines.
Advanced Techniques and Composition
Beyond basic object rendering, Procreate's Perspective Guides can be used to build complex scenes and sellable compositions.
Creating Realistic Details
When adding details like stickers or embellishments to angled surfaces, avoid perfect circles. Instead, use ovals and slightly irregular shapes to mimic how these elements would naturally appear on a receding plane. Straps should follow the vanishing lines of the surface they are on, while their own vertical elements remain true.
Building a Composition
Don't stop at a single object. Group your layers and begin composing your scene. Add lettering, background elements, or other objects to create a narrative. The suitcase example, when combined with lettering like "Here's to the road ahead," can form a compelling greeting card or surface pattern. Perspective helps the viewer "step into" the scene, making it more immersive.
Applying Perspective to Different Subjects
The principles of perspective are not limited to geometric shapes. You can apply them to organic forms as well. For instance, when drawing a plant in a planter, you can use a single vanishing point to define the box shape of the planter. To create an oval opening for the planter, find the center of the rectangle representing the opening, use vanishing lines to locate midpoints on each side, and then sketch your oval touching these midpoints. This ensures the oval appears correctly foreshortened.
Procreate's Perspective Guide: A Versatile Tool
Procreate's Perspective Guide has been a popular feature since its inception, with continuous enhancements. In Procreate 4.1, the functionality was significantly expanded to include powerful new modes within the Drawing Guides. This evolution has made Procreate an even more capable tool for artists aiming to create dynamic and realistic artwork.
A Refresher for Veterans and a Guide for Newcomers
Whether you are a seasoned Procreate user or just starting, this tutorial serves as a comprehensive guide to mastering the Perspective Guide. The ability to easily set up and adjust vanishing points, combined with the precision of Drawing Assist, empowers artists to tackle complex perspective challenges with confidence.
Beyond the Lines: Embracing Imperfection
While Procreate's guides offer precision, remember that art is often about expression. Embrace small imperfections in your linework to add personality and a human touch. The goal is to create compelling visuals that draw the viewer in, and sometimes, a perfectly rendered line can feel less engaging than one with a bit of character.
Resources for Further Learning
For those who wish to deepen their understanding and skills, Procreate offers a wealth of resources. Numerous tutorials, both within the app and from the wider art community, can provide further insights and inspiration. Exploring different brush sets and experimenting with various techniques will continue to refine your perspective drawing abilities.
By consistently utilizing Procreate's Perspective Guides and Drawing Assist, artists can elevate their work, creating illustrations with a profound sense of depth and realism. The tool transforms a potentially daunting aspect of art into an accessible and enjoyable process, enabling the creation of sellable, story-filled compositions.
tags: #procreate #perspective #grid