Photoshop's Quick Mask mode stands as a powerful and remarkably efficient tool for users aiming to create and refine selections with exceptional ease and precision. This feature allows for a visually intuitive approach to defining areas within an image, transforming complex selection tasks into manageable, paint-like operations. By enabling a semi-transparent color overlay, Quick Mask mode offers a clear representation of what is selected and what is not, significantly streamlining the editing workflow and leading to professional-quality results.
Understanding the Core Functionality of Quick Mask Mode
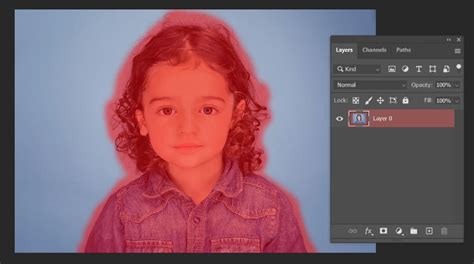
At its heart, Quick Mask in Photoshop is a method for creating and modifying selections. When activated, it applies a semi-transparent color overlay, typically red, to the image. This overlay visually distinguishes between the areas that are selected and those that are not. The fundamental principle is straightforward: areas covered by the overlay are considered "masked" or unselected, while areas that remain clear are "selected." This visual feedback is crucial for achieving accuracy, especially when dealing with intricate details or subtle transitions.
The primary advantage of Quick Mask mode lies in its ability to convert a standard selection into a temporary mask. This mask can then be edited using familiar painting tools, such as the Brush Tool. The interplay between black, white, and shades of gray is key to its operation. Painting with white on the mask effectively "erases" the overlay, thereby increasing the selected area of the image. Conversely, painting with black covers areas with the overlay, effectively deselecting them or shrinking the selection. Intermediate shades of gray can be used to create semi-transparent areas, which are invaluable for achieving smooth, feathered edges or anti-aliased effects, crucial for natural-looking composites and edits.
Activating and Navigating Quick Mask Mode
Engaging Quick Mask mode in Photoshop is exceptionally simple, designed for speed and accessibility. The most common and direct method is by pressing the "Q" key on your keyboard. This single keystroke toggles the mode on and off. Alternatively, you can find and click the Quick Mask icon, which is typically located at the bottom of the Photoshop toolbar palette. When Quick Mask mode is active, the "marching ants" - the animated dotted line that usually delineates a selection - become invisible. Instead, the semi-opaque color overlay takes their place, providing a different, often more informative, visual cue.
Before entering Quick Mask mode, it's often beneficial to create an initial, rough selection using Photoshop's standard selection tools. This could include tools like the Lasso Tool, the Quick Selection Tool, or the Magic Wand Tool. Once this basic selection is in place, entering Quick Mask mode allows for immediate refinement. You can then begin painting with the Brush Tool to precisely add to or subtract from this initial selection, molding it into the perfect mask. It's also possible to create the mask entirely within Quick Mask mode, starting with a blank canvas and painting the desired selection directly onto the image.
CRAZY GOOD selections in Photoshop with QUICK MASK
Refining Selections with Brush and Gradient Tools
The true power of Quick Mask mode is unleashed when combined with painting tools. The Brush Tool is your primary instrument for detailed adjustments. When you're in Quick Mask mode, painting with white will reveal the underlying image by removing the red overlay, thereby expanding your selection. This is how you add areas you want to include. Conversely, painting with black will add the red overlay, covering those areas and effectively subtracting them from your selection. This additive and subtractive painting process allows for meticulous control over the selection's boundaries.
For achieving smoother, more natural transitions, particularly around complex edges like hair or soft fabrics, gradients are an indispensable tool. You can apply a Gradient Tool directly to the Quick Mask. This allows you to blend the selection edges seamlessly, creating feathered effects that are difficult to achieve with a standard brush alone. A gradient transitioning from black to white, for example, will create a gradual increase in the selection's opacity, softening the edge and making it integrate more naturally with other elements in your composition.
Advanced Techniques and Integration with Other Photoshop Features
Quick Mask mode's utility extends beyond basic selection refinement. It can be integrated with other advanced Photoshop features to achieve sophisticated, non-destructive editing workflows.
Non-Destructive Editing with Smart Objects
To ensure that your edits can be modified at any time without permanently altering the original image data, it's highly recommended to convert your layer into a Smart Object before applying Quick Mask or any other significant edits. By working with Smart Objects, you maintain the flexibility to revisit and adjust your masks and selections later, preserving the integrity of your original file.
Leveraging Camera Raw Filter
The Camera Raw Filter in Photoshop, traditionally used for raw image processing, can be powerfully combined with Quick Mask. After making initial tonal or color adjustments in Camera Raw, you can use Quick Mask mode to selectively apply these adjustments to specific areas of your image. This allows for highly targeted color and exposure corrections, enhancing the overall impact and realism of your edits.
Vector Masks for Precision
While Quick Mask primarily operates on pixel-based selections, it can also be a stepping stone to creating Vector Masks. After creating a precise selection using Quick Mask, you can convert this selection into a Vector Mask via the Paths panel. Vector Masks are resolution-independent and are created using mathematical paths, offering exceptionally clean and scalable edges, ideal for logos or graphics that require sharp lines.
Integrating with Illustrator Artwork
Adobe products are designed to work harmoniously. When bringing artwork from Adobe Illustrator into Photoshop for further manipulation, Quick Mask mode can be invaluable for isolating specific elements or creating masks for compositing. This allows you to leverage the vector precision of Illustrator with the extensive pixel-editing capabilities of Photoshop.
Addressing Complex Edges: Hair and Irregular Boundaries
One of the most challenging aspects of image editing is accurately selecting areas with irregular or fine edges, such as wispy hair, fur, or foliage. Standard selection tools often struggle with these details, leading to jagged or unnatural-looking cutouts. Quick Mask mode, especially when combined with other tools, offers a robust solution.
When working with difficult edges, it's essential to zoom in closely to the image. While this may cause some pixelation, it provides a clear view of the precise boundary you need to define. After entering Quick Mask mode and making an initial selection, the "Refine Edge Brush Tool" becomes a critical ally. This tool is specifically designed to analyze the edge of a selection and intelligently detect and select finer details like strands of hair. Options within the Refine Edge dialog, such as "Decontaminate Colors" and "Smooth," can further help in creating a natural-looking selection that blends seamlessly.
Quick Mask vs. Layer Masks: Understanding the Distinction
It's important to differentiate Quick Mask mode from Layer Masks, although they are closely related and can be used in conjunction. A Layer Mask is a permanent, non-destructive way to control the visibility of a layer's content. You paint on a Layer Mask with black to hide parts of the layer, white to reveal them, and gray for semi-transparency.
Quick Mask mode, on the other hand, is a temporary mode for creating and refining selections. The visual overlay it provides is a tool to aid in the selection process. Critically, a selection created or refined in Quick Mask mode can be converted into a permanent Layer Mask. This conversion process allows you to take the precise selection you've meticulously crafted and apply it as a non-destructive mask to your layer, preserving all editability.
Practical Applications and Workflow Enhancements
The applications of Quick Mask mode are vast, spanning various image editing scenarios:
- Isolating Subjects: Quickly and accurately separating a person or object from its background for compositing or background replacement.
- Targeted Adjustments: Applying color corrections, exposure adjustments, or filter effects to specific areas of an image without affecting the rest.
- Creating Vignettes and Special Effects: Precisely defining areas for darkening or lightening to create depth or focus.
- Composite Imaging: Seamlessly blending multiple images together by accurately masking elements from each.
By mastering Quick Mask mode, users can significantly boost their workflow efficiency and elevate their image editing skills. It transforms what can often be a tedious selection process into a more fluid and intuitive experience, enabling greater creative freedom and professional polish.
System Requirements and Performance Considerations
While Quick Mask is a powerful feature, its performance can be influenced by your computer's system specifications. For complex images or extensive use of masking and editing tools, ensuring your Photoshop installation is running on a system that meets or exceeds Adobe's recommended requirements is advisable. This includes having sufficient RAM, a capable graphics card, and adequate processing power. Adequate system resources will ensure a smoother experience, preventing lag and allowing you to work more fluidly, especially when dealing with large files or intricate masking tasks.
Beyond the Brush: Exploring Advanced Masking Tools
While the Brush Tool is fundamental to Quick Mask, Photoshop offers a suite of tools that can complement and enhance your masking efforts. For instance, the "Refine Edge" tools, accessible when a selection is active or within Quick Mask mode, are specifically designed to improve the selection of complex areas like hair. Moreover, for those seeking to streamline repetitive tasks or create custom shortcuts for brush size, opacity, or other parameters, hardware solutions like the TourBox can offer a significant advantage, allowing for quicker adjustments without interrupting the creative flow.
In essence, Photoshop's Quick Mask mode is more than just a selection tool; it's a gateway to more precise, efficient, and creative image editing. By understanding its core principles and integrating it with other Photoshop features, users can unlock new levels of control and artistry in their photographic and graphic design work.