Blurry images can be a source of frustration, obscuring details and diminishing the visual appeal of photographs. Whether it's a fleeting moment captured with a smartphone or a professionally shot landscape, the desire to unblur a photo is a common one. Fortunately, modern image editing software, particularly Adobe Photoshop, offers powerful tools and techniques to combat blur, restoring sharpness and clarity to your images. This guide delves into various methods for removing blur in Photoshop, from its built-in intelligent features to advanced manual adjustments and third-party plugin integration.
Understanding the Nature of Blur
Before diving into solutions, it's crucial to understand why images become blurry. The most common culprits include:
- Camera Shake: This occurs when the camera moves during the exposure, resulting in a general softness throughout the image. It's particularly prevalent in low-light conditions or when using longer focal lengths without proper support.
- Out-of-Focus: This happens when the lens is not properly focused on the subject, leading to a lack of sharpness in the intended area of interest.
- Motion Blur: Similar to camera shake, but specifically caused by the movement of the subject itself during the exposure.
- Lens Imperfections: Some lenses, especially at their widest apertures, can exhibit softness, particularly towards the edges of the frame.
- Low Resolution or Compression Artifacts: While not strictly "blur," these can contribute to a lack of perceived sharpness and detail.
Photoshop's Built-in Shake Reduction: An Intelligent First Step
Photoshop features an intelligent mechanism to automatically reduce image blurring caused by camera motion. This feature, known as Shake Reduction, analyzes the image to identify the nature of the blur and then applies corrective measures.
To access this tool, navigate to Filter > Sharpen > Shake Reduction. Photoshop will automatically analyze the region of the image best suited for shake reduction, determine the nature of the blur, and extrapolate the appropriate corrections to the entire image.
Fine-Tuning Shake Reduction
While Photoshop's automatic analysis is often effective, you can further refine the results using advanced settings.
- Detail Loupe: The Detail loupe in the lower-right pane allows you to closely examine a specific region of the image to assess the effectiveness of the blur reduction. You can zoom in or out on image elements as needed.
- Blur Trace: A blur trace represents the shape and extent of the blur affecting a selected region. Different areas of an image might exhibit differently shaped blurs. The automatic shake reduction considers the blur trace for the default region Photoshop deems most suitable for blur estimation.
- Advanced Panel: The Advanced panel in the Shake Reduction dialog lists available blur traces. Photoshop provides several ways to create and modify these traces. For optimal results, create blur traces in regions of the image that have strong edge contrast.
- Resizing Region: You can simply resize the boundaries of the region in focus to update the associated blur trace.
- Adding Suggested Blur Trace: Click the Add Suggested Blur Trace icon () in the Advanced panel. Draw a selection rectangle anywhere on the image.
- Enhance At Loupe Location: Click the Enhance At Loupe Location icon () to move the focus in the left-pane to the region highlighted in the Detail loupe.
- Multiple Blur Traces: Holding Ctrl (Windows) or Command (Mac) allows you to select multiple blur traces in the Advanced panel. This enables side-by-side previews of results, allowing you to quickly adjust Smoothing and Artifact Suppression and observe their impact on the image.
- Duplicate Blur Traces: Creating duplicate copies of blur traces is beneficial for quickly adjusting Smoothing and Artifact Suppression and previewing changes.
- Save Blur Trace: Select Save Blur Trace from the Advanced panel flyout menu to save custom blur trace configurations.
Understanding Shake Reduction Settings
- Blur Trace Bounds: This setting defines the boundary size of the blur trace.
- Smoothing: Photoshop automatically estimates the image noise. Smoothing reduces high-frequency sharpening noise. You can adjust this slider from its default of 30% if necessary.
- Artifact Suppression: Sharpening can sometimes introduce noticeable noise artifacts. When Artifact Suppression is not enabled, Photoshop generates coarser previews. Adjusting the Artifact Suppression slider to a higher value can mitigate these issues.

Manual Sharpening Techniques in Photoshop
While Shake Reduction is powerful, sometimes manual control is necessary for precise results. Photoshop offers several built-in filters that can effectively sharpen images without external plugins.
The High Pass Filter Method
This is a popular and effective technique for sharpening images in Photoshop without relying on additional software.
- Import and Duplicate Layer: Launch Photoshop and import your blurry image. Always create a duplicate of the background layer (Ctrl+J or Cmd+J) to preserve the original image.
- Desaturate: With the duplicated layer selected, go to Image > Adjustments > Desaturate. This removes color information, which can make the sharpening process more effective.
- Apply High Pass: Navigate to Filter > Other > High Pass. In the dialog box that appears, enter a Radius value. A common starting point is 3 pixels. The goal is to subtly reveal edges without overdoing it.
- Change Blend Mode: Change the Blend Mode of the High Pass layer to Linear Light. This blend mode combines the High Pass filter's edge detail with the underlying image, creating a sharpening effect.
- Apply Layer Mask (Optional but Recommended): To selectively apply sharpening, click the Add layer mask icon at the bottom of the Layers panel.
- Brush Tool: Select the Brush Tool. Paint with black on the layer mask over areas where you don't want sharpening to be applied, or paint with white to reveal the sharpening effect in specific areas. Adjust the brush size and hardness as needed for precise control.
- Enhance Further: For more intense sharpening, you can duplicate the High Pass layer and its blend mode. However, be cautious, as this can quickly lead to over-sharpening and introduce artifacts.
Get Maximum DETAILS without ANY Halos | Advanced Photoshop Sharpening Tutorial
Unsharp Mask and Smart Sharpen
Photoshop also provides dedicated sharpening filters:
Unsharp Mask: Found under Filter > Sharpen > Unsharp Mask, this filter allows you to control the sharpening process with three parameters:
- Amount: Controls the intensity of the sharpening.
- Radius: Determines how wide an area around the edges is affected by sharpening. A smaller radius sharpens fine details, while a larger radius affects broader areas.
- Threshold: Prevents sharpening in areas with low contrast (like smooth gradients or noise), helping to avoid amplifying unwanted artifacts.
A quick tip for group photos: apply Unsharp Mask with settings like 150% Amount, 1 pixel Radius, and Threshold 10. This can make a significant difference in bringing out details in images where perfect focus might have been missed.
Smart Sharpen: Available under Filter > Sharpen > Smart Sharpen, this filter offers more advanced control. It analyzes the image to differentiate between blur and noise, allowing for more targeted sharpening. Key settings include:
- Amount: Similar to Unsharp Mask, controls the sharpening intensity.
- Radius: Controls the width of the sharpened edges.
- Remove: This crucial option allows you to specify the type of blur to remove (e.g., Gaussian Blur, Lens Blur, Motion Blur). Selecting the correct blur type can yield superior results.
- Advanced Options: Smart Sharpen also offers controls for reducing noise and sharpening specific channels.
Leveraging Third-Party Plugins
For users seeking specialized tools or even more advanced capabilities, third-party plugins offer powerful solutions.
Optics by Boris FX
Optics by Boris FX is an industry-leading product for cinematic effects, available as standalone software and as a plugin for Photoshop and Lightroom.
- Setup: Launch Photoshop and open or create a new project. Import your blurry image. Create a duplicate layer (Ctrl+J or Cmd+J) to work non-destructively.
- Launch Optics: Go to Filter > Boris FX > Optics.
- Apply Magic Sharp: Within the Optics interface, use the search bar to find the Magic Sharp effect.
- Utilize Presets or Manual Adjustment: Magic Sharp offers numerous descriptive presets for quick results. For more control, adjust the various settings and parameters available on the right-hand panel.
- Apply: Click the Apply button to return the sharpened image to Photoshop.
Boris FX also offers tutorials demonstrating the use of Optics, including specific sections on the Magic Sharp filter.
Continuum by Boris FX
While primarily video editing software, programs like Adobe Premiere Pro can be used for image adjustments, and Continuum plugins can be leveraged within them.
- Import: Launch Adobe Premiere Pro and import your blurry image.
- Timeline: Drag the imported media onto your timeline to create a sequence.
- Apply BCC+Magic Sharp: In the Effects panel, search for "Magic Sharp." You'll find it under Video Effects > BCC Image Restoration. Drag and drop BCC+Magic Sharp onto your media on the timeline.
- Adjust Parameters: Select the media on the timeline and go to the Effect Controls panel. Adjust parameters like Sharpen Amount and experiment with other settings to achieve the desired sharpness.
This method is a viable alternative when Photoshop or Lightroom access is limited.
Sharpening Images on Mobile Devices
The ubiquity of smartphones means many blurry photos are captured on mobile devices. Fortunately, there are effective ways to unblur images on iPhones and Android devices.
iPhone: Lightroom Mobile
- Download and Install: Get the Lightroom app from the App Store.
- Import Image: Open Lightroom and tap the Gallery icon to import your blurry photo.
- Access Detail Panel: Once the image is loaded, slide the toolbar to the right and tap the Detail option.
- Adjust Parameters: Here you'll find controls like Sharpness, Radius, Detail, and Masking. Experiment with increasing these values to sharpen your image.
- Export: When satisfied with the result, tap the Upload button to save your edited image. Remember that optimal values will vary depending on the specific image.
Android: Snapseed or Instagram
- Instagram: Offers basic editing tools, including "Sharpness" and "Structure," which can be used to enhance photo quality and unblur images.
- Snapseed (by Google): A professional-grade photo editor.
- Download and Install: Get Snapseed from the Google Play Store.
- Import Photo: Open the app and import your blurry image.
- Access Tools: Navigate to the Details option in the menu.
- Adjust Sharpening: Use the "Structure" and "Sharpening" tools. Experiment by adjusting their parameters and values.
- Export: Preview the changes and export the final image when you're happy with the result.
Lightroom: A Powerful Desktop Solution
Like Photoshop, Adobe Lightroom provides robust tools for image enhancement, including unblurring.
- Import Image: Open Lightroom and import your blurry photo.
- Develop Module: Navigate to the Develop tab in the top menu.
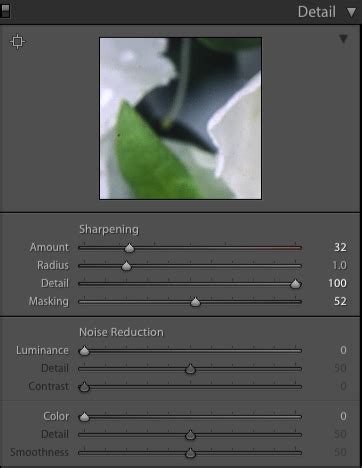
- Detail Panel: In the right-hand sidebar, locate and click on the Detail section.
- Adjust Sharpening: Under the Sharpening section, increase the Amount parameter. Pay close attention to the visual changes.
- Refine Radius and Detail: After setting the initial sharpness, experiment with the Radius and Detail parameters to fine-tune the sharpness and clarity without introducing unwanted artifacts.
- Masking: The Masking slider is crucial for selectively applying sharpening. By holding down Alt (Windows) or Option (Mac) while dragging the Masking slider, you can visualize the areas where sharpening will be applied. Painting with white in the mask will reveal sharpening, while painting with black will conceal it. This is particularly useful for sharpening specific objects while leaving smooth areas untouched.
Preserving Memories and Enhancing Visuals
The ability to unblur images is more than just a technical skill; it's about preserving memories and enhancing visual communication. Blurry pictures can be frustrating to view, making it difficult to discern essential details. They can also be misleading, distorting the appearance of objects or people. For projects, presentations, or simply personal enjoyment, unblurring an image can significantly improve its visual appeal and professionalism. Ultimately, by mastering the techniques described in this guide, you can breathe new life into your blurry photographs, ensuring that important moments and details are clearly and beautifully preserved.