When creating professional video content, especially for corporate events or presentations, the visual quality of sponsor logos is paramount. Often, these logos are provided in EPS (Encapsulated PostScript) format, a vector-based file type favored for its scalability without loss of quality. However, a common challenge arises when importing these EPS files into Adobe Premiere Pro: they frequently retain a white background, which clashes with the desired aesthetic and can obscure other important video elements. This tutorial will guide you through the most effective methods for removing these unwanted white backgrounds, ensuring your sponsor logos integrate seamlessly into your Premiere Pro projects, allowing them to elegantly fade in and out over dynamic, color-shifting backgrounds.
Understanding the Challenge: EPS and Transparency
EPS files, while excellent for maintaining sharp lines and scalability, do not inherently support transparency in the same way as formats like PNG or TIFF. When imported directly into Premiere Pro, the software often interprets the default white background as part of the image, leading to the undesirable opaque white box around your logos. This necessitates a pre-processing step to isolate the logo and create a transparent background before bringing it into your video editing timeline.
Method 1: Leveraging Photoshop's Magic Wand Tool for Simple Logos
For logos that are relatively simple, particularly those with distinct, solid color areas and minimal fine detail, Photoshop's Magic Wand tool offers a swift and efficient solution. This method is particularly effective if the white background is a uniform color.
First, open your EPS logo file in Adobe Photoshop. If the logo is a layered file, this will be a significant advantage. You can often simply turn off or delete the background layer, revealing transparency. However, if the logo is a single, flattened layer with a white boundary, the Magic Wand tool becomes your primary instrument.
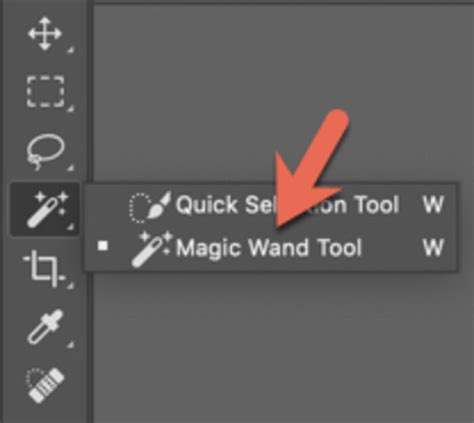
Select the Magic Wand tool from Photoshop's toolbar. Click on the white background area surrounding the logo. The Magic Wand tool selects contiguous pixels of similar color. You can adjust the Tolerance setting in the Options bar to control how similar the colors need to be for selection. A higher tolerance will select a broader range of white shades. For a pure white background, a low tolerance might suffice, while for slightly off-white or varying shades, you might need to increase it.
Once the white background is selected, simply press the Delete key on your keyboard. If the background is a separate layer, this will remove it, leaving transparency. If it's part of the main layer, you might need to ensure the layer is not locked or convert it to a regular layer by double-clicking it in the Layers panel. This process is straightforward and requires no advanced Photoshop skills.
Important Consideration: As noted, this method works best when the white area is not an integral part of the logo itself and can be easily distinguished by color. It's also crucial to ensure that the background is not set as a "locked background" layer, which would prevent deletion. If it is, double-click the layer in the Layers panel to convert it into a standard editable layer.
Method 2: Utilizing Photoshop's Eraser Tool for More Control
While the Magic Wand is efficient for solid backgrounds, the Eraser tool offers more granular control, especially if the white background has subtle variations or is very close to the logo's edges.
Open your EPS logo in Photoshop. Select the Eraser tool. Similar to the Magic Wand, you can adjust the brush size and hardness of the Eraser tool. For precise removal, a smaller, harder brush might be ideal. Carefully "paint" over the white background areas you wish to remove.
This method is more manual and time-consuming than the Magic Wand but provides greater accuracy when dealing with complex shapes or backgrounds that blend more closely with the logo. It’s a good fallback if the Magic Wand selects too much or too little.
Method 3: Advanced Techniques - Clipping Paths and Color Keying
For more professional results, especially with intricate logos or when dealing with color logos where the white might be close to a light color within the logo, advanced Photoshop techniques or Premiere Pro's built-in effects can be employed.
Drawing a Clipping Path in Photoshop
A clipping path is an invisible vector outline that defines the visible boundaries of an image. In Photoshop, you can use the Pen tool to meticulously draw a path around the exact shape of your logo. Once the path is created, you can convert it into a selection and then use that selection to mask out the unwanted background.
- Select the Pen Tool: Choose the Pen tool (P) from the toolbar.
- Draw the Path: Carefully click and drag to create anchor points and curves around your logo. Aim to trace the outer edge of the logo precisely.
- Create a Clipping Path: In the Paths panel, click the "Save path as a clipping path" button (or go to
Window > Pathsand selectMake Clipping Pathfrom the panel menu). - Load Selection: With the path active, hold down
Ctrl(Windows) orCmd(Mac) and click on the path thumbnail in the Paths panel. This loads the path as a selection. - Mask or Delete: You can then invert the selection (
Select > Inverse) and delete the background, or create a layer mask from the selection, which is a non-destructive way to hide the background.
This method provides the cleanest results, especially for complex shapes, as it uses vector data to define the edges.
Using Premiere Pro's Color Key Effect
If you prefer to handle the background removal directly within Premiere Pro, the Color Key effect can be a viable option, though it's generally less precise than Photoshop methods for EPS files with solid white backgrounds.
- Import your EPS logo: Ensure the EPS is imported into Premiere Pro and placed on a video track above your main video and background.
- Apply the Color Key Effect: Go to the
Effectspanel, navigate toVideo Effects > Keying, and drag theColor Keyeffect onto your logo clip. - Select the White Color: In the
Effect Controlspanel, under theColor Keysettings, click the eyedropper tool next toKey Colorand then click on the white background in your Program Monitor. - Adjust Settings: You will need to fine-tune the
ToleranceandEdge Thinsettings. For a pure white background, settingToleranceto a high value like 255 might work, as suggested in some discussions.Edge Feathercan help soften the edges, but for sharp logos, you might want to keep this low or at 0.
Caveats for Color Key: This method is more effective for solid, uniform colors. If your logo has white elements or very light colors that are close to the background white, the Color Key might inadvertently make parts of your logo transparent. For a black and white logo, setting tolerance to 255 might work, but for a color logo, it might be less predictable. The suggestion to leave the Edge Thin at 0 and Edge Feather at 1.5 indicates an attempt to create a clean cut.
Preparing Your Logo for Premiere Pro: Exporting with Transparency
Once you have successfully removed the white background in Photoshop, it's crucial to export the logo in a format that preserves transparency.
- PNG: This is the most common and recommended format. Go to
File > Export > Export As...and choosePNGas the file format. Ensure that theTransparencyoption is checked. PNG files maintain transparency and are suitable for web and video use. - TIFF: TIFF is another excellent option that supports transparency. It can sometimes offer better quality for certain types of graphics, but PNG is generally more widely compatible and results in smaller file sizes for this purpose.
When exporting, ensure your Photoshop document is set up correctly. If you removed the background by deleting it, you should see a checkerboard pattern, indicating transparency.
Integrating Logos into Premiere Pro: Fades and Moving Backgrounds
With your transparent logos ready, you can now import them into your Premiere Pro project.
- Import Transparent Logos: Drag your exported PNG or TIFF files into your Premiere Pro Project panel.
- Place on Timeline: Drag the logo clip onto a video track positioned above your main video footage and your dynamic background.
- Create a Dynamic Background: For your moving, color-changing background, you can achieve this in several ways:
- Generate > Gradient Ramp: In Premiere Pro, go to
File > New > Legacy Title(or use the Essential Graphics panel for newer methods). Within the Legacy Title, you can create a Gradient Ramp. You can set multiple colors and control their transitions. Export this as a video file or use it directly if your Premiere Pro version supports it as a dynamic graphic. - After Effects: For more sophisticated animated backgrounds, consider creating them in Adobe After Effects and then importing them into Premiere Pro. This offers far greater control over animation, color blending, and movement.
- Stock Footage: Utilize pre-made animated background stock footage that you can purchase or find from free sources.
- Generate > Gradient Ramp: In Premiere Pro, go to
- Applying Fade-In and Fade-Out: To make your logos fade in and out:
- Opacity Control: Select your logo clip on the timeline. In the
Effect Controlspanel, underOpacity, you'll seeTime RemappingandOpacity. Click the stopwatch next toOpacityto set keyframes. - Keyframing: Move the playhead to the beginning of the clip, set the opacity to 0%, and click the diamond icon to create a keyframe. Move the playhead forward to where you want the logo to be fully visible, set the opacity to 100%, and another keyframe is automatically created. Repeat this process at the end of the clip by setting the opacity back to 0% to create a fade-out.
- Cross Dissolve (Optional): For smoother transitions, you can also apply the
Cross Dissolvetransition from theEffectspanel to the beginning and end of your logo clips.
- Opacity Control: Select your logo clip on the timeline. In the
How to Create Animated Gradient in After Effects
Troubleshooting Common Issues
- Jagged Edges: If your logo appears with jagged or pixelated edges after removal, it might be due to the original EPS resolution or the method used for background removal. Revisit the Photoshop steps, particularly using the Pen tool for a clean vector path, or ensure you are exporting at a sufficiently high resolution.
- Color Mismatch: If the white background is very close in color to parts of your logo, the Color Key effect in Premiere Pro might struggle. In such cases, the Photoshop methods, especially clipping paths, are far more reliable.
- File Format Compatibility: Always ensure you are exporting to a format that Premiere Pro reliably handles with transparency, such as PNG or TIFF. Older or less common formats might not preserve transparency correctly.
By following these methods, you can effectively remove unwanted white backgrounds from your EPS sponsor logos and integrate them beautifully into your Premiere Pro video projects, enhancing the overall professional polish of your conference videos with dynamic visuals and smooth transitions. The ability to precisely control the transparency of your sponsor's branding is a key element in creating a visually cohesive and impactful presentation.
tags: #remove #white #background #premiere #pro