Photoshop offers a powerful suite of tools that can transform ordinary images and text into compelling visual elements. One such effect, highly sought after for its vintage appeal and tactile quality, is the rubber stamp effect. Whether you aim to create a postal stamp, an ink stamp, or a subtle watermark, understanding the nuances of achieving this look in Photoshop is invaluable. This guide will walk you through the process, from initial selection to the final touches that lend authenticity to your creation, utilizing a variety of techniques to achieve diverse stamp styles.
Mastering Selections for Stamp Creation
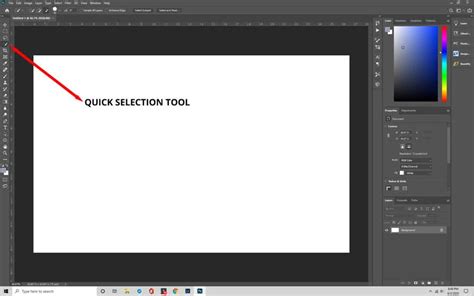
The foundation of any effective stamp effect lies in precise selection. Photoshop's "smart selection tools" are your primary instruments here, allowing you to isolate the specific area you intend to transform into a stamp. These tools, such as the Quick Selection Tool or the Magic Wand Tool, can intelligently detect edges and areas of similar color, significantly streamlining the initial stage.
Once you have a clear selection of your desired stamp area, the next crucial step is to establish a "layer mask." This non-destructive method allows you to hide or reveal parts of a layer without permanently deleting pixels. To create a layer mask, navigate to the top menu and select "Layers" > "Layer Mask" > "Reveal All." Alternatively, you can click the "Add Layer Mask" icon, which typically resembles a rectangle with a circle inside, located at the bottom of the Layers panel. This mask will serve as the canvas upon which your stamp effect will be built.
Applying and Refining the Stamp Effect Filter
With your selection masked, it's time to introduce the core "Stamp Effect filter." Before diving in, it's essential to define the aesthetic of your stamp by selecting the desired "foreground colour" and "background colour." Click on the color squares in the toolbar to open the Color Picker and choose hues that mimic traditional stamp inks, such as deep reds, blues, or the classic brownish-black.
Following color selection, access the "Filter Gallery" by going to the top menu: "Filter" > "Filter Gallery." Within the Filter Gallery, you'll find various artistic filters. The "Stamp" filter is your primary target. Once applied, you can "fine-tune the Stamp effect." This is achieved by manipulating the "Lightness" and "Smoothness" sliders. The Lightness slider controls the contrast within the stamp, mimicking the way ink can bleed or appear faded, while the Smoothness slider adjusts the sharpness of the edges, simulating the unevenness of a real rubber stamp impression. Experimenting with these sliders is key to achieving a realistic and desirable intensity for your effect.
Leveraging Smart Objects for Editability
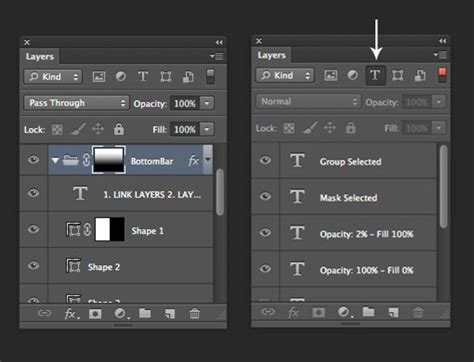
A critical technique for maintaining flexibility throughout the design process is converting your layers into a "Smart Object." This is particularly beneficial when you intend to combine multiple elements, such as "a text layer, image layer, filters, and gradients," while retaining the ability to "edit the effects" at any point. To create a Smart Object, hold down the "Shift" key and click on all the relevant layers you wish to group. Then, right-click on the selected layers and choose the "Convert to Smart Object" option from the context menu.
If, after applying filters, the edges of your stamp appear too crisp and lack the organic imperfection of a real stamp, you can soften them with a "blur filter." Select "Filter" > "Blur" and choose an appropriate blurring option, such as Gaussian Blur, to subtly soften the edges. Remember, the goal is to introduce a touch of realism, not to make the stamp appear out of focus.
Achieving Transparency and Realistic Texture
To create a believable stamp that can be placed over other images, you'll often need to make the background transparent. After applying the Stamp Effect filter and ensuring your layer is a Smart Object, you can utilize the "Magic Eraser tool" to remove background pixels, rendering them transparent. Click the Magic Eraser tool on the background pixels you wish to remove.
For a truly authentic stamp, incorporating a textured appearance is paramount. This is where the use of a "texture layer" and "layer masks" becomes essential. First, ensure you "activate the layer mask thumbnail" in the Layers panel by clicking on it. Then, "copy the pixels" from your texture layer. Click on the thumbnail of the texture layer and then click on the image itself to load the texture as a selection.
The crucial step is to "paste the pixels into the layer mask." To ensure you are pasting directly into the mask, hold down "Alt on Windows or Option on Mac" and click the layer mask thumbnail. This will temporarily display the mask itself, which will turn entirely white. Then, select "Ctrl+V on or Command+V" to paste the textured pixels into the layer mask. This process essentially uses the grayscale values of the texture to control the transparency of your stamp, creating the impression of ink absorption and paper grain. Finally, click the "eye icon" in the Layers panel to hide the texture layer's thumbnail, allowing you to see how your changes have affected the stamp's appearance.
Advanced Techniques for Custom Stamp Design
Beyond the basic filter application, Photoshop offers more intricate methods for crafting custom stamps, particularly when dealing with text and complex layouts. For instance, you can "learn how to turn any image into a rubber stamp, postal stamp, ink stamp or watermark in Photoshop."
Creating a Stamp Outline and Circular Text
A common approach to creating a stamp involves starting with a new document, perhaps an "850 x 550px document." You can then add a "Gradient Map adjustment" for initial color toning. To establish a stamp outline, the "Ellipse Tool" is invaluable. Holding the "Shift key" while drawing with the Ellipse Tool ensures the creation of a "perfect circle." Subsequent scaling of these circle layers using "Command/Control-T" (Free Transform) allows for precise adjustments to create concentric rings, common in many stamp designs.
How to Type on Circle in Photoshop
For intricate stamp designs, consider downloading and loading "Circle Photoshop Shapes" (.CSH files). These pre-defined shapes can be accessed via "Edit > Preset Manager" and selecting "Preset Type > Custom Shapes." When using the "Custom Shape Tool," ensure the "Defined Proportions" option is checked for consistent results. Setting the "Foreground color to #000000" (black) is typical for outline elements.
The process of incorporating text into a circular design requires specific steps. When working with a vector mask thumbnail (e.g., of a circle layer), you can select the "Horizontal Type Tool" and hover over the circle's path. As the cursor changes shape, indicating it's ready to follow the path, you can type your text. Fonts like "Intro" with a color of "#000000" are often used.
Integrating Images and Grunge Textures
Including photographic elements within your stamp design is also achievable. By "keeping the Control key pressed and clicking on the Vector Mask Thumbnail" of a specific layer (e.g., a "Man Portrait layer"), you can create a selection from that layer's mask. Opening the "Layer Style window" of the image layer and utilizing the "Blend If sliders" at the bottom can help "remove the white color," integrating the image more seamlessly.
To add a "grungy stamp texture," you can create a new layer named "Stamp Lines" and apply a layer mask to it. Similarly, a layer for "Old Envelope Stamp Brushes" can be added for final touches, imparting a realistic aged effect.
Step-by-Step Circular Text Creation
A detailed method for creating circular text involves several steps:
- Create a New Document: Go to "File > New" with dimensions like 600x600 pixels and a "Transparent Background."
- Create a Circle Selection: Use the "Elliptical Marquee Tool," holding "Shift" for a perfect circle. Adjust position with "Space bar" while dragging.
- Add a Stroke: Go to "Edit > Stroke," setting a width (e.g., 10 px), location "Inside," and a black color.
- Create a Second Circle: Deselect ("Ctrl+D") and repeat steps 2 and 3 to create an inner circle.
- Create a Circular Path: Select the "Ellipse Tool," choose "Path" from the Options bar, and draw a circle path slightly outside the inner circle, holding "Shift."
- Write Text: Select the "Horizontal Type Tool," choose your font (e.g., Arial, Bold, 65 pt, center alignment), hover over the circular path until the cursor changes, and type your text (e.g., 'PANTAI BIRA'). Press "Ctrl+Enter" to commit.
- Duplicate Text: Activate the text layer, press "Ctrl+J" to duplicate.
- Rotate Text: Select the copied text layer and go to "Edit > Transform Path > Rotate 180" to position it at the bottom.
- Edit Text: Change the duplicated text as needed (e.g., 'SUL-SEL').
- Flip Horizontal: If the bottom text is upside down, select the copied text layer and go to "Edit > Transform Path > Flip Horizontal."
- Set Use Free Transform: Press "Ctrl+T," hold "Alt+Shift," and drag a corner to enlarge the text bounding box if necessary.
- Add Date: Use the "Horizontal Type Tool" to add central text for dates, times, etc.
- Merge to Smart Object: Hold "Shift," click all relevant layers, right-click, and select "Convert to Smart Object."
Applying Color and Filter Effects
Once your stamp structure is complete and merged into a Smart Object, you can define its color. Click the "foreground color box" and select your desired ink color (e.g., brownish-black #3e3634 or blue). To fill the entire selection with this color, press "Alt + Delete" (if the entire canvas is selected).
To introduce a "slightly cracked stamp ink effect," apply a filter brush. Select the layer mask and go to "Filter > Filter Gallery > Brush Strokes > Spatter." Adjust the "Spray radius" and "Smoothness" values (e.g., Spray radius: 2, Smoothness: 1) for a subtle spatter effect.
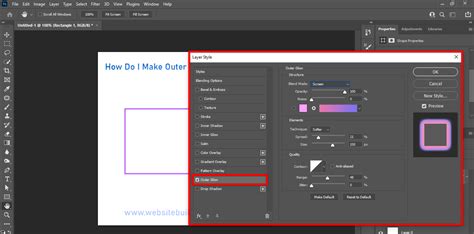
Finally, for a subtle outer glow that enhances the impression of ink on paper, select "Layer > Layer Style > Outer Glow." Configure settings like "Blend Mode: Normal," "Opacity: 40%," choose a "Fill color" matching your stamp ink, set a "size" (e.g., 3 px), and "Range: 100%."
Exploring Pre-made Resources and Add-ons
For those seeking to expedite the process or achieve highly specific styles, numerous pre-made resources and add-ons are available. These can include complete kits with "20+ ink stamp letterpress text effects" in a single PSD file, offering a quick way to "make a stamp in a few clicks."
Other add-ons focus on "layer styles," providing "12 individual layer styles with different textures," along with "grunge actions" for irregular edges and color adjustments. If you prefer a "vintage feel," kits are available that are "specially made to make a stamp with a retro feel." For designers primarily working with text, packs of "text effects" are designed to enhance stamp PNG designs.
These resources, often found on platforms like Envato, offer a flat monthly fee for unlimited downloads of "stamp effect Photoshop add-ons, stamp images, stamp PNGs, and more," providing a vast library for diverse creative needs.
The Super Easy Grunge Stamp Typography Setup
Achieving a versatile "letterpress grunge effect" can be simplified through a combination of basic Photoshop tools. The key is often the strategic use of textures and layer blending modes. This approach focuses on distressing the edges and surfaces of text elements to mimic the imperfections of traditional printing methods.
Utilizing Free Resources for Authenticity
To further enhance the realism of your grunge stamp effect, incorporating specific free resources can be highly beneficial. These might include high-resolution images of "ink paint," such as "LoveRolled black ink" in various sizes and resolutions, allowing for detailed texture application. Similarly, "paper textures," like "Clean cold press paper," can be layered to simulate the substrate onto which the stamp is pressed, adding depth and tactile quality. These resources are crucial for achieving a convincing aged and worn appearance.
By combining the precise selection and filtering techniques within Photoshop with the thoughtful application of texture and pre-made assets, you can effectively create a wide array of realistic and visually engaging rubber stamp effects suitable for various design projects.