Sharpening images in Photoshop is a fundamental skill for any designer or photographer aiming to produce crisp, clean, and visually impactful imagery. It's the process of enhancing the details and contrast within an image, making it appear more refined and drawing the viewer's eye to key elements. While traditional sharpening techniques can sometimes yield varied results, often affecting color or introducing unwanted artifacts, Photoshop offers sophisticated tools like the Smart Sharpen filter, designed for precise and nuanced adjustments. This tutorial will explore the power and versatility of the Smart Sharpen filter, contrasting it with other methods and guiding you through its effective application.
Understanding the Fundamentals of Sharpening
At its core, sharpening in Photoshop involves increasing the contrast along the edges of an image. This is achieved by making the lighter pixels adjacent to an edge even lighter and the darker pixels even darker. This enhanced contrast creates the illusion of greater definition and clarity, making details "pop" and the overall image appear sharper and more polished. The goal is to bring out subtle textures and fine lines that might otherwise be lost, adding depth and dimension to your photographs.
Several tools and filters within Photoshop are dedicated to this purpose. The most common include the Unsharp Mask, the High Pass filter, and the Smart Sharpen filter. Each operates on slightly different principles and offers varying degrees of control. While the Sharpen Tool itself exists in the toolbar, it's often best reserved for quick, localized adjustments, as it offers less precise control compared to dedicated filters.
The Evolution from Unsharp Mask to Smart Sharpen
The Unsharp Mask (USM) filter has been a staple in Photoshop for years, and for good reason. It provides three adjustable parameters: Amount, Radius, and Threshold. The Amount controls the intensity of the sharpening effect, the Radius determines how far from an edge pixels are affected, and the Threshold allows you to exclude areas with low contrast, preventing noise from being sharpened. Many photographers and designers still rely on USM for its straightforward approach, especially for images destined for web use where a strong "pop" is desired.
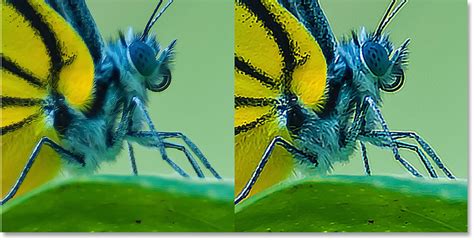
However, the Smart Sharpen filter represents a significant advancement. As the name suggests, it's a "smarter" tool, designed to provide more control and produce cleaner results. One of its key advantages is its ability to detect edges. Unlike Unsharp Mask, which sharpens all pixels regardless of whether they are part of an edge or noise, Smart Sharpen can differentiate, sharpening edges more effectively while leaving noise relatively untouched. This leads to a more natural-looking sharpen with less prominent halos.
Leveraging Smart Objects for Non-Destructive Editing
A crucial aspect of working with sharpening filters in Photoshop, especially the more advanced ones like Smart Sharpen, is the use of Smart Objects. Converting a layer into a Smart Object (by right-clicking the layer and selecting "Convert to Smart Object") transforms it into a special layer that contains image data from the original file. The primary benefit here is that any filters applied to a Smart Object become "Smart Filters."
Smart Filters are infinitely editable. This means you can double-click on the Smart Filter in the Layers panel at any time to reopen its dialog box and adjust its settings. This non-destructive workflow is invaluable, allowing you to experiment with different sharpening levels and refine your adjustments without permanently altering the original image data. It also means you can easily mask out areas you don't want to be sharpened, offering granular control over the effect.
For example, if you've converted your image layer to a Smart Object, you can then apply the Smart Sharpen filter. A Layer Mask is automatically generated with the Smart Filter. You can then select a soft-edged brush and paint with black on the mask to hide the sharpening effect in specific areas (like smooth skies or skin tones) or paint with white to bring the sharpening back. This level of control ensures that your sharpening enhances, rather than detracts from, the overall image quality.
Unveiling the Smart Sharpen Dialog Box
To access the Smart Sharpen filter, navigate to Filter > Sharpen > Smart Sharpen. The dialog box that appears offers a comprehensive set of controls.
The Preview Window
On the left side of the dialog, you'll find an image preview. This window displays a magnified view of your image, typically at 100% zoom, providing the most accurate representation of the sharpening effect. You can resize the dialog box to enlarge this preview area and use the plus (+) and minus (-) icons to adjust the magnification. Clicking and dragging within the preview window allows you to move to different areas of the image, ensuring you can assess the sharpening across various details.
Presets and Customization
At the top right, a "Preset" dropdown menu offers pre-configured sharpening settings. While the "Default" preset can be a good starting point, it's often beneficial to save your preferred custom settings as new presets for future use. This is particularly useful if you frequently work with similar types of images or have a specific sharpening style you adhere to.
Core Sharpening Controls
Below the presets are the primary sharpening controls:
- Amount: This slider dictates the strength of the sharpening effect. Moving it to the right increases the contrast along edges, making details more pronounced. As with most sharpening, starting with a moderate value and gradually increasing it is recommended.
- Radius: This parameter controls the width of the area around an edge that the sharpening effect will influence. A smaller radius sharpens very fine details, while a larger radius affects broader edges. The optimal radius value is highly dependent on the image resolution and intended output. For web images, a smaller radius is generally preferred, while for print, a slightly larger radius might be necessary to compensate for the printing process.
- Reduce Noise: This slider, available in Photoshop CC and later versions, is a powerful tool for mitigating the noise that can be amplified by sharpening. It helps to clean up grainy areas, ensuring that the enhanced details don't come at the cost of image quality. It's important to use this judiciously, as overusing it can smooth out desirable details.
Targeted Blur Removal
A critical feature of Smart Sharpen is its ability to intelligently remove specific types of blur. The "Remove" dropdown menu offers three options:
- Gaussian Blur: When selected, Smart Sharpen behaves much like the classic Unsharp Mask filter, applying a general sharpening effect.
- Lens Blur: This is the most versatile option and is often the best choice for most situations. It's specifically designed to address softness caused by lens imperfections or general image blur, and it's also when Smart Sharpen gains its edge-detection capabilities.
- Motion Blur: This option is tailored to counteract blur caused by camera movement during the exposure.
The choice of "Remove" type, particularly "Lens Blur," is essential for enabling Smart Sharpen's edge detection, which is key to its ability to sharpen edges without excessively sharpening noise.
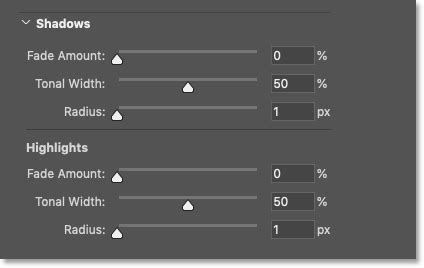
Advanced Controls: Shadows and Highlights
The "Shadows" and "Highlights" tabs provide granular control over how sharpening is applied to the darker and lighter areas of your image, respectively. This is where Smart Sharpen truly excels in preserving detail and avoiding common sharpening artifacts.
- Fade Amount: This slider allows you to reduce the intensity of the sharpening effect within the shadows or highlights. Increasing the fade amount means less sharpening is applied to those specific tonal ranges.
- Tonal Width: This control defines the range of brightness levels within the shadows or highlights that the "Fade Amount" will affect. Lower values target only the darkest or brightest pixels, while higher values encompass more of the midtones.
- Radius: Similar to the main Radius control, this setting determines the width of the area around pixels that Photoshop analyzes to determine if they fall within the specified tonal range.
These advanced controls are invaluable for preventing clipping (where highlights are blown out to pure white or shadows are crushed to pure black) and for maintaining detail in challenging tonal areas. For instance, if sharpening causes bright areas around an object's edges to become overexposed, you can use the "Fade Amount" in the Highlights section to dial back the sharpening in those specific areas.
Common Sharpening Pitfalls and How to Avoid Them
Despite the power of Smart Sharpen, it's still possible to over-sharpen an image, leading to undesirable results. Understanding these common pitfalls is key to achieving professional-looking results.
Halos and Artifacts
Sharpening halos are bright or dark outlines that appear around edges when the contrast is increased too aggressively or the radius is too wide. While Smart Sharpen is better at minimizing these than Unsharp Mask, they can still occur. To avoid them, keep the Radius value as low as possible while still achieving the desired sharpness. If halos appear, reduce the Radius and adjust the Amount accordingly.
Noise Amplification
Sharpening can exacerbate existing noise in an image, making it more noticeable and distracting. The "Reduce Noise" slider in Smart Sharpen is your first line of defense. Additionally, consider using Photoshop's dedicated "Reduce Noise" filter before applying sharpening, especially on images captured at high ISO settings.
Clipping and Loss of Detail
Over-sharpening can lead to clipping in the highlights and shadows, where the brightest or darkest pixels are pushed to pure white or black, respectively, resulting in a loss of detail. The Shadows and Highlights controls within Smart Sharpen are specifically designed to combat this. By carefully adjusting the "Fade Amount" in these sections, you can restore clipped detail without compromising the overall sharpness.
Color Shifts
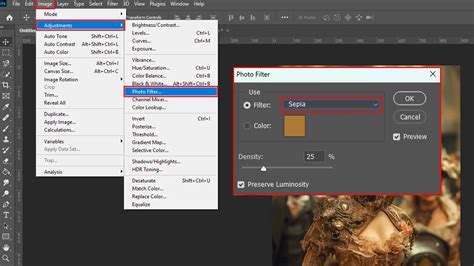
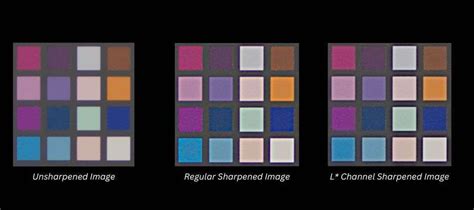
A common issue with some sharpening methods is the alteration of color information. This is particularly problematic when sharpening in RGB mode. A highly effective way to circumvent this is to convert your image to LAB Color mode (Image > Mode > LAB Color). In LAB mode, the image is divided into three channels: Lightness (L), and two color channels (A and B). By applying sharpening exclusively to the Lightness channel, you can enhance detail without affecting the color integrity of the image. Smart Filters also work effectively in LAB mode.
Alternative Sharpening Techniques
While Smart Sharpen is a powerful tool, other methods offer unique advantages:
High Pass Sharpening
The High Pass filter is another popular technique for sharpening images, often favored for its subtlety. To use it, duplicate your layer (Command/Ctrl + J), then go to Filter > Other > High Pass. Adjust the Radius so that only the edges and details of your image become visible. Then, change the blend mode of this High Pass layer to "Overlay," "Soft Light," or "Hard Light." This method allows for very fine control over the sharpening effect and is excellent for portraits where you want to enhance fine details without introducing harshness.
Camera Raw Filter
For those working with RAW files, the Camera Raw filter (accessible via Filter > Camera Raw Filter) offers robust sharpening and noise reduction tools within its "Detail" panel. This integrated approach can streamline the editing process, especially when dealing with raw image data.
Sharpening for Different Mediums
The level of sharpening required can vary significantly depending on how the image will be viewed or printed.
- Web/Screen Display: Images intended for online viewing often benefit from a moderate level of sharpening. Excessive sharpening can look artificial on screens, and the compression applied to web images can sometimes soften details, so a noticeable sharpen is often desired.
- Print: Images destined for print generally require more sharpening. The printing process itself can introduce a slight softening effect, and the higher resolution of print media means that finer details can be rendered more effectively with a stronger sharpen. When sharpening for print, a slightly higher Radius value might be necessary.
Conclusion: The Art of Refinement
Sharpening is often one of the final steps in the post-processing workflow, the "finishing touch" that elevates an image from good to great. The Smart Sharpen filter in Photoshop, when understood and applied correctly, offers an unparalleled level of control and precision. By embracing non-destructive editing with Smart Objects, understanding the nuances of its dialog box, and being mindful of common pitfalls, you can transform your images, bringing out their inherent detail and clarity to create truly compelling visuals. Experimentation is key; each image is unique, and finding the perfect sharpening settings often involves a delicate balance of adjustments tailored to its specific characteristics and intended use.