DaVinci Resolve is a powerful, all-in-one solution for video editing, color correction, compositing, and audio post-production. For those looking to elevate their video projects from good to great, understanding and implementing sound effects is paramount. This tutorial delves into the diverse array of sound effects and audio manipulation tools available within DaVinci Resolve, focusing on the user-friendly application of these elements on the Edit and Fairlight pages.
The Foundation: DaVinci Resolve's Integrated Workflow
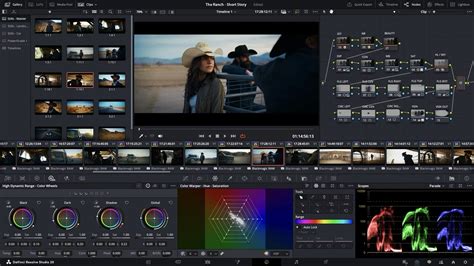
DaVinci Resolve's interface is thoughtfully organized into distinct pages, each dedicated to a specific aspect of post-production. The Cut and Edit pages offer accessible tools for general video editing, including the integration of audio elements. For more specialized and advanced audio work, the Fairlight page provides a professional-grade digital audio workstation (DAW) environment. This integrated approach means that a vast array of effects, transitions, titles, generators, and audio tools are readily accessible within the Effects Library.
The Effects Library, a central hub for all creative assets, categorizes these tools into three primary sections: the Toolbox, OpenFX, and AudioFX. Within these categories, users will discover a rich selection of video and audio transitions, titles, generators, and specific DaVinci Resolve effects, designed to enhance visual and auditory storytelling.
Elevating Your Visuals: Video Transitions and Titles
While this tutorial primarily focuses on sound effects, a brief understanding of video transitions and titles is beneficial, as they often work in tandem with audio to create a cohesive final product. DaVinci Resolve offers all the common video transitions, including dissolve, push, shapes, and wipes. More advanced editions introduce Fusion transitions such as camera shake, circles, and crash zoom, adding dynamic appeal to your footage.
The Cross Dissolve is the default transition, indicated by a small red bar. Users can easily change this standard by right-clicking a desired transition and selecting "Set as Standard Transition." Clicking the star icon next to any transition adds it to your DaVinci effects favorites for quick access.
To apply a transition between clips, or at the beginning or end of a clip, simply drag it onto the desired point on the timeline. The length of the transition can then be adjusted using the on-screen bars. For applying a transition to multiple clips simultaneously, select the clips or edit points, then navigate to Timeline > Add Video Only Transition. The keyboard shortcut Option+T (or Alt+T on Windows) also provides a quick way to add a video transition.
Titles and text elements are equally important for conveying information and adding visual flair. The Effects Library categorizes titles into three groups: Titles, Fusion Titles, and Subtitles. The basic "Titles" category is suitable for static text, while "Fusion Titles" offer animated text options with advanced effects, often indicated by a lightning icon signifying a Fusion clip that supports motion blur.
To add a title, drag the chosen title from the Effects Library to the timeline and customize its appearance and animation in the Inspector panel. A key distinction to remember is that standard titles are placed on video tracks, while subtitles require a dedicated subtitle track.
Harnessing the Power of Audio: Sound Effects and Fairlight
DaVinci Resolve boasts rich audio options alongside its extensive video effects library. You can easily add sound effects and even stock music to your videos directly on the Cut and Edit pages. For more intricate audio editing and mixing, the Fairlight page is an indispensable tool, offering a professional-grade environment with a vast number of audio effects and transitions.
Audio effects are applied much like video transitions and filters. The most straightforward method is to drag the desired audio effect or transition directly onto the clip or between clips on the timeline. Alternatively, you can select the edit point, right-click, and choose "Add to Selected Edit Points and Clips."
The Fairlight Sound Library: A Deep Dive
The Fairlight page is where the true magic of audio post-production happens. It provides advanced tools for mixing, mastering, and sound design, including the powerful Sound Library. This library is crucial for efficiently managing and deploying sound effects.
One particularly engaging feature within Fairlight is the Sampler. This tool allows you to assign any sound to a range of keys on a virtual keyboard, enabling creative sound design and the creation of custom instrument patches. To assign a sample to a key, you can drag an audio clip directly from the Media Pool onto the desired key on the Sampler interface. For instance, if you have a long audio file containing multiple distinct sounds, like footsteps, you can drag that source file into the Sampler multiple times, mapping each instance to a specific key or range of keys.
Create Cinematic Audio in DaVinci Resolve in Under 5 minutes!
After assigning a sound sample to a key, you can define the "Keys Low" and "Keys High" range for that mapping. This allows you to control which notes on your MIDI controller trigger specific sounds or sections of an audio file. For example, if the first pad on your MIDI controller corresponds to the note C5 (MIDI value 72), you can map a specific segment of your "footsteps" audio file to that key. By repeating this process, you can build complex soundscapes and trigger them dynamically.
While Fairlight doesn't include a built-in MIDI sequencer, it is fully capable of recording virtual instruments. To record a performance from a MIDI controller, you simply need to record-arm the track and initiate recording within the transport controls. This allows you to play back your MIDI controller, capturing your performance as an audio file. This is incredibly useful for recording foley, such as footsteps, in sync with your video. As the on-screen character walks, you can play the corresponding footstep sounds on your MIDI controller, ensuring precise synchronization and a natural feel. This process of mapping and recording is fundamental to getting started with the Fairlight Sound Library and creating professional-sounding audio for your projects.
Exploring DaVinci Resolve Effects
Beyond transitions and audio manipulation, DaVinci Resolve offers a robust suite of effects that can be applied to video clips, text, and even entire sections of your timeline.
Generators: Building Blocks for Visuals
Generators are essential utility items found in most video editing applications. DaVinci Resolve's Generators category includes fundamental elements like color bars, solid colors, and gradients, which serve as foundational layers for various creative applications.
OpenFX: ResolveFX and Third-Party Plugins
The OpenFX category is where you'll discover ResolveFX, DaVinci Resolve's proprietary set of effects, as well as third-party plugins formatted as OFX. It's important to note that many of the more advanced ResolveFX are exclusive to the paid Studio version of DaVinci Resolve. Applying these effects in the free version will result in a watermark on the output. For professional users, the Studio version unlocks powerful features such as retouching, film grain, glow, and lens flare, which can significantly enhance the polish and visual appeal of a project.
Key Effect Categories: Adjustment Clips and Fusion Compositions
Within the broader effects landscape, two categories stand out for their power and versatility: Adjustment Clips and Fusion Compositions.
Adjustment Clips: These act as powerful organizational tools, allowing you to apply a single effect or a series of stacked effects to multiple clips simultaneously. They function similarly to adjustment layers in Adobe applications like Photoshop, Premiere Pro, and After Effects. To use an Adjustment Clip, drag it onto a video track positioned above the clips you wish to affect. For example, if your primary video clips are on Video Track 1, you would place the Adjustment Clip on Video Track 2.
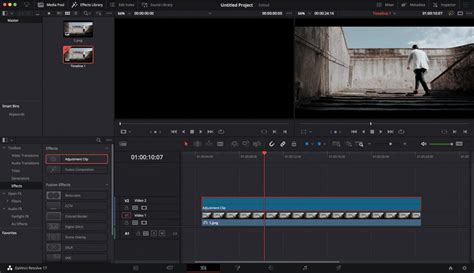
To apply an effect, simply drag and drop it from the Effects Library onto the Adjustment Clip. The settings for the effect can then be fine-tuned within the OpenFX Inspector panel. If an effect's controls are not immediately visible, double-clicking on the relevant slider will expand them. The ability to stack multiple effects on an Adjustment Clip allows for the creation of highly complex and nuanced looks. Crucially, both ResolveFX and third-party OFX effects can be applied to Adjustment Clips, offering immense creative freedom.
Fusion Compositions: This category is dedicated to advanced motion graphics and compositing, offering capabilities comparable to Adobe After Effects. When you drag a Fusion Composition onto your timeline, an empty Fusion container is created. This acts as a canvas for building sophisticated visual elements.
To understand how Fusion works, consider creating a simple animated title. Drag a Fusion Composition onto a track above your video clips (e.g., Video Track 2) and ensure its duration matches that of the desired title sequence. The three stars on the clip in the timeline indicate that it is a Fusion clip.
Once you navigate to the Fusion page, you'll encounter a node-based interface. Nodes are the fundamental building blocks in Fusion, representing different operations or elements that are connected to form a complete effect. The "MediaOut1" node is crucial; it's how Fusion outputs the final rendered result. To integrate your title, click the "Title" option on the toolbar and connect the resulting "Title" node to the "MediaOut1" node. This process establishes the flow of information, rendering your animated title as part of your video.
Beyond Built-in Tools: Exploring Effects Packs
While DaVinci Resolve provides a comprehensive set of built-in effects, transitions, and audio tools, the creative possibilities are further expanded by a vast ecosystem of third-party effects packs. These packs, available from various online marketplaces and creators, offer high-quality assets that can significantly speed up your workflow and introduce unique stylistic elements.
Motion Array, for instance, offers a large library of effects, titles, and transitions designed to help users create professional-looking videos quickly and efficiently. For those facing tight deadlines, utilizing these pre-made assets can be an invaluable time-saver, allowing you to focus on the narrative and overall vision of your project rather than spending excessive time on individual effect creation.
By understanding the fundamental DaVinci Resolve effects and how to apply them, and by knowing where to look for additional creative resources, editors can powerfully enhance their video projects. This tutorial has provided a solid overview of the options available, empowering you to explore the vast potential of sound effects and visual enhancements within DaVinci Resolve.