Achieving a perfectly composed photograph often involves more than just capturing the moment; it requires meticulous post-processing. Among the most fundamental and frequently utilized editing techniques in Adobe Photoshop is cropping, a process that serves an array of benefits and purposes. While the ideal scenario is to capture the perfect shot directly through the camera lens, minimizing the need for extensive editing, reality often presents us with less-than-ideal circumstances. Sometimes, an otherwise stunning photo is just a bit crooked, or an unintended element mars the composition. These are precisely the moments where Photoshop's powerful cropping and straightening tools become invaluable allies, allowing you to refine your images and elevate their visual impact.
The Fundamental Role of Cropping in Photo Editing
Cropping an image is a cornerstone of photo editing, offering a straightforward yet impactful way to enhance composition, eliminate distractions, and improve the overall aesthetic of a photograph. It is one of the most used Photoshop elements, serving a multitude of benefits. For instance, if you need to crop an image but still require a specific height and width for a social media post, or if dimensions don't matter at all and you simply desire that perfect-looking photo, cropping is the solution. This process allows you to remove unwanted areas of an image, thereby focusing the viewer's attention on the subject matter and creating a more compelling narrative within the frame.
While hardcore photographers might advocate for capturing the ideal shot in-camera to avoid post-production work, and many introductory photography classes discourage cropping to foster thoughtful composition, the reality for many users is that editing is a necessary and beneficial part of the workflow. There are still plenty of perfectly valid times where a bit of cropping makes an image stronger. Sometimes, you can’t help but alter the scenery or angle when you have less than a minute to take the shot. These are exactly the times where using the cropping tool can be your friend. It makes your life easier and also makes you better at taking snapshots in the long run.
Navigating Photoshop's Crop Tool
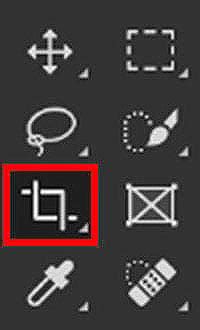
The absolute easiest method to crop an image in Photoshop is by utilizing the dedicated Crop Tool found in the toolbar. You will usually see it on the left side of the screen, but if it’s not immediately apparent, you can also find it using the search bar. The beauty of the Crop Tool lies in its flexibility; it is entirely up to you how you want to use it. Want just a sliver cut out from the original size? Easy. Needing an entire section removed to hide that embarrassing background? Also easy.
To begin, select the Crop Tool in the Tools panel, or simply press 'C' on your keyboard, which is its designated shortcut. Once the tool is activated, you'll notice a bounding box around your image, defining the area that will be kept. You have a few tools and options at your disposal when cropping your image.
Adjusting Dimensions and Aspect Ratios
If you are looking for a specific aspect ratio, you can easily change the dimensions of the crop in the uppermost toolbar. In the dropdown bar, you will find many options: you can select WxH (width and height) ratios, predetermined PPI (pixels per inch, also known as the clarity of a photo), or, if you already know the dimensions, you can insert them manually. This feature is incredibly useful for ensuring your images meet the precise requirements for various platforms, from social media to print.
And what if you change your mind about the crop dimensions? You can do that too. When you are changing the size or dimension of your crop box, simply select any of the four corners with your mouse. If you are using a specific crop dimension, remember that the dimension will always remain the same as you make the crop smaller or larger. If you are using a manual crop box, however, the width and height of the crop box will change with each corner selection. Before deciding on your perfect crop, note that you can easily move the crop box in and around the original image by executing a simple click and drag to your desired location.
Advanced Cropping Techniques: Perspective and Content-Aware Fill
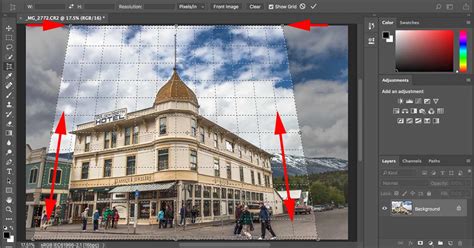
Beyond basic cropping, Photoshop offers advanced tools to tackle more complex editing scenarios. Introduced in Photoshop 15, the Perspective Crop Tool is a truly unique feature that allows you to not only crop an image but also alter its actual perspective. This is particularly useful for correcting "keystone distortion," a common issue where vertical lines in an image appear to converge, often seen in photos of buildings taken from a low angle.
To use the Perspective Crop Tool, with your photo already uploaded into Photoshop, type "perspective crop" into your search bar. To specify the size you want, keep the cropping tool still activated and draw a box on the part of the picture that you want to keep. One of the most widely regarded uses for the Perspective Crop Tool is to straighten the angle of the image. For the absolute best results at straightening your photo’s angle with the Perspective Crop Tool, you should try aligning the vertical edges of the rectangle with the vertical lines of the picture.
Another powerful feature, introduced in Photoshop CC 2015.5, is the Content-Aware Fill integrated with the Crop Tool. This is an excellent tool if you are looking to rotate an image but want to maintain its background imagery and/or color. To execute Content-Aware Fill perfectly, go to the top of your toolbar and select the "Crop" tool. In the options bar, click "Content-Aware." After doing so, the original crop rectangle will automatically expand to include the entire selected image. Move the cursor outside of a corner of your desired crop location. A curved, double-pointed arrow will display. Rotate the image as you deem fit, then release the mouse. Click the checkmark or hit Enter on your keyboard once the desired rotation is complete. This intelligent feature analyzes the surrounding pixels and intelligently fills in the newly created transparent areas, seamlessly extending the background.
Straightening Images: Precision and Ease
Mistakes happen, especially when taking photos! For that perfect shot that is just a tad misaligned, Photoshop offers several straightforward methods to straighten an image instantly.
The Straighten Tool within the Crop Tool
One of the most efficient ways to straighten an image is by using the Crop Tool itself. For the perfect shot that is just a tad misaligned, straighten the image instantly in Photoshop’s Cropping tool. In the cropping toolbar above the image, select the straighten icon. The image will be cropped according to the angle of the line you draw, while Photoshop will delete all sections outside the crop. Note that at the top toolbar, there is a "delete cropped pixels" option.
To execute this, activate the Crop Tool (C). Then, in the options bar at the top of the screen, you'll see a "Straighten" icon. Click on this icon. Now, find a clear horizontal or vertical line within your image that should be straight, such as a horizon, a building edge, or a table. Click and drag along this line with the Straighten Tool. The farther you drag the Straighten Tool, the easier it is to align it with the reference line. Once you release the mouse button, Photoshop will automatically rotate and crop the image to straighten it based on the line you drew.
Straighten Tool in Photoshop
Using the Ruler Tool for Precise Alignment
While the Straighten Tool is convenient, some users prefer the greater control offered by the Ruler Tool. The Ruler Tool, often nested behind the Eyedropper Tool in the Toolbar, works similarly but with a key difference: it doesn't automatically crop the image upon line creation.
Using the Ruler Tool to straighten an image is akin to using the Straighten Tool, but with a couple of important distinctions. Select the Ruler Tool. Click on the left side of the line you want to straighten (e.g., the horizon) to set a starting point. Then, with your mouse button still held down, drag across to the right side to set the endpoint. Unlike the Straighten Tool, Photoshop does not automatically rotate the image at this stage. This allows you to meticulously reposition the start and end points of your line if they aren't perfectly aligned. Once you are satisfied with the line, you can then go to Image > Crop to apply the straightening and cropping. This method provides a bit more work but offers far more power and precision, especially for complex straightening tasks.
Leveraging Camera Raw Filter for Advanced Adjustments
For even greater control and to address more complex distortions, Photoshop's Camera Raw filter is an indispensable tool. This method involves a little more work but is far more powerful than the other methods of straightening an image. In the Photoshop menu, select "Filter | Camera Raw Filter…". This will open the image or image layer in Camera Raw. You can then click the icon for the Transform Tools from the toolbar along the top. These tools give you complete control over leveling the image, as well as correcting all manner of distortions, including converging verticals.
Compositional Aids: Grids and Guides
To further assist in achieving perfect alignment and composition, Photoshop offers helpful grid and guide options within the Crop Tool. If you are looking for some additional help on perspective or straightening, be sure to take advantage of the cropping tool’s unique grid options. By clicking the grid-like icon at the top of your toolbar, Photoshop will present you with a drop-down menu of options that will aid in your visualization.
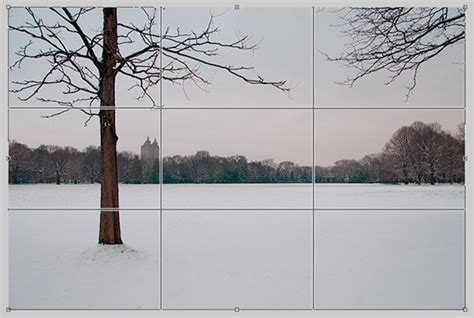
One particularly useful option is the "Rule of Thirds" compositional guide. To activate this, enable the "Rule of Thirds" option within the Crop Tool settings. This will display guidelines that divide the image into nine equal parts. For optimal composition, position key elements of your image along these lines or at their intersections. You can also add new Guides manually by selecting "View | New Guide…" in the menu and specifying their orientation (horizontal or vertical) and position. These guides, along with the grid, serve as visual benchmarks, helping you to align elements precisely and ensure a balanced and aesthetically pleasing final image.
Beyond the Crop Tool: The Pen Tool for Precision Cutting
While the Crop Tool is the primary instrument for cropping, it's worth noting that other powerful tools in Photoshop can also be used for cutting and cropping images with incredible precision. The versatile Pen Tool, for instance, can be used to create custom selections and vector shapes, which can then be used to isolate and crop specific areas of an image. If you're looking for more quick tutorials on its capabilities, you can find blogs that show you how to remove the background from an image, resize a layer, and outline text in Photoshop.
Embracing AI for Enhanced Straightening
In cases where preserving details during straightening is a concern, especially with complex images or significant adjustments, consider exploring AI-powered tools. Tools like Generative Fill can assist in intelligently extending backgrounds after rotation or cropping, maintaining visual consistency and detail. To activate "Generative Fill," you'll typically select an area, and then click the checkbox to activate the feature. To refine areas generated by Generative Fill, select the Selection Brush Tool (found with the Lasso Tool) and carefully paint over the specific regions you wish to adjust. This technology offers a glimpse into the future of photo editing, where artificial intelligence assists in achieving professional-level results with greater efficiency.
Artistic Considerations: When Crookedness Works
It's important to remember that while straightening is often about removing distractions and ensuring a deliberate composition, there are instances where a "crooked" or tilted image can be used for artistic effect. Flower photographers sometimes tilt the camera to emphasize long stems. Street and architectural photographers sometimes tilt the camera to add a sense of immediacy to the scene or to fill the frame with the subject. At the end of the day, if you notice a crooked horizon but you’re not sure you want to fix it, that’s okay! Perhaps try to straighten it up, then compare the before and after. See what you think.
Conclusion: A Foundational Editing Skill
Knowing how to effectively straighten and crop images is crucial for enhancing their visual impact and improving overall composition. These techniques are not merely technical corrections but foundational editing habits that can significantly elevate your photography. While straightening an image in Photoshop is often treated as a quick fix, learning to do it accurately ensures that your images are not just technically sound but also artistically compelling. By mastering these tools and techniques, you can transform ordinary snapshots into polished, professional-looking photographs. So go practice! Find some images that need straightening, then test out the methods shared!
tags: #straighten #tool #in #photoshop