Adobe Photoshop stands as a cornerstone of digital image editing, offering a vast array of tools and functionalities that can initially seem overwhelming, especially for newcomers. However, for students and educators, Photoshop, as part of the Adobe Creative Cloud, unlocks a world of creative possibilities, enhanced by accessible resources and often available at significant educational discounts. This comprehensive tutorial aims to demystify Photoshop, guiding students through its essential features, powerful tools, and advanced techniques, from basic image adjustments to complex graphic design projects. Creative Cloud members have access to thousands of fonts and resources to enhance their projects, and customizing Photoshop's preferences can greatly improve workflow, allowing for the setup of keyboard shortcuts for the most-used tools.
Understanding the Photoshop Interface and Workspace
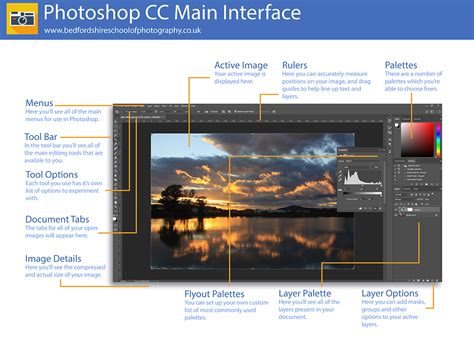
The first step to mastering Photoshop is to become familiar with its interface. Photoshop is a powerful tool for digital image editing, and its layout is highly customizable. We can customize the layout by dragging panels and adjusting the workspace to suit our individual needs and workflow. Understanding the purpose of each panel, such as the Tools panel, Options bar, and Layers panel, is crucial. The Tools panel houses all the essential tools for editing and creating images, while the Options bar displays settings specific to the currently selected tool. The Layers panel is perhaps the most critical, allowing for non-destructive editing by working on different elements of an image separately.
Essential Image Adjustments for Beginners
Photoshop offers powerful tools for enhancing images, and starting with basic adjustments is key to improving any photograph. Cropping helps focus on the main subject of an image. To crop, we select the Crop Tool from the toolbar and drag the handles to define the desired area. Resizing changes the dimensions of an image. We go to Image > Image Size to adjust the width and height. For web images, it's often necessary to reduce file size without compromising quality.
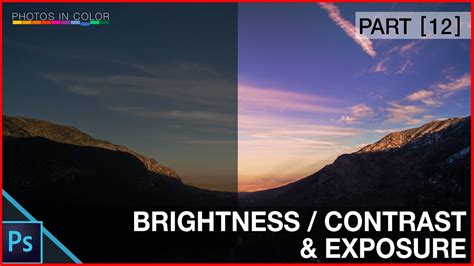
Brightness and contrast controls help improve image tone, making images lighter or darker and increasing or decreasing the difference between light and dark areas. The Levels tool lets us fine-tune shadows, midtones, and highlights, offering more control over the tonal range of an image. For even more granular control, we use Curves. This powerful tool allows us to adjust specific tonal ranges by manipulating a curve graph, offering precise control over the overall look and feel of an image.
The Power of Layers and Masks
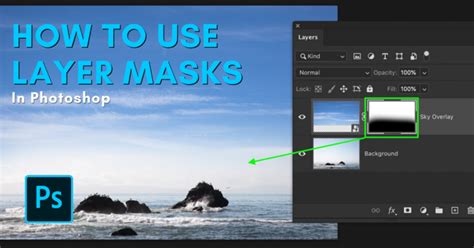
Layers are a fundamental and indispensable feature in Photoshop. They function like transparent sheets stacked on top of each other, allowing us to work on different parts of an image separately. This non-destructive approach means that changes made to one layer do not affect others, providing immense flexibility and the ability to easily correct mistakes. We use masks to hide or reveal parts of a layer. To add a mask, we click the mask icon in the Layers panel. A mask essentially acts as a stencil, allowing us to selectively apply effects or edits to specific areas without permanently altering the original pixels.
Blending modes change how layers interact with each other, offering a vast array of creative possibilities. By experimenting with different modes such as Multiply, Screen, Overlay, or Soft Light, we can create unique lighting effects, color adjustments, and sophisticated visual compositions. Understanding how each blending mode affects the underlying layers is key to unlocking their full potential.
Advanced Photo Manipulation Techniques
Advanced photo manipulation techniques can transform ordinary images into stunning works of art. Content-Aware editing in Photoshop allows us to seamlessly remove or add elements to images with remarkable accuracy. For more complex edits, the Content-Aware Move tool lets us reposition objects within an image while Photoshop intelligently fills in the gaps, making it appear as if the object was never there. The Content-Aware Scale feature is incredibly useful for resizing specific parts of an image, such as a person or an object, without distorting key elements or the overall composition.
Advanced retouching techniques help us restore damaged photos or create flawless portraits. For precise edits, we use the Clone Stamp tool to paint over imperfections with sampled pixels from elsewhere in the image. This is invaluable for removing blemishes, scars, or unwanted objects. Frequency separation is a powerful method for retouching skin, allowing for the separation of texture and color details, which can then be edited independently to achieve a smooth yet natural look.
Mastering Typography in Photoshop
Typography plays a huge role in graphic design, and Photoshop provides robust tools for working with text. To add text in Photoshop, we use the Type Tool. Simply click it in the toolbar and then click on the canvas to start typing. To edit existing text, double-click the text layer in the Layers panel. For precise positioning of text, we use the Move Tool. Text layers are incredibly versatile. To create curved text, we can use the Pen Tool to draw a path and then use the Type Tool to type along that path, or utilize the Path Selection Tool for adjustments.
Photoshop offers powerful tools for creating text effects. The Warp Text option allows us to bend text into various shapes, adding dynamic flair to our designs. We can also create custom brushes to add unique textures to text, or use layer masks to seamlessly blend text with images. Layer styles, such as drop shadows, bevels, and glows, can be applied to text to add depth and dimension. Text styles are a time-saving feature for large projects, allowing us to save a specific combination of formatting, layer styles, and effects. To make a new style, we format text with the desired font, size, and color, and then include any desired layer styles. For consistency across a project, we often create a set of styles for headings, body text, and captions, which can also be shared between documents.
Photoshop Text effect Compilation: 18 Simple Text Effects for Beginners
Designing Graphics and Logos
Photoshop offers powerful tools for creating stunning graphic design projects, from logos to web banners. Logos are the face of a brand, and their design requires careful consideration. We can start by sketching ideas on paper or by utilizing Photoshop's drawing tools. For text in logos, we experiment with different fonts and customize them to fit the brand's personality. Color is crucial; we use Photoshop's color picker to choose a palette that matches the brand's identity. Photoshop tutorials can help refine logo design skills, guiding students through best practices for creating memorable and effective brand marks.
Web graphics need to be eye-catching and load quickly. For banners, we focus on clear messaging and strong visuals. We use Photoshop's type tools to create attention-grabbing headlines and employ shape tools and layer styles to create compelling buttons and icons. Animated banners can be made using Photoshop's timeline feature, adding dynamism to online advertisements.
Print design requires meticulous attention to detail and an understanding of color modes (CMYK for print vs. RGB for digital). Brochures and flyers are common print projects. We start with a clear layout, using guides and grids to align elements precisely. For business cards, the focus is on making a strong first impression. We design within standard card dimensions and ensure adequate bleed, which is the area that extends beyond the trim edge to prevent white borders after cutting.

Student and Teacher Resources and Discounts
Adobe understands the importance of empowering students and educators with powerful creative tools. Photoshop opens up many creative possibilities for classroom projects, helping students learn essential design skills while working on curriculum topics. Adobe provides special deals and resources for students and teachers using Photoshop. Students and teachers can save significantly on Photoshop through Adobe Creative Cloud. This educational offering often includes Photoshop alongside over 20 other Creative Cloud apps, providing a comprehensive suite for all creative needs. The student and teacher versions possess the same features as the full professional version, ensuring no compromise in functionality. To qualify for these educational discounts, individuals typically need to prove their status as a student or educator.
Adobe provides many free resources to help students and teachers learn Photoshop. The Creative Cloud has a dedicated "Learn Photoshop" section, organizing content by topic and difficulty. Yes, many free Photoshop tutorials are available directly within Creative Cloud, including video lessons, step-by-step guides, and hands-on projects. The Photoshop Learn & Support page is a great starting point for accessing these resources. Many of our tutorials are available online and do not require downloading, though some may offer downloadable project files to facilitate following along with the lessons.
For peer support, students can check out Adobe's online forums, where a vast community of users shares tips, solutions, and inspiration. Many schools also have Adobe user groups, providing a local network for learning and collaboration. We recommend starting with simple tasks and working through tutorials in order of difficulty, rather than rushing to advanced topics before mastering the basics. Yes, many step-by-step guides for Photoshop are available in Creative Cloud, breaking down complex tasks into simple, manageable steps.
Streamlining Your Workflow and Speeding Up Tasks
Photoshop offers many ways to work faster and smarter, crucial for students managing multiple projects and deadlines. We can speed up our Photoshop work by setting up custom toolbars and keyboard shortcuts. For shortcuts, we navigate to Edit > Keyboard Shortcuts. Here, we can assign keys for our most-used tools and menu items, significantly reducing the time spent navigating menus. It's smart to group similar tools together in the toolbar; for example, placing all retouching tools in one section can improve efficiency.
Photoshop's batch tools are invaluable for editing many images at once. The Droplets feature allows us to create small executable files that apply a predefined set of edits to an entire folder of photos with a single click. For more complex, repetitive tasks, we can utilize scripts. Scripts are text files containing Photoshop commands that can automate intricate workflows.
Creative Cloud makes team projects significantly easier. We can share files, fonts, and color palettes seamlessly with our collaborators, ensuring everyone is working with the same assets. Furthermore, we can leverage third-party integrations to connect Photoshop with project management tools, streamlining the entire creative process from concept to delivery.

Creative Project Ideas and Applications
The possibilities for creative projects in Photoshop are virtually limitless. Students can learn to fix warped perspectives in their photos, a common issue with wide-angle lenses or shots taken from unusual angles. Ready to dive into the world of creating conceptual artwork? Tutorials cover everything needed, from mastering subject cutouts and harmonizing color and lighting in multiple images to even crafting a captivating parallax animation in After Effects, showcasing Photoshop's role in broader multimedia projects.
Students can learn how to create a breathtaking Northern Lights composite by blending different images, meticulously matching colors and light, and utilizing essential tools like Levels, Clipping Masks, Smart Objects, and Custom Photoshop Brushes. Another creative avenue is learning to create a unique artistic effect by combining a portrait with splatter effects, or to combine graphics and photos to create beautiful, surreal visual effects.
Mastering background removal is essential for many design tasks. Photoshop allows students to learn how to remove backgrounds from graphics and illustrations accurately and professionally, a skill vital for creating clean product mock-ups or website assets. Learning to create realistic shadows for compositing, product mock-ups, product placements, e-commerce, and graphic layouts adds a professional polish to any visual.
The integration of Lightroom Controls within Photoshop allows users to leverage powerful tools to improve any photo, offering advanced color grading and tonal adjustment options, especially through the Camera Raw filter. Students can also learn to create stunning and realistic lighting effects, or to build breathtaking nature composites using only free stock image assets and Photoshop savvy. Creating realistic light rays, for instance, can be achieved using Levels, Radial Blur, and Layer Masks, demonstrating the power of combining fundamental tools for advanced visual outcomes.