Adobe Photoshop offers a powerful and versatile toolkit for enhancing your images, and one of the most effective ways to add depth, character, and artistic flair is through the use of texture layers. Whether you're aiming for a vintage aesthetic, a grungy urban feel, or simply want to add visual interest to a flat background, understanding how to apply and manipulate textures can significantly elevate your graphic design projects and photographic work. This guide delves into the various techniques for incorporating texture layers in Photoshop, from basic blending modes to creating your own unique textures.
The Fundamental Approach: Layer Blending Modes
At its core, applying textures in Photoshop involves layering one image (the texture) over another (your base image) and controlling how they interact. This is where layer blending modes become indispensable tools. They dictate how the pixels of one layer blend with the pixels of the layers beneath it.
Step-by-Step Guide to Applying Textures
The process begins with your primary image and the texture you wish to apply.
- Open Your Image: Start by opening the image you want to add texture to in Adobe Photoshop. This will be your base layer.
- Import the Texture: Next, open the texture file you intend to use. Navigate to "File" > "Open" and select your texture image. This will typically open the texture in a new tab within Photoshop.
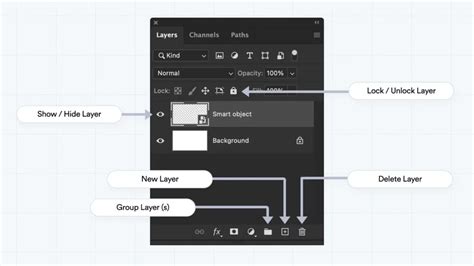
- Paste the Texture into Your Image: Switch back to your original image tab. To bring the texture into your project, press Ctrl/Command + V to paste it. This action places the texture as a new layer above your original image.
- Resize and Position the Texture: The imported texture layer may not perfectly align with your base image in terms of size and position. To rectify this, utilize the Move Tool, accessible via the shortcut 'V'. Click and drag the texture to reposition it. For scaling and rotation, use the handles that appear around the texture's bounding box. A more refined control over size, rotation, and skewing can be achieved by pressing Ctrl/Command + T for the Free Transform tool.

Harnessing the Power of 'Screen' Blending Mode
A highly effective blending mode for many textures, especially those with lighter tones, is 'Screen'.
- Apply the 'Screen' Blending Mode: In the Layers panel, ensure your texture layer is selected. Locate the blending mode drop-down menu, typically found at the top of the panel. Change the mode from 'Normal' to 'Screen'.
- Understanding 'Screen': The 'Screen' blending mode works by making the dark areas of the texture layer transparent and blending the lighter areas with the underlying image. This is excellent for overlaying subtle grain, light paper textures, or subtle grunge effects without obscuring the details of your original photo.
Fine-Tuning with Levels and Opacity
Once a basic texture is applied, further adjustments can significantly improve the result.
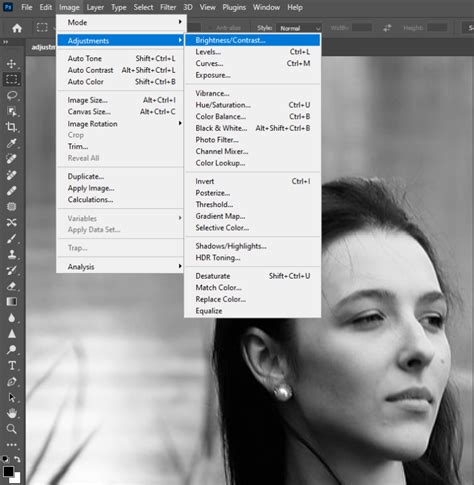
- Adjust Levels for Better Contrast (Optional): To enhance the impact and ensure the texture complements your design, you can adjust its tonal range.
- Select the texture layer in the Layers panel.
- Go to "Image" > "Adjustments" > "Levels."
- Within the Levels dialog box, a histogram displays the texture's tonal distribution. To deepen shadows, drag the black point slider to the right. To brighten highlights, move the white point slider to the left. The middle gray slider allows for midtone adjustments.
- Click "OK" when satisfied. This step is crucial for fine-tuning the texture's contrast to align with the mood and style of your overall design.
- Adjust Opacity (Optional): If the texture appears too dominant or overpowering, reducing its intensity is easily achieved by adjusting the layer's opacity.
- In the Layers panel, locate the Opacity slider.
- Drag the slider to the left until the texture achieves the desired subtlety and blends harmoniously with the underlying image.
Adding Depth with Multiple Textures and 'Multiply'
For more complex and nuanced effects, layering multiple textures is a common and effective strategy.
- Duplicate the Texture Layer (Optional): To build upon an existing texture effect, you can duplicate the current texture layer. Right-click on the texture layer in the Layers panel and select "Duplicate Layer." This allows you to apply different adjustments or blending modes to the duplicated layer, creating a richer composite.
- Apply the 'Multiply' Blending Mode (Optional): Introduce a different type of texture, perhaps a white paper texture with minimal distress, by adding another layer.
- Import and position this new texture layer as you did before.
- In the Layers panel, change its blending mode to 'Multiply'.
- Understanding 'Multiply': The 'Multiply' blending mode darkens areas of the image based on the color information of the blending layer. It blends the texture's dark areas with the underlying image while rendering the lighter areas transparent. This is particularly useful for adding darker, more solid textures or for creating a vignetting effect.
21 PHOTOSHOP TIPS – Easy Through Advanced!
Fine-tuning the opacity of this 'Multiply' texture layer, as described previously, is essential to ensure it integrates well without overwhelming the image.
The Versatility of Photoshop Textures
Photoshop textures are not merely decorative overlays; they are powerful tools that can fundamentally alter the perception and aesthetic of an image. They are effects that can be layered onto graphic design projects or photographs using blending modes to achieve unique outcomes. Opacity settings allow for precise control over how these layers interact.
Transforming Images with Textures
The applications are vast:
- Vintage Aesthetics: A family photo can be imbued with a vintage paper aesthetic by overlaying an old paper texture.
- Grungy Effects: A logo design can gain a raw, industrial feel with a grungy concrete texture.
- Visual Interest: Textures are excellent for injecting visual interest into otherwise plain backgrounds in vector graphics and web designs.
- Aged Appearance: Old paper or canvas textures can lend a photograph an aged, vintage look.
Advanced Texture Techniques
Beyond basic blending, Photoshop offers more sophisticated ways to integrate textures.
- Layer Masks: Layer masks are fundamental for controlling which parts of a texture are visible. By painting on a layer mask with black, you hide the texture in those areas, allowing the underlying image to show through. White reveals the texture, and shades of gray create semi-transparency. This allows for selective application, ensuring your subject remains clear while the background or specific elements gain textural qualities.
- To activate a layer mask, click its thumbnail in the Layers panel. You can then paint on the mask to reveal or conceal parts of the texture layer.
- File > Place Linked: For greater non-destructive control, consider using "File" > "Place Linked." This imports the texture image into your main document as a separate layer but maintains a link to the original texture file. Any edits made to the original texture file will be reflected in your Photoshop document, and conversely, edits within Photoshop (like transformations) are non-destructive to the original texture.
- Creating Brushes from Textures: For highly specific applications, you can convert textures into custom brushes. This allows you to "paint" texture onto your image with greater control.
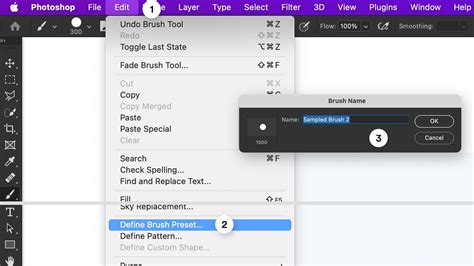
- Select the desired area of your texture using a selection tool like the Lasso Tool.
- Go to "Edit" > "Define Brush Preset." This converts the selected area into a new brush that can be accessed from the Brush Tool options.
Exploring Diverse Texture Sources
The origin of your textures can be as varied as your creative vision.
Photographing Your Own Textures
Building a personal library of textures is highly recommended. This not only provides unique assets but also ensures you can use them in competitions where stock assets might be prohibited. The key is to look for "patina" â the worn, rough look found on aged surfaces.
- Metal and Rust Textures: Look for old, rusty, or scratched metal surfaces. Ensure you photograph them as squarely as possible with even lighting for maximum usability.
- Textures from Tiles and Stones: Old tiles and stone slabs often possess natural textures and uneven surfaces that can be effective. Modern tiles with printed patterns can also work, especially when blurred.
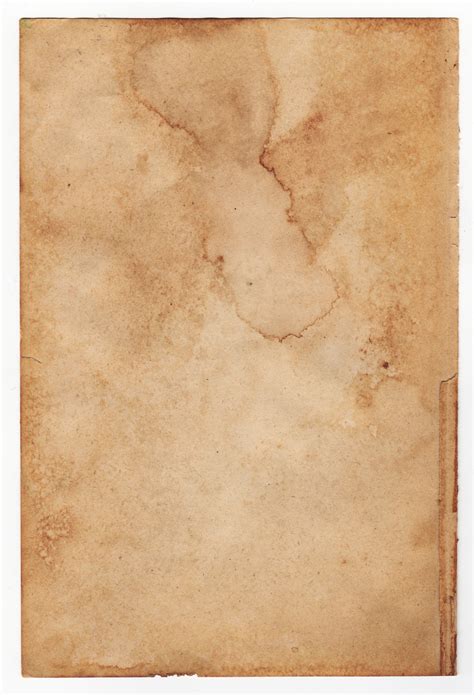
- Paper Textures: Various types of paper, from handmade to tea-stained, offer a rich source of patterns and textures. Be mindful of copyright if using printed materials.
Creating Your Own Textured Paper
A simple yet effective method for creating aged paper textures involves:
- Placing paper in a baking tray.
- Applying strong tea or coffee for staining.
- Drying in a low-temperature oven to fix the stain and add wrinkles.
- Adding charcoal dust or ashes for darker areas.
Lighter weight paper can buckle, while heavier cardstock is more robust. Matt paper generally absorbs stains better than glossy varieties.
Digitally Created Textures
For those who prefer working within Photoshop, digital creation offers numerous possibilities.
- Using Rendering Filters: Photoshop's "Filter" > "Render" menu includes options like Clouds and Fibers. Combining these rendered layers with different blending modes and blur effects can produce unique textures.
- Using Custom Brushes: Beyond pre-made brushes, creating your own from scanned marks or digital paintings adds a personal touch. Experimenting with brush dynamics (size, rotation, opacity jitter) prevents repetitive patterns.
Ready-Made Texture Layers
Numerous free and paid texture packs are available online from sources like Adobe Stock. However, always check resolution suitability and licensing restrictions, especially if you plan to use them commercially or in competitions.
Advanced Blending and Creative Applications
The true artistry in texture layering lies in combining different techniques.
Combining Blending Modes
As demonstrated with 'Screen' and 'Multiply', using multiple texture layers with distinct blending modes can create complex and visually rich results. For instance, one texture might add a subtle grain, while another introduces a darker, more pronounced pattern.
Desaturation and Blur
Often, the color of a texture can detract from the desired effect. Desaturating the texture layer (Ctrl/Command + Shift + U) removes its color, leaving only the tonal information. Adding blur, such as Gaussian Blur or Lens Blur, can soften the texture's details, making it more suitable as a background element or for creating atmospheric effects.
Layer Masks and Brush Control
Layer masks are paramount for selective application. By using textured brushes on a layer mask, you can precisely control where the texture appears, allowing elements of the underlying image to show through in a controlled manner. This is particularly useful for creating distressed effects or for integrating textures seamlessly.
Seamless Textures and Offset Filter
For repeating patterns, the "Offset" filter ("Filter" > "Other" > "Offset") is invaluable. It allows you to shift an image by a specified number of pixels horizontally and vertically. By offsetting a texture and then cloning or healing any visible seams, you can create a seamless tile that can be repeated infinitely without obvious breaks.
21 PHOTOSHOP TIPS – Easy Through Advanced!
Conclusion
Texture layers in Adobe Photoshop are a remarkably versatile tool for enhancing visual appeal. From subtle overlays to dramatic transformations, the ability to layer, blend, and adjust textures provides endless creative possibilities. By mastering the fundamental blending modes, understanding adjustment layers, and exploring various sources for texturesâwhether photographed, digitally created, or sourcedâyou can add depth, character, and a unique artistic signature to your work. The journey into texture layering is one of continuous experimentation and discovery, yielding rich and rewarding results for any visual project.