Tilt-shift photography, often perceived as an optical illusion, transforms everyday scenes into captivating miniature worlds. While specialized tilt-shift lenses are the traditional tools for achieving this effect, Photoshop offers a powerful and accessible way to simulate this unique distortion, making it possible for anyone to create the illusion of tiny, model-like subjects. This tutorial delves into the process of achieving a convincing tilt-shift effect within Photoshop, transforming your photographs into miniature dioramas.
Understanding the Tilt-Shift Concept
At its core, tilt-shift photography is about controlling the plane of focus. The term itself breaks down into two key movements: "tilt" and "shift." The "tilt" refers to the physical tilting of the camera's lens or sensor relative to the subject. This manipulation alters the plane of focus, allowing a narrow strip of the image to remain sharp while the areas above and below rapidly fall into blur. The "shift" movement, on the other hand, is primarily used to correct perspective distortion, particularly in architectural photography, by moving the lens parallel to the sensor.
However, for the miniature effect, it's the "tilt" aspect that is paramount. By creating an artificial, extremely shallow depth of field that doesn't correspond to the actual distance of the subject, the viewer's perception is tricked. Our brains are accustomed to seeing shallow depth of field in close-up macro photography, where subjects appear small. When applied to a large-scale scene, this shallow depth of field creates a disconnect, making the entire scene appear as if it were a small-scale model. This is why tilt-shift photography is often colloquially referred to as the "miniature effect" or "miniature faking."
Preparing Your Image for the Miniature Effect
Before diving into Photoshop, selecting the right image is crucial for a convincing tilt-shift simulation. The effectiveness of the miniature effect hinges on a few key photographic principles:
Capturing a Wide Scene
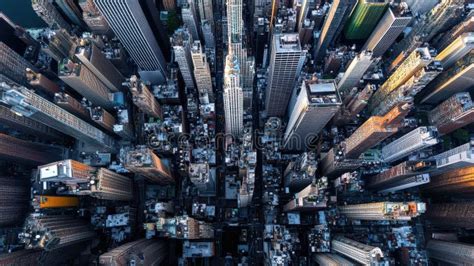
To best simulate the effect of looking down on a miniature model, it's ideal to capture a wide scene. This can be achieved by using a wide-angle lens or zooming out while stepping back from your subject. The goal is to encompass a significant amount of detail within the frame, providing ample areas for both sharp focus and subsequent blurring. A scene that contains a lot of detail will enhance the believability of the miniature effect.
Shooting from a High Perspective
The most effective tilt-shift simulations are often created from a high vantage point, looking down on the subject at an angle. This mimics the perspective one would have when observing a physical model. Whether it's a cityscape viewed from a tall building, a landscape from a hilltop, or even a street scene from an elevated position, a higher perspective significantly contributes to the illusion of scale. The larger the angle between the camera and the ground, the more pronounced and realistic the miniature effect tends to be. While lower angle shots can still be manipulated, higher angled shots generally yield the most compelling results.
Ensuring Depth in Your Shot
While the miniature effect is primarily about manipulating depth of field in post-processing, the original photograph should ideally possess some inherent depth. This means having elements at varying distances from the camera - a foreground, a mid-ground, and a background. This provides a more natural canvas for applying the simulated shallow depth of field. If your image is very flat, the effect might appear less convincing.
Initial Edits and Smart Objects
It's generally recommended to perform most of your basic image adjustments before applying the tilt-shift effect. This includes color correction, exposure adjustments, and sharpening. If you plan to use Lightroom, it's a good practice to import your image there first, make these initial edits, and then transfer it to Photoshop as a Smart Object. Importing as a Smart Object is a vital step because it allows for non-destructive editing. This means that any filters applied, including the tilt-shift blur, can be revisited and modified later without degrading the original image quality.
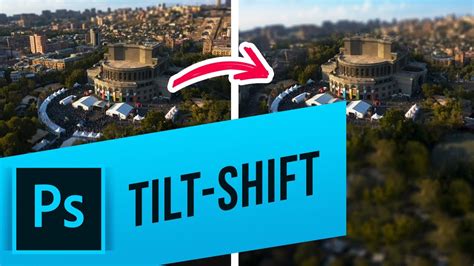
Applying the Tilt-Shift Effect in Photoshop
Photoshop CS6 and later versions offer a dedicated "Tilt-Shift" blur filter within its Blur Gallery, making this effect more accessible than ever. Here's a step-by-step guide to creating your own miniature illusions:
Step 1: Duplicate Your Layer
Begin by opening your chosen image in Photoshop. To preserve your original image, the first step is to create a duplicate of the background layer. This can be done by pressing Ctrl/Cmd + J on your keyboard or by dragging the background layer thumbnail to the "Create New Layer" icon in the Layers panel. This duplicate layer will serve as your working canvas.
Step 2: Accessing the Tilt-Shift Blur
With your duplicated layer selected, navigate to Filter > Blur > Tilt-Shift. This action will open the Tilt-Shift blur module, which overlays your image with a control interface. This interface resembles a dual graduated filter tool, designed to help you define the area of focus and the extent of the blur.
Step 3: Manipulating the Focus Area
The Tilt-Shift blur interface features a central pin with several adjustable lines:
- Center Point: This is the anchor of the effect. By default, it's placed in the center of the image. You can click and drag this point to reposition the entire focus area.
- Solid Lines: These represent the boundaries of your sharp focus area. The region between these two solid horizontal lines will remain in sharp focus. You can adjust the width of this sharp area by clicking and dragging the small dots on each solid line up or down.
- Dotted Lines: These lines define the transition zone where the blur gradually increases. The area between a solid line and its corresponding dotted line is where the blur effect feathers out. You can adjust the length of these transition zones by clicking and dragging the dots on the dotted lines.
- Blur Intensity: The intensity of the blur can be adjusted in a couple of ways. You can click and drag around the outer ring of the central pin (like a dial) or use the "Blur" slider in the "Blur Tools" panel, typically located in the upper right of the gallery. As you make adjustments, Photoshop provides a live preview of the effect. A blur setting between 5 and 9 pixels is often a good starting point for realism, though some tutorials suggest 15-20 pixels for a more pronounced effect.
Remember that the goal is to mimic the optical principles of tilt-shift lenses. The sharp area should be a narrow band, and the blur should fall off naturally. Be mindful of irregularities at the borders of the blurred areas, as these can detract from the realism.
Step 4: Exploring Additional Controls (Optional)
Within the Tilt-Shift blur module, you'll find other sliders that can further refine the effect, though they are often left at their default settings for a classic miniature look:
- Distortion: This slider allows you to add a motion blur effect to the blurred areas. Dragging it to the right can create a "zoom" effect, while dragging to the left can introduce a "spin" or radial blur. By default, distortion might only be applied to the bottom portion of the image, but options like "Symmetric Distortion" can be checked for a more uniform application.
- Bokeh: This setting can influence the appearance of the out-of-focus areas, adding specific colorations or enhancements.
- Light Range: This slider offers control over blur based on specific luminance values within the image, allowing for more nuanced blur application.
While these advanced options can be experimented with, for a standard miniature effect, focusing on the blur intensity and the focus area is usually sufficient.
Step 5: Hiding the Overlay and Fine-Tuning
To get a clearer view of the effect on your image, you can temporarily hide the Tilt-Shift control overlay by pressing and holding the H key on your keyboard. To compare your edited image with the original, you can uncheck the "Preview" option at the top of the Blur Gallery or press the P key.
If you imported your image as a Smart Object, the Tilt-Shift filter is applied to a dedicated layer mask. This provides immense flexibility. You can switch to the Brush tool and paint with black on the mask to reveal parts of the original layer (removing the blur) or paint with white to add the blur back. This allows you to go beyond the limitations of the filter's interface and precisely control where the blur is applied.
How to Create a Tilt-Shift Effect in Photoshop
Step 6: Enhancing the Miniature Feel with Color and Contrast
Once you're satisfied with the blur effect, it's time for some final touches that truly sell the miniature illusion. Miniature models often have vibrant, saturated colors, and a slightly enhanced contrast can make them pop.
- Boosting Saturation: To achieve a more "toy-like" or hand-painted model appearance, increasing the color saturation is highly effective. You can do this by going to
Image > Adjustments > Hue/Saturationand increasing the "Saturation" slider. Alternatively, you can create a Hue/Saturation adjustment layer for non-destructive editing. Be careful not to overdo it, as excessively saturated images can look unnatural. A slight boost, perhaps to +20 or +30 on the saturation slider, is often sufficient. - Adjusting Brightness and Contrast: You can also create a "Brightness/Contrast" adjustment layer and slightly increase both values. This can help accentuate the details and give the image a more polished, model-like finish.
Step 7: Finalizing and Exporting
After applying these enhancements, you can "flatten" your image if you're happy with the result, or save it as a layered Photoshop file to retain the ability to make further adjustments. If you initially brought the image into Photoshop from Lightroom, you can send it back to Lightroom to apply any final global adjustments before exporting.
Beyond the Basics: Creative Applications and Considerations
While the Tilt-Shift blur filter in Photoshop is a powerful tool, the true artistry lies in its application. Here are some additional points to consider:
- Embrace Imperfection: While striving for realism, remember that photography is an art form. Don't be afraid to break the "rules" of optics. Sometimes, slightly irregular blur transitions or exaggerated saturation can lead to more visually interesting and unique results.
- Subject Matter: The tilt-shift effect works best on scenes with a clear subject and a sense of depth. Cityscapes, busy street scenes, landscapes with distinct foreground and background elements, and even photos of people can be transformed.
- Lighting: Shooting during the "golden hours" (shortly after sunrise or before sunset) can add warmth and enhance the overall mood of your image, further contributing to the miniature feel.
- Stabilization: For the sharpest possible focus area, ensure your original photograph is well-stabilized. Camera shake will be amplified when the sharp area is very narrow.
- Experimentation: The best way to master the tilt-shift effect in Photoshop is through practice. Experiment with different images, adjust the blur settings, play with the focus area, and try different enhancement techniques. The Blur Gallery offers other filters like Field Blur and Iris Blur, which can be used in conjunction with or instead of Tilt-Shift for even more creative control over depth of field.
By understanding the principles behind tilt-shift photography and leveraging the powerful tools within Photoshop, you can unlock a new dimension of creativity, transforming ordinary photographs into captivating miniature worlds. This technique offers a fantastic way to spice up otherwise mundane shots and create visually striking images that capture the viewer's imagination.
tags: #tilt #shift #photography #in #photoshop