When you aspire to transform a raster image, such as a photograph, into a scalable vector graphic, the task might seem daunting. However, Inkscape offers a powerful solution to circumvent the laborious process of manual recreation. Its built-in tracing features can accomplish in mere moments what would otherwise consume hours or even days of dedicated effort. This tutorial delves into the intricacies of Inkscape's "Trace Bitmap" functionality, empowering users to convert pixel-based images into editable vector artwork efficiently.
Importing and Initializing the Tracing Process
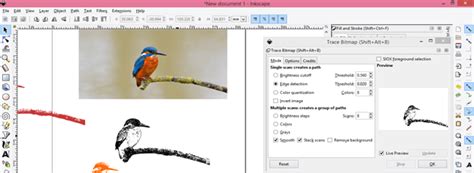
The journey begins with importing your chosen bitmap image into Inkscape. This can be achieved by navigating to File > Import and then locating the desired JPEG or PNG file. Once the image is present on the canvas, it's crucial to select it. This action signals to Inkscape which element is designated for tracing. Following selection, pressing the 3 key on your keyboard will conveniently zoom the view to encompass the entire selected image, allowing for a clearer assessment of its details.
For a more focused approach, you might wish to slide the image slightly to a preferred position on the canvas. The core of the tracing functionality resides within the Path > Trace Bitmap command. Accessing this will unveil a dialogue box brimming with options to customize the vectorization process.
Understanding Trace Bitmap Modes: Single Scan vs. Multiple Scans
The Trace Bitmap dialogue box presents two primary modes for converting raster to vector: "Single Scan" and "Multiple Scans." Each mode offers distinct approaches to interpreting pixel data and generating vector paths.
Single Scan Mode: Simplicity and Speed
The "Single Scan" mode is ideal for simpler images or when a monochromatic output is desired. Within this mode, several sub-options dictate how Inkscape analyzes the bitmap:
Brightness Cutoff: This method operates by analyzing the luminance of each pixel. Pixels exceeding a certain brightness threshold are rendered as black, while those below are rendered as white. The "threshold" setting directly controls this cutoff point, allowing you to adjust the darkness of the resulting vector. It's important to note that the preview for Brightness Cutoff does not update dynamically; you must click "OK" to see the result and then "Undo" to make further adjustments. This iterative process of "OK, Undo, change value, OK, Undo" can be time-consuming but allows for precise control.
Edge Detection: This mode focuses on identifying areas where there are significant changes in pixel brightness, effectively tracing the outlines or edges of shapes. The "threshold" setting here determines the sensitivity to these brightness differences. A "Update" button allows for a more interactive preview, enabling you to see the impact of threshold adjustments in real-time.
Color Quantization: While the name suggests color, in Single Scan mode, this option is primarily used to reduce the image to a limited number of shades of gray. The "number of colors" setting dictates how many distinct gray levels will be generated.
For line drawings and silhouettes, particularly those with well-defined edges, the Single Scan mode, especially with Edge Detection, can yield excellent results. Silhouettes, with their stark contrast, tend to perform exceptionally well with Inkscape's tracing tool due to their defined edges.
Multiple Scans Mode: Complexity and Color
The "Multiple Scans" mode is designed for more complex images, including those with multiple colors or intricate details. This mode generates several overlapping paths, which can then be stacked or separated to create a more nuanced vector representation.
Grays: This option allows you to generate multiple scans based on different shades of gray. You can specify the "number of scans," which directly correlates to the number of gray levels produced. While it's possible to set a very high number of scans (e.g., 256), this can significantly increase file size and processing time. Experimenting with a smaller, manageable number, such as 10, is often recommended.
Colors: This is the most powerful option for tracing multicolor images. It analyzes the image and generates separate paths for different color regions. The "number of scans" here determines the number of distinct color layers Inkscape will attempt to create. It's important to remember that Inkscape, by default, recognizes black and white as colors. Therefore, to achieve, for instance, 3 distinct colors in your output, you might need to set the scan count to 5 (representing the 3 desired colors plus black and white).
When using Multiple Scans, several additional options within the "Options" tab can refine the tracing process:
Remove background: This checkbox, when ticked, attempts to identify and eliminate the background color from the traced output, especially effective when there's a clear contrast between the subject and its background. This option tends to work best with the "Colors" detection mode.
Stack Scans: When enabled, this option ensures that the generated scans are layered on top of each other, filling any gaps and creating a continuous, solid appearance. If unchecked, the scans are treated as separate entities, resulting in a cutout effect where gaps might be visible. For creating cut files, unchecking "Stack Scans" is often preferred.
Smooth: Applying a Gaussian blur before tracing can help to smooth out jagged edges. However, excessive smoothing can lead to a loss of fine detail, so it's a setting to be adjusted with care.
Speckles: This setting helps to remove small, unwanted traced areas. Increasing the "Speckles" value too high, however, can result in the loss of finer details within the image.
Smooth Corners: This option aims to round off sharp corners in the traced vector, producing a softer appearance.
Optimize Paths: The primary function of this setting is to reduce the number of nodes (points that define the vector paths) generated. A lower node count leads to smaller file sizes and smoother performance, but too few nodes can limit editing flexibility.
Advanced Techniques and Considerations
Layering and Manual Refinement
Inkscape's "Trace Bitmap" feature can be used iteratively. For instance, one can perform a trace with a high number of grayscale scans to capture subtle tonal variations and then perform a separate trace using the "Colors" mode with a limited number of colors. These two resulting vector layers can then be stacked in Inkscape, with the color layer positioned above the grayscale layer, and its blend mode set to "Color." This approach mimics the workflow described by users who might otherwise use Photoshop for similar effects.
Each trace operation in Inkscape results in a grouped object. If you perform multiple traces, these will appear as nested groups. To edit individual paths, you'll need to "Ungroup" these objects. Right-clicking on the traced result and selecting "Ungroup" will break down the group into its constituent layers or paths.
While automatic tracing is incredibly powerful, it's not always perfect. The quality of the original bitmap significantly impacts the tracing outcome. Images with noise, blurriness, or subtle gradients can present challenges. In such cases, manual intervention becomes necessary.
Inkscape provides robust tools for manual vectorization. The Pencil (freehand) tool (F6) allows for freeform drawing, while the Pen (Bezier) tool (Shift+F6) offers precise control over curves and lines, enabling you to meticulously trace over the original bitmap. Creating new layers in the Layer dialog (Shift+Ctrl+L) and adjusting the opacity of the original bitmap can facilitate a more accurate manual tracing process.
Inkscape - Speed sketching With the Bezier Curve Tool. Beginners guide
Print Considerations and Color Modes
A common point of discussion in the context of tracing for print revolves around color modes, specifically CMYK versus RGB. SVG, as a web standard, primarily uses the RGB color model. While Inkscape doesn't natively support CMYK, it's possible to export SVGs as PDFs and then open these PDFs in applications like Adobe Illustrator, where the color mode can be converted to CMYK.
The concern about "inordinate" printing costs due to complex color gradients or numerous spot colors is valid in traditional printing. Professional printing often relies on spot colors (like CMYK or custom Pantone colors) for accuracy and cost-effectiveness. Reducing the number of colors in a design, especially for large print runs, can indeed lower expenses.
When discussing printing with a traditionalist, it's important to clarify that SVG is a digital format for the web. If the intention is to print, the workflow often involves converting the SVG to a print-ready format. The advice to save as PDF and then convert to CMYK in a professional design application is a sound strategy for print production.
File Size and Performance
The complexity of a traced image directly correlates with its file size and the performance of your system. Tracing with a very high number of scans, especially in multicolor mode, can generate a substantial number of nodes. This can lead to slower rendering times, increased memory usage, and potentially program instability, particularly on less powerful computers. For instance, a 256-grayscale trace or a high-scan multicolor trace from a large bitmap can result in a file size of 12MB or more, even on a moderately capable machine. Experimenting with a lower number of scans is often a good starting point to balance detail and performance.
Images less than 3MB in size are generally recommended for multicolor tracing to avoid system slowdowns or crashes, as the "Trace Bitmap" feature can be CPU-intensive.
Optimizing Trace Settings for Different Image Types
The effectiveness of Inkscape's tracing tools is highly dependent on the nature of the source image.
Photographs and Complex Images
For photographic images or those with extensive gradients and subtle color variations, "Trace Bitmap" can be a starting point, but manual refinement is almost always necessary. The "Colors" mode with a high number of scans can capture a semblance of the original, but the resulting vector may appear "posterized" or have aliasing artifacts. These imperfections often require manual cleanup using the node editing tools. The "Autotrace" feature within the "Colors" option is noted as being particularly slow and prone to crashing the program, so it's advisable to approach it with caution.
Line Art and Logos
Simple black-and-white line art, logos, or icons are prime candidates for successful automatic tracing. The "Brightness Cutoff" or "Edge Detection" modes in "Single Scan" are often sufficient. For logos, ensuring clean, well-defined lines in the original bitmap will yield the best results.
Pixel Art
Inkscape also includes a "Pixel Art" mode within the "Trace Bitmap" dialog. This mode is specifically designed to create more accurate tracings of pixel art, preserving the blocky, grid-like aesthetic. While it can generate more faithful representations of pixel art than other modes, it's still a form of automatic conversion and may require minor adjustments.
Troubleshooting and Best Practices
Preview Issues: If the preview in the "Trace Bitmap" dialog isn't updating, ensure you're not using the "Brightness Cutoff" mode without clicking "OK" and then "Undo." For other modes, the "Update preview" button is your friend.
Unexpected Results: If the tracing doesn't look as expected, try different modes and adjust the relevant threshold or scan settings. Experimentation is key. The preview window is essential for understanding how your settings will affect the output.
Clean Up Artifacts: Automatic tracing can leave behind stray nodes, unwanted shapes, or rough edges. Utilize the "Edit paths by nodes" tool (
N) to select and delete extraneous nodes, smooth curves, and refine shapes.Symmetry: If manual symmetry is required for a traced object, you can often split a curve, duplicate the relevant part, flip it, and then join the pieces.
File Size Management: For complex traced images, consider simplifying paths using the "Optimize Paths" setting or manually reducing node count after tracing to keep file sizes manageable.
High-Quality Source: The adage "garbage in, garbage out" applies here. A higher-quality original bitmap will naturally lead to a better-traced vector. Removing backgrounds or cleaning up the source image before tracing can significantly improve results.
Inkscape's "Trace Bitmap" feature is a powerful tool that democratizes the creation of vector graphics. While it excels at quickly converting simple images, it also serves as a valuable starting point for more complex projects, enabling users to achieve professional-looking results with a combination of automatic tracing and manual refinement. This capability is particularly noteworthy as it's often absent in many premium design applications, positioning Inkscape as an indispensable free resource for designers and hobbyists alike.