Halftones, a foundational technique in the history of printing, have evolved from a practical necessity to a distinctive artistic style. Originally conceived as a method for printers to represent grayscale images using a single color ink, halftones achieve this by varying the size of dots within a fixed pattern, thereby creating the illusion of lighter or darker areas. This raster effect, when scaled up, can be repurposed to generate captivating designs across various formats. The inherent complexity of manually creating such precise patterns makes them an ideal candidate for parametric design tools, which can automate the process and allow for non-destructive, iterative adjustments. For those on macOS seeking to work with custom vector halftones, specialized applications like Vectoraster offer dedicated functionality.
Understanding the Core Mechanics of Halftone Creation
At its heart, creating a halftone effect involves manipulating a source image and a pattern element. In illustration software, this often translates to utilizing layers. To begin, two distinct layers are essential. The first, designated as the "source layer," will contain the content upon which the halftone effect is based - typically an image intended for reproduction as a dot raster pattern. For instance, a low-resolution portrait, such as an old photograph of Darwin, can serve as a perfectly adequate source image. Indeed, for effective halftone generation, images as small as 200-300 pixels wide are often sufficient.
The second layer is dedicated to the halftone pattern itself. This layer starts with a basic shape, which will become the individual "dot" of the halftone. This shape can be anything from a simple circle or square to a line or any other custom form. Initially, it may be beneficial to hide the source layer to focus solely on the placement and appearance of the halftone pattern.
Applying the Halftone Effect with Layer Nodes
Once both the source layer and the pattern layer are established, the next crucial step is to employ an "Apply layer node" to generate the actual halftone effect. This node functions by utilizing the information from one layer (the source layer) to modify the individual elements within another layer (the pattern layer). To initiate this process, the user must first designate the source layer by clicking and dragging from the input socket for the source layer and establishing a connection to the image source layer.
With the connection made, the halftone effect begins to take shape. The user can then continue to adjust the pattern or the point shapes, observing the effect update in real-time with each modification. By default, the Apply layer node typically applies changes through uniform scaling. However, users are encouraged to experiment with other transformations, such as altering the color or rotation of the points. Further aesthetic control can be achieved by offsetting or rotating the entire pattern layer or the source image layer to fine-tune the final appearance of the effect.
Expanding the Possibilities: Beyond the Basic Halftone
The creation of a basic halftone effect is merely the starting point for the creative potential within tools like Paragraphic. Because the pattern layer operates as any other layer within the software, users can leverage a wide array of additional nodes to introduce elements like randomization to the pattern or apply other transformations to the individual dots. Furthermore, combining multiple layers, each with distinct settings, can lead to the development of exceptionally intricate and unique visual effects.
Online Tools for Instant Halftone Creation
For those seeking a more immediate solution, online services offer a streamlined approach to generating halftone graphics. HalftonePro, for example, is a web-based platform that converts photographs into halftones, resulting in bold vector graphics. It's noted that high-contrast images tend to yield the best results for this process. The degree of detail in the conversion can be precisely controlled using a "Vertical elements" slider. While the basic functionality of Halftone Pro is available free of charge, downloading the output as an SVG file, as opposed to a PNG, incurs a one-time payment of $15.
Historical Roots: The Woodcut and its Enduring Influence
The concept of using fine linework to create tonal variations is not new; it has deep historical roots. A compelling example can be found in woodcuts from centuries ago, such as those produced by Albrecht Dürer, often referred to as the "Andy Warhol of woodcut artists." Woodcut is an ancient printing technique where skilled blockcutters meticulously engrave an image into a wooden block. The inherent nature of woodcuts results in bold and stark imagery, as they traditionally lack the mid-tone colors and blends found in painting. However, artists like Dürer masterfully mimicked mid-tones by carefully constructing layers of fine linework. Despite its age, this technique continues to influence contemporary art and design, appearing in diverse applications ranging from tattoos and beer labels to currency. The mathematical precision of the SVG format is also well-suited to this style, though the manual rendering of thousands of intricate lines can be an impractical endeavor for many.
Leveraging Specialized Software for Vector Halftones
For users who require more advanced control and a dedicated workflow for vector halftones, specialized applications and plugins are available. In Adobe Illustrator, for instance, the "Color Halftone" effect, found under the Pixelate menu, is a powerful tool. To utilize it, one typically creates a shape, applies a black and white gradient, and then applies the Color Halftone effect. Subsequent steps involve expanding the appearance to convert the rasterized effect into scalable vector elements.
A more sophisticated approach within Illustrator involves using plugins like Astute Graphics' Phantasm. This plugin offers a "Halftone" live effect that provides extensive control over various parameters, including the type of pattern (Regular, Alternating, FM, Radial), DPI (density), angle, and dot properties (scale, shape, tint). The "Clip to Object" option is particularly useful for ensuring the halftone pattern conforms precisely to the boundaries of the original artwork. Once applied, the Phantasm halftone effect can be expanded into pure, scalable vector halftones, offering a high degree of flexibility for further editing.
Easy Vector Halftone in Adobe Illustrator | PHANTASM
Practical Considerations for Vector Halftone Graphics
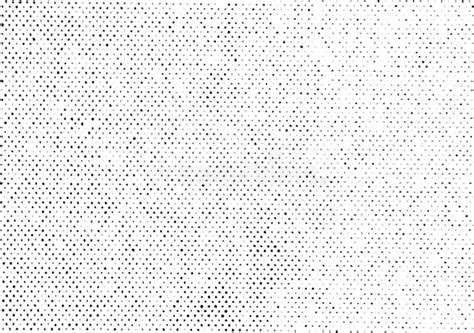
A vector halftone graphic is a distinct image type characterized by an array of tiny dots, varying in size and spacing, to simulate a gradient effect. This technique is frequently employed in printing and graphic design to produce monochrome images that convey an illusion of depth and shading. Unlike raster images, which are composed of pixels, vector images are built upon mathematical formulas. This fundamental difference allows vector graphics to be scaled up or down indefinitely without any degradation in quality.
Creating a vector halftone graphic can be achieved with remarkable speed, often in under two minutes, provided the right tools and a degree of familiarity are present. The general process involves selecting an image, converting it to grayscale, and then applying a halftone effect. This can be accomplished using various graphic design software, such as Adobe Illustrator, or through online tools like HalftonePro. The key to achieving the desired outcome lies in meticulously adjusting the size and spacing of the dots.
It is entirely possible to create vector halftone graphics without relying on professional design software. Numerous online tools are available that facilitate this process. These platforms typically allow users to upload an image and apply a halftone effect, with the resulting image downloadable as a vector file. However, it is important to note that these online tools may offer less granular control over the final output compared to dedicated professional design software.
When embarking on the creation of a vector halftone graphic, adhering to best practices is crucial for optimal results. It is advisable to commence with a high-quality source image. Converting the image to grayscale beforehand is recommended to ensure the halftone process accurately captures the tonal values. During the application of the halftone effect, careful adjustment of the dot size and spacing is essential for achieving the desired level of detail and shading. Experimentation with different settings is key to discovering the perfect aesthetic.
Vector halftone graphics are remarkably versatile and can be integrated into designs in numerous ways. They serve effectively as backgrounds, textural elements, or as a means to introduce depth and shading into illustrations. Their application extends to the creation of distinctive effects within logos and other graphic elements. The inherent scalability of vector graphics means they can be resized to any dimension without compromising their quality, opening up a vast array of creative possibilities.
While it is possible to convert a color image into a vector halftone graphic, the process inherently involves converting the image to grayscale. This is because the halftone effect relies on the variation in dot size and spacing to simulate different shades of gray.
The output of vector halftone graphics can be saved in a variety of file formats, including SVG, EPS, and PDF. These formats are designed to preserve the vector nature of the image, ensuring its scalability without quality loss. Some online tools may also offer downloads in raster formats like PNG or JPEG, but these will not retain the same level of quality when scaled.
Vector halftone graphics are exceptionally well-suited for printing. Their foundation in mathematical formulas, rather than pixels, allows them to be scaled to any size without any loss of detail, making them ideal for large-format applications such as posters and banners.
To hone one's skills in creating vector halftone graphics, consistent practice is paramount. Experimenting with different images and settings will reveal a wide spectrum of achievable effects. Additionally, a wealth of online tutorials and courses are available to deepen one's understanding of this technique.
Despite their numerous advantages, there are certain limitations to be aware of when creating vector halftone graphics. The process, particularly for complex images, can be time-consuming. Furthermore, not all images are equally amenable to this technique. Images characterized by subtle gradients and extremely fine details may not translate effectively into a halftone effect.
Exploring Halftone Techniques in Commercial Design
In the realm of screen and offset printing, halftones are widely employed to mimic the way colors are constructed in CMYK printing. They are particularly effective for creating bold stencil designs, adding tactile texture to digital art, and achieving the transparent effects often seen in contemporary design. Whether the goal is sharp contrast or subtle gradients, halftone patterns offer a flexible method for exploring textures and effects that can significantly enhance any design. Their applicability spans across a variety of art styles, making halftone a fundamental technique for any creative professional, from posters and T-shirts to intricate digital illustrations.
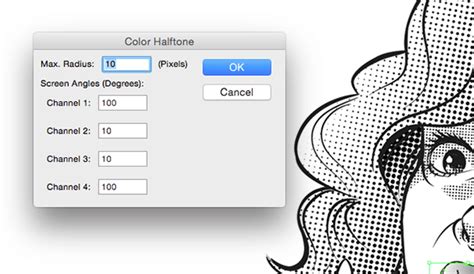
Illustrator's native "Color Halftone" effect provides a direct route to incorporating this aesthetic. The process involves selecting or creating the artwork to which the effect will be applied. The "Color Halftone" dialog box then offers parameters for adjustment, including "Max. Radius," which governs the size of the halftone dots (larger values for bigger dots, smaller values for finer dots), and "Screen Angles," which define the orientation of the halftone screens for each CMYK color channel. It's important to note that the "Color Halftone" effect may not provide a live preview, requiring the user to click "OK" to confirm the changes. Further edits can be made by accessing the "Appearance" panel. For a more dynamic halftone, applying a black and white gradient to the object beforehand can influence dot scaling according to the object's tone.
Rasterizing and Expanding Halftone Effects
As with many raster-based live effects in design software, the resolution of the final output is dictated by the "Document Raster Effect Settings." For screen-based templates, this is typically set to 72ppi, resulting in less detail but quicker rendering. For print-based templates, a more detailed but slower 300ppi is common. To rasterize a single object with a native halftone effect applied, one selects the object and chooses "Object > Expand Appearance."
For grouped selections containing multiple elements with a native halftone effect, a slightly different approach is required. Before proceeding, ensuring the "Document Raster Effect Settings" are at the desired resolution is crucial. In the "Rasterize" dialog box, settings for resolution (ppi) should match the document settings, with 300ppi being a good standard for print work. For those looking to convert these rasterized effects into vector form, the "Image Trace" panel in Illustrator can be utilized. Setting the mode to "Black and White" and checking the "Ignore White" option under advanced settings can produce clean vector outlines from the halftone pattern.
The Enduring Appeal of Halftone in Merchandising and Art
The creation of halftone designs is a timeless and unique method for enhancing merchandise. Whether inspired by vintage comic book aesthetics, the desire to feature a band's photograph on a shirt, or the bold graphic style of screen printing, halftones offer a distinctive visual language. Screen printing, a technique with a history spanning centuries and commonly used today for garment printing, has a rich relationship with halftones. The popularity of halftones surged in the 1800s as a means to replicate the subtle tones and details of photographs, becoming a staple in newspapers and other printed materials, and remaining prevalent in printing today.
Understanding halftones involves recognizing them as a design style that employs a series of small dots, varying in size and spacing, to achieve a gradient-like effect. Essentially, halftones function as a visual illusion, tricking the brain into perceiving different shades and shadows. By strategically altering the size and spacing of these dots, fine details and depth are imitated, creating the illusion of a fully detailed image or full-color artwork.
Crafting Halftone Designs for Print and Beyond
The creation of successful halftone images begins with selecting appropriate software. Programs like Adobe Photoshop and Illustrator are popular choices, but downloadable applications such as Apple's Procreate can also be used. The conversion process typically involves several key steps: first, converting the image to grayscale to focus the halftone process on tonal values. Second, adjusting the contrast is crucial to ensure that details are clear and distinct. Proper adjustment of the image's tonal values is vital for legibility when the halftone effect is applied. This can often be achieved through the curves adjustment in the selected layer. Without proper curve adjustments, the defined highlights and shadows can be lost, diminishing the recognizability of the design. Clarity at a distance is a critical factor in achieving an appealing and recognizable print.
When preparing artwork for screen printing, it is imperative to consider the acceptable file types and sizes to ensure optimal print quality. Vector files, such as AI or EPS, are generally preferred due to their scalability without quality loss. High-resolution raster files, including JPEG, PSD, or TIFF, are also acceptable if they meet the necessary resolution standards, typically 300 DPI or higher.
Advanced Halftone Techniques and Their Applications
Beyond basic halftone application, other techniques exist within screen printing. "Simulated separation" is one such process, involving the layering of multiple colored halftones to construct a full-color design. Through careful layering and color selection of these halftone layers, experienced printers can produce highly detailed and colorful prints using a limited color palette.
For those looking to create vector halftones directly within Adobe Illustrator, a common method involves creating a rectangle filled with a black and white gradient. The "Color Halftone" effect is then applied to generate a raster halftone pattern based on this gradient. Following this, "Object > Expand Appearance" converts the raster effect into vector elements.
To achieve smoother transitions between halftone dots and avoid muddy overlaps, it is beneficial to use a grayscale gradient instead of solid black when applying the Color Halftone effect. After applying the effect, expanding the appearance and grouping all halftone dots prepares them for further manipulation. This can include replacing the default dots with custom shapes, such as circles, stars, or unique custom forms, by copying the desired shape and using it to replace the existing dots.
For those seeking ready-made resources, various Illustrator assets are available. These include halftone brushes and patterns, vector art with halftone designs, paper textures with halftone effects, and pre-colored halftone patterns. These assets can significantly expedite the process of incorporating halftone effects into projects, from comic strips and pop art to more complex illustrations.
Differentiating Halftones from Dithering
It is important to distinguish halftones from another related technique: dithering. Halftones utilize regular, repeating dot grids where the size of the dots varies to simulate tones. Dithering, conversely, employs irregular or patterned dot placement with a constant dot size to break up quantization and prevent banding. While both techniques convert continuous tones into dot patterns, halftoning achieves this by altering dot size on a grid, whereas dithering modifies dot placement off-grid. Halftones are fundamentally dots of varying sizes and spacing, artfully arranged to simulate a tone or gradient, and their use, particularly in comics, lends a distinct and beloved aesthetic.