DaVinci Resolve's Render Cache is a powerful tool designed to significantly enhance timeline playback performance, particularly when working with complex projects involving heavy effects, high-resolution footage, or intricate Fusion compositions. This feature acts as a "lifesaver" by pre-rendering segments of your timeline, allowing DaVinci Resolve to play these rendered clips back as smoothly as if they were unedited, original footage. This article delves into the intricacies of DaVinci Resolve's render cache, exploring its functionality, optimal settings, location management, and how it differs from other rendering processes like "Render in Place."
Understanding the Core Functionality of Render Cache
At its heart, DaVinci Resolve's render cache functions by pre-rendering parts of your timeline. This process creates temporary files that store the processed output of clips, including applied effects, color grades, and Fusion compositions. By doing so, DaVinci Resolve can then access and play these pre-rendered clips directly, bypassing the need for real-time processing. This dramatically reduces the computational load on your system, leading to significantly smoother playback, even with demanding sequences.
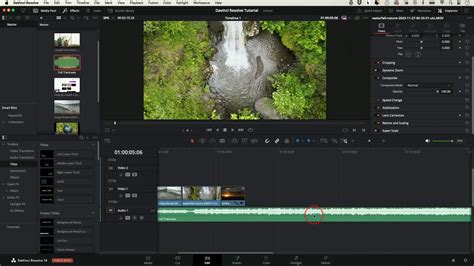
A key indicator of the render cache's status is the line above each clip on the timeline. Initially, this line may appear red, signifying that the clip is either unrendered or has undergone changes requiring a re-render. As the caching process progresses, this red line transforms into a blue line, visually confirming that the clip has been successfully cached and is ready for smooth playback.
Enabling and Configuring Render Cache
Activating and configuring the render cache in DaVinci Resolve is a straightforward process, offering flexibility to suit various workflows. You can initiate the render cache through the top menu by navigating to "Playback" and then selecting "Render Cache." Here, you have two primary options: "Smart" and "User."
- Smart Mode: This is the most user-friendly method, ideal for those seeking an automated solution. In Smart mode, DaVinci Resolve intelligently identifies and caches timeline clips that are likely to cause playback issues due to heavy effects, complex Fusion compositions, noise reduction, or other demanding processes. The software automatically caches these clips when the system is idle, ensuring that your timeline is continuously optimized without manual intervention.
- User Mode: For users who prefer more granular control over the caching process, "User" mode offers manual selection. In this mode, you can explicitly choose which clips to cache. This is typically done by right-clicking on a specific clip within the timeline and selecting "Render Cache Fusion Output" or "Render Cache Clip Output," and then setting the option to "On" or "Auto." You can also enable "Render Cache Color Output" to cache the results of your color grading.
Regardless of the mode selected, the caching process involves DaVinci Resolve converting your source clips into temporary files. The visual cue of the red line turning blue on the timeline signifies the successful completion of this process for individual clips.
Optimizing Cache Performance: Format and Location
The choice of cache format and the location where these cache files are stored play crucial roles in both performance and disk space management.
Render Cache Format Recommendations
The "Render Cache Format" setting allows you to select a codec that is optimized for your system's hardware and the editing workflow. For optimal performance, the following recommendations are generally made:
- For Windows users: DNxHR is the recommended format. Specifically, DNxHR SQ (Standard Quality) is a good balance between quality and file size, rendering quickly and being processor-friendly.
- For Mac users: ProRes is the preferred format. ProRes 422 LT offers excellent quality and efficient rendering, making it a strong choice for Mac-based workflows.
These formats are chosen because they are designed for high-throughput video editing, allowing your processor, graphics card, and memory to handle them more efficiently than highly compressed codecs like H.264 or H.265.
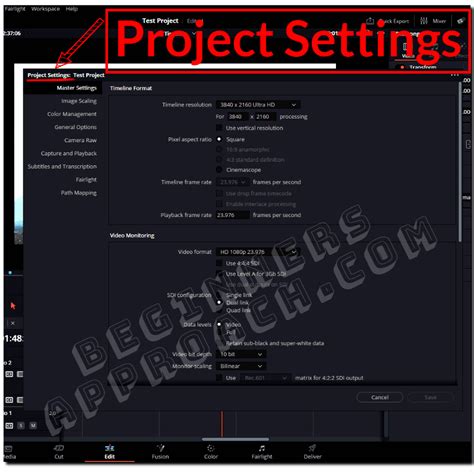
To change the render cache format, you need to access the Project Settings. Click the gear icon in the lower right corner of the DaVinci Resolve interface, then navigate to "Project Settings" > "Master Settings" > "Optimized Media and Render Cache" > "Render Cache Format."
Managing Cache File Locations
DaVinci Resolve's render cache files, often stored in proprietary ".dvcc" format, can consume a significant amount of disk space, sometimes reaching into terabytes. It is therefore essential to manage their location effectively.
By default, DaVinci Resolve stores these cache files in specific folders within your project directories. You can locate these folders by going to "Project Settings" > "Master Settings" > "Working Folders." Within this section, you'll find options for "Proxy Generation Location" and other working folders, which often have random alphanumeric names. If you open one of these folders, you'll see files ending in ".dvcc."
To change the default location for your render cache, click the "Browse" button next to the relevant folder path (e.g., "Proxy Generation Location" or a dedicated "Render Cache Location" if available in your version). It is highly recommended to direct these cache files to a fast, dedicated drive, such as a solid-state drive (SSD), to maximize playback performance. Many users opt for a high-speed external SSD like a Samsung T7 or T9 for this purpose. By setting the cache location to a specific folder on this drive, you can prevent your operating system drive from filling up.
It's worth noting that if you encounter an error message upon opening a project that asks you to update the cache location, following the same steps for changing the cache location by clicking the "Browse" button will resolve the issue.
Render Cache vs. Render in Place: Understanding the Differences
While both "Render Cache" and "Render in Place" aim to improve playback performance, they serve distinct purposes and operate differently.
Render Cache: This is an automatic or semi-automatic background process that creates temporary, locally stored files optimized for your specific DaVinci Resolve system. Render cache files are primarily intended for use within that single Resolve installation and are written to your fastest local SSD. They are dynamic and can be easily updated or deleted. Render cache renders at the timeline resolution.
Render in Place: This is a more deliberate, manual process that essentially "bakes" a clip or a section of your timeline into a shareable video file, akin to exporting a clip from the Deliver page and re-importing it. Render in Place creates a self-contained video file that can be used on shared storage or synced across multiple systems, making it ideal for collaborative workflows. These rendered files can be stored on network drives or cloud storage. When using Render in Place, you have more control over codec settings, the inclusion of handles (extra frames at the beginning and end of the clip for editing flexibility), and the option to render using the source resolution, thereby retaining the highest possible quality. A key characteristic of Render in Place is that it bakes in all effects except for color grading by default, allowing for further grading on top.
Please Change This Render Cache Setting Right Now
A critical distinction is how these rendered files are handled during final export. By default, DaVinci Resolve will utilize "Render in Place" files during the final export. However, it will not use "Render Cache" files. If you wish to have your final export utilize render cache, you must enable the "Use Render Cached Images" option in the Deliver page's advanced settings. For Render in Place, if you need to make edits to the original source material after rendering in place, you must "decompose" the clip back to its original state from the timeline. This action is unique to the timeline and cannot be performed if you try to decompose a rendered clip pulled from the Media Pool to another timeline.
Troubleshooting Common Cache Issues
Despite its benefits, users may occasionally encounter issues with the render cache.
Cache Clip Not Working
If your cache clips are not functioning as expected, several factors could be at play:
- Incorrect Cache Settings: Ensure that your cache format and location are correctly configured in the Project Settings. Verify that the "User" cache setting is enabled if you are attempting manual caching.
- Insufficient Storage Space: DaVinci Resolve requires ample storage space for caching. If your drive is running low on free space, the software may be unable to cache clips properly.
- Software Glitches: In rare cases, a bug within DaVinci Resolve itself could be the culprit. Updating to the latest version of the software or performing a clean reinstallation might resolve such issues.
Clearing Render Cache Files
Over time, render cache files can accumulate and consume considerable disk space. Regularly clearing these files is essential for maintaining system performance and freeing up storage.
To clear render cache files:
- Navigate to the "Playback" menu at the top of the DaVinci Resolve interface.
- Select "Delete Render Cache."
- From the sub-menu, choose "All" to delete all render cache files associated with your current project. Alternatively, you can choose "User" or "Smart" to clear specific types of cache.
- You can also manage render cache files on a project-by-project basis through the "Manage Render Cache" option within the "Delete Render Cache" menu. This allows you to sort cache files by size and select specific projects for cleaning.
It's important to remember that clearing cache files will not affect your original media. The process only removes the temporary rendered files. Once cleared, DaVinci Resolve will automatically re-render necessary clips the next time you open the project and require them.
If you encounter a corrupt cache, you can select the affected clips on the timeline and then go to "Playback" > "Delete Render Cache" > "Selected Clips."
Beyond Cache: Enhancing Workflow with Related Tools
While the render cache is a primary tool for optimizing playback, other features and tools can further streamline your editing process.
- Optimized Media: This is a legacy feature that pre-renders your source clips into a more edit-friendly format before you begin editing. While it can improve playback, DaVinci Resolve's modern proxy workflow is generally considered a more efficient and flexible alternative. Optimized media is created before editing begins, whereas render cache operates during the editing process.
- Proxies: Proxies are lower-resolution versions of your source media that are used during editing to ensure smooth playback. Unlike optimized media, proxies are not "baked in" effects. They are a separate set of files that are automatically swapped out for the full-resolution media during export.
- Render Clips in Place: As detailed earlier, this is a manual process for creating shareable video files of selected clips or timeline sections. It's invaluable for collaboration and for ensuring absolute playback stability for particularly demanding segments.
For users who find themselves frequently performing manual rendering operations or relying heavily on keyboard shortcuts, specialized hardware like TourBox can offer a significant workflow advantage. TourBox acts as a custom controller, allowing users to assign complex shortcuts and functions to physical knobs, dials, and buttons, eliminating the need to memorize lengthy key combinations and providing tactile control for tasks like color adjustments.
In conclusion, mastering DaVinci Resolve's render cache is fundamental to achieving a fluid and efficient editing experience. By understanding its functionality, configuring it correctly, and managing its associated files, editors can unlock smoother playback, reduce system strain, and ultimately dedicate more time to the creative aspects of their projects.