The realm of 3D art is constantly evolving, with artists pushing the boundaries of realism and detail. Texturing, in particular, is a crucial discipline that breathes life into digital models, transforming inert meshes into tangible, believable objects. Lyubov Vasileva, a rising talent in the 3D art community, offers a compelling look into her workflow, particularly her process for creating realistic and captivating damaged textures, exemplified by her work on the NORA Precision Milling & Drilling Machine project. Her journey, from junior to middle weapon artist, highlights a deep passion for texturing and a commitment to continuous learning, which she generously shares.
From Weapons to Worn Surfaces: A Passion for Texture
Lyubov Vasileva's journey into the world of 3D modeling began two years ago, a relatively short but impactful period that has seen her rise to the position of Middle Weapon Artist. Her initial focus on creating weapons for popular computer games honed her skills in delivering realistic and detailed models. However, her true passion lies in the intricate art of texturing. "My real passion, however, is texturing images," she states. "I think this is the most interesting and creative aspect of working in 3D modeling. Texturing allows you to give models a realistic look and add depth and volume to them." This dedication to the craft is evident in her desire to continuously improve and explore new horizons.
While her professional experience has largely been within the demanding environment of hardcore, realistic online games, Lyubov found herself drawn to the aesthetic of aged and damaged objects in her personal projects. "I often get questions about why my portfolio looks like an assembly of old and dusty, dirty assets," she explains. "The answer is simple - at work, I had enough calm and basic assets. And for this reason, in my free time, I want to do more interesting textures." This personal drive led her to experiment with materials like rust, dirt, and severely damaged surfaces, pushing her skills beyond the clean aesthetics often required in game development.
The NORA Project: A Canvas for Creative Exploration
The NORA Precision Milling & Drilling Machine project became a significant milestone in Lyubov's artistic development. It presented an opportunity to blend her professional skills with her personal interest in creating worn, characterful surfaces. "Recently, I came across a cool model of NORA Precision Milling & Drilling Machine," she recalls. "This machine attracted my attention for its capabilities and precision." Her creative vision extended beyond simply replicating the existing model; she aimed to imbue it with a unique character by modifying one of its handles. "I changed the design of the handle, making it more ergonomic and convenient to use. In addition, I added a wooden element to give the machine a more aesthetic appearance." This thoughtful modification not only enhanced the machine's functionality but also its visual appeal, demonstrating a holistic approach to design.
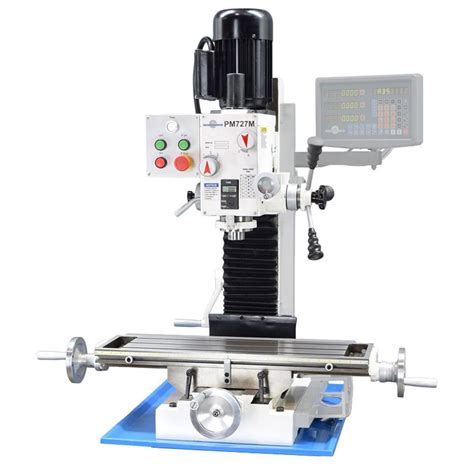
The NORA project also underscored the critical importance of reference imagery in 3D art. Lyubov acknowledges the limitations she faced with the available references for the NORA machine, noting that "there were very few images, and they were limited to photos of just one machine." This scarcity necessitated a more analytical approach. "However, I adhere to the main principle in my work: to collect images from all possible angles. This allows me to create more accurate and detailed models." Her dedication to thorough research is further exemplified by her PureRef files for weapon models, which can reach up to 3GB due to the extensive collection of images from various angles and lighting conditions. This meticulousness is paramount for achieving high-quality, realistic results.
The Power of Reference: Beyond the Object Itself
Lyubov emphasizes a crucial distinction between references for modeling and those for texturing. "To be honest, I use reference images mainly for product modeling," she advises. "For texturing, I usually create a separate huge ref board on which I collect a lot of photos with similar materials. Never limit yourself to photos of your product only when texturing your image. Always find similar coatings and be able to analyze the physical properties of products. This will help you avoid the problem of insufficient photos to create microfractures."
This philosophy extends to understanding the inherent qualities of materials. When texturing metal, for instance, it's not enough to look at photos of the specific object. One must study various metal surfaces-polished, matte, rough-to grasp how light interacts with them. This deep dive into material properties is what allows for the creation of convincing micro-details. Lyubov’s approach involves compiling extensive reference boards, sometimes featuring dozens of photos, to capture the nuances of different textures and how they behave under varying lighting conditions. This comprehensive collection is vital for accurately depicting microfractures, which can be challenging to capture from limited sources.
Bridging the Gap: Photoshop to Substance Painter
A significant portion of Lyubov's insights revolves around the seamless transition from 2D texturing workflows in Photoshop to 3D texturing in Substance 3D Painter. For artists familiar with Photoshop, the learning curve for Painter is significantly gentler than one might expect. "If You Know Photoshop, You Already Know 3D Painter," she asserts. The core principles of layers and masks, fundamental to Photoshop, are equally critical in Substance Painter.
The process begins with understanding how to build complex materials using layers and masks. In Photoshop, this involves starting with a base fill layer and adding subsequent layers, each with its own color and a mask to control its visibility. These masks, essentially grayscale images, dictate where a layer appears. Simple splatter patterns, scratch textures, or noise can be used as masks to introduce subtle variations in color, texture, and roughness. Lyubov highlights the utility of Photoshop's Pattern Preview mode for ensuring seamless tiling of textures.
Once these masks are created in Photoshop, they are exported as individual grayscale images. These images then serve as the foundational elements within Substance Painter. The workflow in Painter mirrors that of Photoshop: creating fill layers, assigning colors, and crucially, applying masks. Within Painter's masks, these exported grayscale images are used to control the distribution of effects. The software's interface might differ, but the underlying logic of layering and masking remains consistent.
Mastering Material Properties in Substance Painter
Substance Painter offers a more advanced suite of tools for manipulating material properties beyond just color. It provides dedicated channels for roughness, height, metallic, and normal maps, allowing for independent control over each aspect. This means a material can be made shinier or rougher without altering its base color, adding a significant layer of realism.
Lyubov explains how the same masks used in Photoshop can be leveraged in Painter to control these various channels. A scratch mask, for instance, can not only dictate where scratches appear visually but also add physical depth through the height channel, creating the illusion of indentations. Similarly, roughness variations can be applied, making certain areas of the material appear more matte or reflective. She stresses the importance of subtlety in these adjustments, advising to push height values to very low numbers to maintain a believable appearance.
Furthermore, Painter's ability to tile and scale masks on 3D models is a significant advantage over Photoshop's 2D environment. This allows artists to fine-tune the scale of details, ensuring they look appropriate from any viewing distance. Adjustment layers, akin to those in Photoshop, further enhance this control, enabling nondestructive tweaks to hue, saturation, lightness, levels, and contrast, with the ability to target specific channels.
Advanced Techniques and Workflow Organization
The tutorial delves into more advanced features of Substance Painter, such as Generators. These powerful tools automatically create masks based on a model's mesh maps, like curvature and ambient occlusion. This enables the creation of intricate effects, such as realistic edge wear, by dynamically reacting to the model's geometry. This automated process significantly reduces the need for manual mask painting.
Organization is also key to managing complex texturing projects. Lyubov advocates for grouping layers into folders within Painter, mirroring the organizational strategies used in Photoshop. This ensures that projects remain manageable, especially when dealing with intricate material setups. The ability to instantiate materials across multiple texture sets or objects within a scene further streamlines the workflow, ensuring consistency and efficiency.
Lyubov's journey, from her early days as a junior artist to her current role, is a testament to the power of passion, continuous learning, and a willingness to explore new creative avenues. Her detailed insights into creating damaged textures, particularly through the lens of the NORA project and her proficient use of Substance Painter, offer invaluable guidance to aspiring 3D artists. Her belief that foundational Photoshop skills translate directly to the 3D realm empowers newcomers to embrace the exciting world of 3D texturing with confidence. The emphasis on understanding material properties, meticulous reference gathering, and leveraging the robust features of modern texturing software like Substance Painter are pillars of her successful approach.