Adobe Photoshop is a venerable tool that serves as the backbone of image manipulation and graphic design for professionals and hobbyists alike. The recent release of Adobe Photoshop Creative Cloud (CC) 2014, the 15th iteration of the product, prompts reflection on workflows and the software's enduring power. While newer versions are available, the fundamental beauty of Photoshop lies in the immense power it can bring to your images. However, it is a complex piece of software, and for beginners, coming to grips with its capabilities can be a daunting prospect. As a photographer, Photoshop is the main editing software package I use in my photography workflow. Every photographer or designer has their own unique approach to editing images using Photoshop. I’m constantly refining and tweaking my editing workflow, and I get such a buzz when I find an alternative method or a shortcut that I wasn’t aware of before, which makes things more efficient.
Navigating the Photoshop Environment: Your Creative Canvas
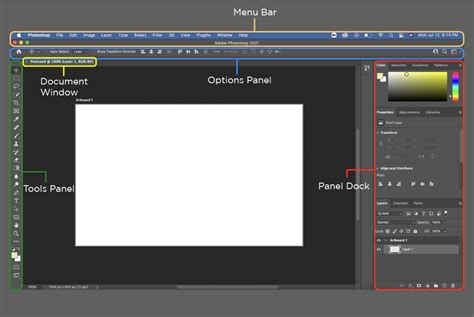
Before we delve into the exciting world of Photoshop, it's essential to familiarize ourselves with its environment. When we first open Photoshop, we're greeted by a sophisticated and customizable interface. At the heart of this interface is the Menu Bar, located at the top, which contains a variety of menus such as File, Edit, and Image, each holding an array of functions. Directly beneath, we find the Tool Options Bar, displaying settings for the selected tool. The main area, or canvas, is where our creativity comes to life, and surrounding it are panels like Layers, Adjustments, and History, which are integral to our workflow. To start working, we need to create a new document by going to File > New or using the shortcut Ctrl+N (Cmd+N on Mac). Once our document is set up, understanding how to navigate is key. We can use tools like the Zoom Tool or the Hand Tool to change our view. These can be accessed from the toolbar or with keyboard shortcuts like Z for Zoom and H for Hand. Our mouse cursor transforms into different icons depending on the tool we're using, providing a visual cue to its function. To work efficiently in Photoshop, we must keep our workspace organized and know how to find our way around. This includes mastering navigation like zooming in and out with the mouse wheel or by pressing Ctrl and + or - (Cmd on Mac).
Core Photoshop Tools: The Building Blocks of Image Manipulation
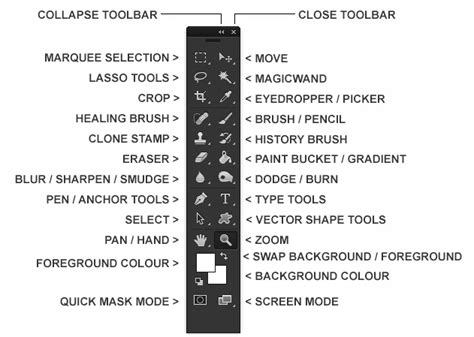
Photoshop's extensive array of tools is what makes it a leading software in the image editing industry. The Toolbar is a vertical strip of icons on the left side of the screen, each representing a different tool. Familiarize yourself with this major hub, where tools like the Move Tool, Brush Tool, and Eraser Tool are accessed. Selections are fundamental in Photoshop because they allow us to isolate and work on specific areas of an image. Photoshop is known for its versatility in brushes and painting tools. The Brush Tool is powerful, with a variety of brush presets available. Retouching tools like the Spot Healing Brush and Clone Stamp Tool are indispensable. The Spot Healing Brush quickly removes blemishes, while the Clone Stamp allows us to duplicate parts of an image-a real lifesaver when repairing or replicating image elements.
The Power of Layers and Masks: Non-Destructive Editing at its Finest
Before we dive into the intricate world of Photoshop, it's essential to grasp the power of layers and layer masks. Layers in Photoshop are akin to transparent sheets stacked on top of one another, where each layer holds different pieces of your image. When we begin working with layers, understanding that the stack order affects visibility is key-layers at the top cover those below them. Adjustment layers are special; they allow us to apply color and tonal adjustments to our image without permanently changing the original layer. Layer masks are our secret weapon for revealing or hiding portions of a layer. We use white on the mask to show content and black to conceal it-think of it as a grayscale map where shades of gray represent varying levels of transparency. Managing layers, especially in complex compositions, necessitates a structured approach. We use groups to keep related layers neatly organized, making our workflow more efficient and our project easier to navigate.
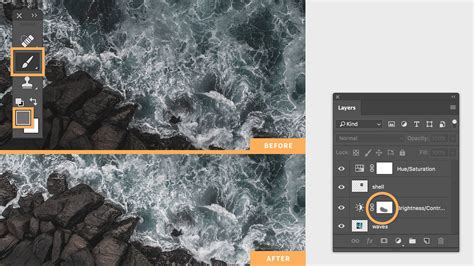
To save time when you need a copy of a mask from one layer to another adjustment layer, especially after you’ve used the brush tool to create a mask, simply hold down the Option key on a Mac or CTRL key on a PC, click on the layer mask, and drag it to the adjustment layer in question. This is a highly efficient method for duplicating masks.
Enhancing and Correcting Image Colors: A Spectrum of Possibilities
In this section, we'll explore how to enhance and correct image colors using Photoshop's robust tools such as adjustment layers, levels, and curves. Adjustment layers are the cornerstone of non-destructive editing in Photoshop. By using them, we can apply color and tonal adjustments to our image without permanently altering the original layer. These include but are not limited to Brightness/Contrast, Hue/Saturation, and Color Balance adjustments. When we talk about working with color, we're focusing on creating the right color palette for our images. Incorporating different blend modes can also significantly affect how colors interact with each other on different layers. Curves and Levels are powerful tools for detailed color correction and exposure adjustments. With Curves, we can pinpoint specific tonal areas and adjust them with precision, creating contrasts or lightening shadows. Mastering these techniques allows us to achieve professional-looking results, elevating the visual quality of our work.
Normally in the Curves adjustment, you adjust points on the curve line which affect the image’s tonal range. The S-shaped curve is a classic tonal tweak for boosting contrast and color saturation. However, if you add a curves adjustment layer, change the blend mode to Soft Light and reduce the Fill down to approximately 55% (the reduction amount will depend entirely on your image & preference), this gives a similar boost to color and contrast.
Advanced Design Elements: Elevating Your Graphics
When venturing into advanced design elements in Photoshop, we'll focus on utilizing specialized tools and features to elevate our graphics. We can enrich our artwork with the Custom Shape Tool, which offers an array of preset shapes or the possibility to create our own unique designs. By exploring the Shapes Panel, we encounter an assortment of default options or can import custom shape presets to our library. If certain shapes are missing, we can easily replenish them via Photoshop's shape resources. In our workflow, Smart Objects are essential for maintaining the integrity of our design's original elements. By converting layers into Smart Objects, we allow ourselves the freedom to transform and apply filters without permanently altering the original graphic. To isolate and modify specific design components with precision, we must harness advanced selection techniques. The Pen Tool is one of our best allies for creating anchor points and intricate paths to achieve clean and exact selections. For more complex shapes or when we need to merge shapes, Photoshop's shape tool options facilitate this process, allowing us to manipulate and combine shapes on a level that surpasses the basics.
Refining Photos: The Art of Retouching
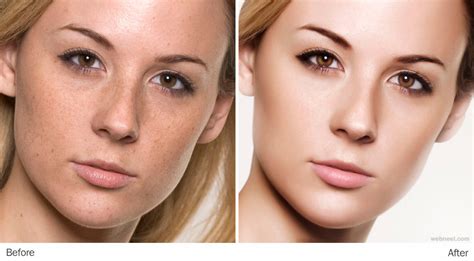
When we approach the art of refining photos, retouching them is essential for producing professional and eye-catching results. In the realm of photo editing, familiarizing ourselves with the core tools is crucial. The Spot Healing Brush Tool is perfect for quick fixes, such as removing blemishes or small objects, as it blends the affected area with the surrounding pixels. When it comes to adjusting exposure, the Dodge and Burn Tools are particularly handy. We use the Dodge Tool to lighten areas of our photo, and conversely, the Burn Tool to darken them. As we advance our skills, we delve into sophisticated retouching methods to tackle complex editing tasks. Utilizing layers and masks allows us to apply non-destructive edits, meaning we can readjust any changes without permanently altering the original image. Crafting photo effects often involves manipulating the exposure or color balance, which is where our understanding of tools like the Dodge, Burn, and Sponge Tools is essential.
Create a separate layer, change the blend mode (Mode) to Overlay and fill the layer with 50% gray. Name this layer “Dodge and Burn”. The Dodge and Burn tools are my go-to method for making selected areas of an image lighter or darker. Dodge is for lightening and the Burn tool is for darkening an area. Use a soft Brush and set Exposure to between 6-12%. In most cases, I leave Range set to Midtones. If you find that you have overdone it in the specific areas, just reduce the Opacity on the layer.
Mastering Dodging and Burning with 4 Techniques (Photoshop Tutorial)
Essential Shortcuts and Workflow Enhancements
To increase efficiency and creativity in Photoshop, learning keyboard shortcuts is paramount. Keyboard shortcuts can save a lot of time and make it easier to perform tasks in Photoshop. For example, holding the space bar while using the elliptical marquee tool allows you to move it around, holding Shift constrains it to a perfect circle, and holding Alt or Option draws from the center.
Cmd+Shift+Alt+E (Mac) or Ctrl+Alt+Shift+E on a PC is the command to keep all the layers in a Photoshop file and make a merged copy on top of them. This is an incredibly useful shortcut for creating a composite layer for further adjustments or for saving a flattened version without affecting your original layers.
When working with multiple images in the same document, the File > Place command is invaluable. I normally work with multiple images in the same document. The Patch Tool was my favorite of the Healing Brush Tools in Photoshop CS5. But now that I’ve upgraded to CS6, the Patch tool has just gotten even better. You can now use the Patch tool to fill using the Content-Aware on a new empty layer. I prefer to set the Adaption to Loose. Make sure Sample All Layers has been ticked.
Similar to the above point, the Warp tool is great for fine-tuning an element of an image, especially if you are working on composites. I seem to use this shortcut a lot. If I’m working on multiple images in the same document, I may need to resize one or two of the images accordingly.
When you are retouching your image to get rid of dust and blemishes and so forth, you may need to zoom in as much as 300% or more. Open another window for the same document by Window>Arrange>New window for new_filename.PSD but keep it at 25% (or fit to window). This allows you to see the overall image while making detailed edits.
Leveraging External Resources and Assets
Using textures, stock images, and artificial intelligence (AI) tools can elevate the appearance of your images and improve your productivity. Did you know that Adobe Stock offers a collection of free images that you can use in your projects? These high-resolution images can really elevate the appearance of your work, and the best part is that you can access them for free. There are also lots of free Photoshop extras at the PhotoshopCAFE vault. Grab brushes, images, cheat sheets, keyboard shortcut sheets, presets, brushes, and lots more. Access is free here.
Cultivating Observational Skills and Practice
To increase the quality of your images, it’s important to observe and pay attention to details in nature, light, and the environment. This can help you with your design, illustration, and photography. Take a close look at things and try to understand what gives them their essence, such as what makes glass look like glass or how shadows and light interact. I like to ask people a question: When you see chrome, what color is it? And most people say silver, but it’s not. If you just glance at it quickly, yes, it could appear to be silver. But if you really look at chrome, what it’s doing is just reflecting the environment.
Some areas of Photoshop require practice and skill, such as using brushes, dodging and burning, and painting. To improve in these areas, it’s helpful to spend some time working with these tools every day. For example, you can use brushes to add light to an image by painting with white on an overlay layer. You can also practice making selections and using the pen tool. Dodging and burning is a technique in Photoshop that allows you to adjust the exposure and contrast of specific areas of an image. It’s a powerful tool that can help you create more dynamic and visually appealing images. Use the Brush tool (shortcut: B) to paint with white on the new layer to add light and increase the exposure of specific areas. To make the brush stroke more subtle, drop the flow to around 10% by pressing Shift+1. If you’re using a pen tablet, you can enable pen pressure in the brush settings to make the brush stroke even more natural and smooth. Remember, the more you practice dodging and burning, the better you’ll get at it.
The Value of Structured Learning and Inspiration
Consistent practice can be achieved by setting regular learning goals and following structured tutorials, such as a beginner's guide to Adobe Photoshop. You can browse the categories of tutorials or search for specific topics. In addition to video tutorials, there are also written steps to help you learn at your own pace. I believe in the power of books to improve skills and provide inspiration. Throughout my career as a Photoshop Instructor, I have written 21 books on the subject, starting with a Photoshop 6 book back in 2001 and continuing with my latest book on drones and drone photography. In all of my books, I try to include as many inspirational images as possible to inspire readers. I know that I can gain a lot of inspiration from looking at other people’s work, and I believe it’s important to seek out inspiration and then use it to create something of your own. One of the biggest things I have seen destroy a nice design is bad use of typography.
I find the Layer Comps feature in Photoshop invaluable. It is a useful guide to the different editing stages as a before and after comparison. It is so easy to overdo it and get carried away with over-editing your image.
Saving and Exporting Your Masterpieces
When we work with Adobe Photoshop, especially the latest iteration, Photoshop 2022, saving and exporting are foundational skills that ensure the integrity and usability of our work. When ready to export a document, Adobe Photoshop offers a myriad of formats. JPEG is commonplace for web use due to its balance of quality and file size. For lossless quality, TIFF and PSD are preferred, with PSD being the native Photoshop format containing all layers and adjustments. It's crucial to choose the correct format based on our end use. To prepare our documents for printing, a few key adjustments are necessary. Resolution is a top priority; we aim for 300 dpi (dots per inch) to ensure high-quality prints. In addition, it's critical to confirm that our color mode is set to CMYK to align with printer capabilities, as screens display in RGB. Our document's resolution and canvas size directly impact the final output. Adjusting the resolution dictates the clarity of our print and digital work. For web images, we might reduce the resolution to 72 dpi to decrease file size and enhance loading times. Modifying the canvas size allows us to change the active area of our Photoshop document.
As beginners, we should focus on understanding layers, which form the building blocks of non-destructive editing in Photoshop. Effective self-learning begins with exploring trusted tutorials and resources, such as 10 must-know Photoshop skills for beginners, which outline key edits and adjustments. Beginners should enhance their editing skills by mastering basic adjustments like cropping, resizing, and color correction. All beginners need to understand the interface, including navigating images, and fundamental concepts like resolution and image adjustment layers. To showcase Photoshop proficiency on a resume, include specific projects you've worked on or link to an online portfolio. By following these tips and incorporating them into your workflow, you can create professional-grade images and elevate your skills in Photoshop.